Android自定义View

在Android开发中有很多业务场景,原生的控件是无法满足应用,并且经常也会遇到一个UI在多处 重复使用情况,那么就需要通过自定义View的方式来实现这些UI效果。

作为一个Android开发工程师自定义View属于一个必备技能。

View和ViewGroup体系结构
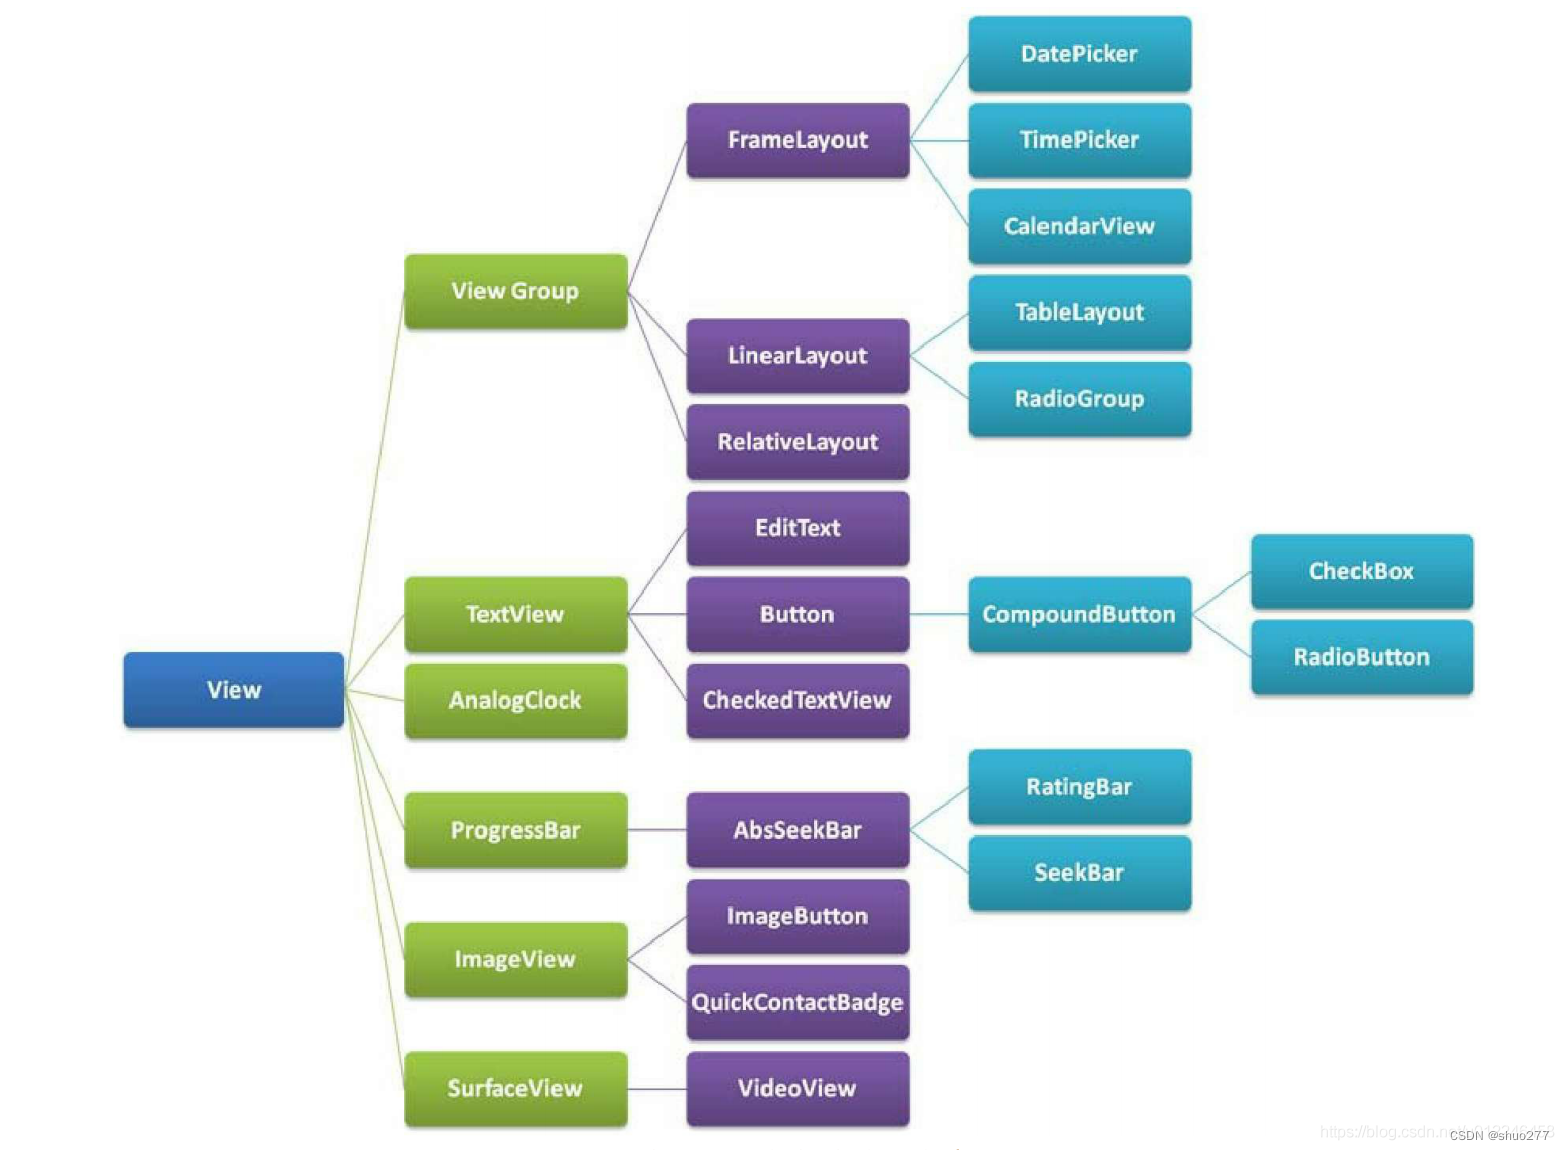
img

自定义View的几种方式

自定义View的实现方式有以下几种:

  • 组合控件

  • 继承控件

  • 自绘控件

组合控件

组合控件就是将多个控件组合成一个新的控件,可以重复使用。

应用场景:在项目中经常会遇到一些比较复杂的UI块需要用在多处使用,那么我们就可以通过五大布局 和基本控件组合成一个新的布局View,这样就可以方便的将该UI用在项目的不同页面中,比如一个标题 栏。这种方式比较简单,只要通过布局文件实现相应的UI,然后将该UI加到适合的五大布局中即可。
组合控件完整的实现步骤:

  1. 编写布局文件

  2. 实现构造方法

  3. 初始化UI 4. 提供对外的方法

  4. 在布局当中引用该控件

  5. activity中使用

实现一个简易的标题组件

中间是title的文字,左边是返回按钮

  1. 编写布局文件 view_header.xml
1
2
3
4
5
6
7
8
9
10
11
12
13
14
15
16
17
18
19
20
21
22
23
24
25
26
<?xml version="1.0" encoding="utf-8"?>
<RelativeLayout xmlns:android="http://schemas.android.com/apk/res/android"
android:layout_width="match_parent"
xmlns:app="http://schemas.android.com/apk/res-auto"
android:background="#89CEED"
android:id="@+id/rl"
android:layout_height="60dp">

<ImageView
android:id="@+id/iv_img"
android:layout_width="wrap_content"
android:layout_height="wrap_content"
android:layout_centerVertical="true"
android:layout_marginLeft="10dp"
app:srcCompat="@drawable/ic_baseline_arrow_back_24"/>

<TextView
android:id="@+id/textView"
android:layout_width="wrap_content"
android:layout_height="wrap_content"
android:textSize="22sp"
android:layout_centerInParent="true"
android:textColor="@color/white"
android:text="微信" />

</RelativeLayout>
  1. 实现构造方法
  2. 初始化UI
  3. 提供对外的方法
1
2
3
4
5
6
7
8
9
10
11
12
13
14
15
16
17
18
19
20
21
22
23
24
25
26
27
28
29
30
31
32
33
34
35
36
37
38
//因为我们的布局采用RelativeLayout,所以这里继承RelativeLayout。
public class HeaderView extends RelativeLayout {
private Button left_btn;
private TextView title_tv;
private RelativeLayout layout_root;
public HeaderView(Context context) {
super(context);
}

public HeaderView(Context context, AttributeSet attrs) {
super(context, attrs);
initView(context);
}
public HeaderView(Context context, AttributeSet attrs, int defStyleAttr)
{
super(context, attrs, defStyleAttr);
}
//初始化UI,可根据业务需求设置默认值。
private void initView(Context context) {
LayoutInflater.from(context).inflate(R.layout.view_header, this,
true);
left_btn = findViewById(R.id.left_btn);
title_tv = findViewById(R.id.title_tv);
layout_root = findViewById(R.id.header_root_layout);
layout_root.setBackgroundColor(Color.BLACK);
title_tv.setTextColor(Color.WHITE);
}
//设置标题文字的方法
private void setTitle(String title) {
if (!TextUtils.isEmpty(title)) {
title_tv.setText(title);
}
}
//对左边按钮设置事件的方法
private void setLeftListener(OnClickListener onClickListener) {
left_btn.setOnClickListener(onClickListener);
}
}
  1. 在布局当中引用该控件
1
2
3
4
5
6
7
8
9
10
11
12
13
<?xml version="1.0" encoding="utf-8"?>
<LinearLayout xmlns:android="http://schemas.android.com/apk/res/android"
xmlns:app="http://schemas.android.com/apk/res-auto"
xmlns:tools="http://schemas.android.com/tools"
android:layout_width="match_parent"
android:layout_height="match_parent"
android:orientation="vertical"
tools:context=".MainActivity2">
<com.hopu.customviewdemo.view.HeaderView
android:id="@+id/title_bar"
android:layout_width="match_parent"
android:layout_height="wrap_content" />
</LinearLayout>
  1. activity中使用
1
2
3
4
5
6
7
8
9
10
11
12
13
14
15
16
public class MainActivity2 extends AppCompatActivity {
private HeaderView title_bar;
@Override
protected void onCreate(Bundle savedInstanceState) {
super.onCreate(savedInstanceState);
setContentView(R.layout.activity_main2);
title_bar = findViewById(R.id.title_bar);
title_bar.setLeftListener(new View.OnClickListener() {
@Override
public void onClick(View v) {
Toast.makeText(MainActivity2.this, "左侧按钮被点击",
Toast.LENGTH_SHORT).show();
}
});
}
}

继承控件

通过继承系统控件(View子类控件或ViewGroup子类控件)来完成自定义View,一般是希望在原 有系统控件基础上做一些修饰性的修改,而不会做大幅度的改动,如在TextView的文字下方添加下 划线,在LinearLayout布局中加一个蒙板等。这种方式往往都会复用系统控件的onMeasure和onLayout方法,而只需要重写onDraw方法,在其中绘制一些需要的内容。
实现TextView文字下方显示红色下划线

  1. 继承View控件,并重写onDraw方法
1
2
3
4
5
6
7
8
9
10
11
12
13
14
15
16
17
public class UnderlineTextView extends
androidx.appcompat.widget.AppCompatTextView {
public UnderlineTextView(Context context, @Nullable AttributeSet attrs) {
super(context, attrs);
}

@Override
protected void onDraw(Canvas canvas) {
super.onDraw(canvas);
Paint paint = new Paint();
paint.setColor(Color.RED);
paint.setStrokeWidth(5);
int width = getWidth();
int height = getBaseline();
canvas.drawLine(0, height, width, height, paint);
}
}
  1. 在布局文件中调用

就像使用一个普通TextView一样使用UnderlineTextView。

1
2
3
4
<com.hopu.customviewdemo.view.UnderlineTextView
android:layout_width="match_parent"
android:layout_height="wrap_content"
android:text="张三"/>

自绘控件

这种情况一般是出现了通过系统自带组件的各种设置项无法满足需求时,即可采用自行绘制解决。比如我们绘制一个定制图案的Loading组件。
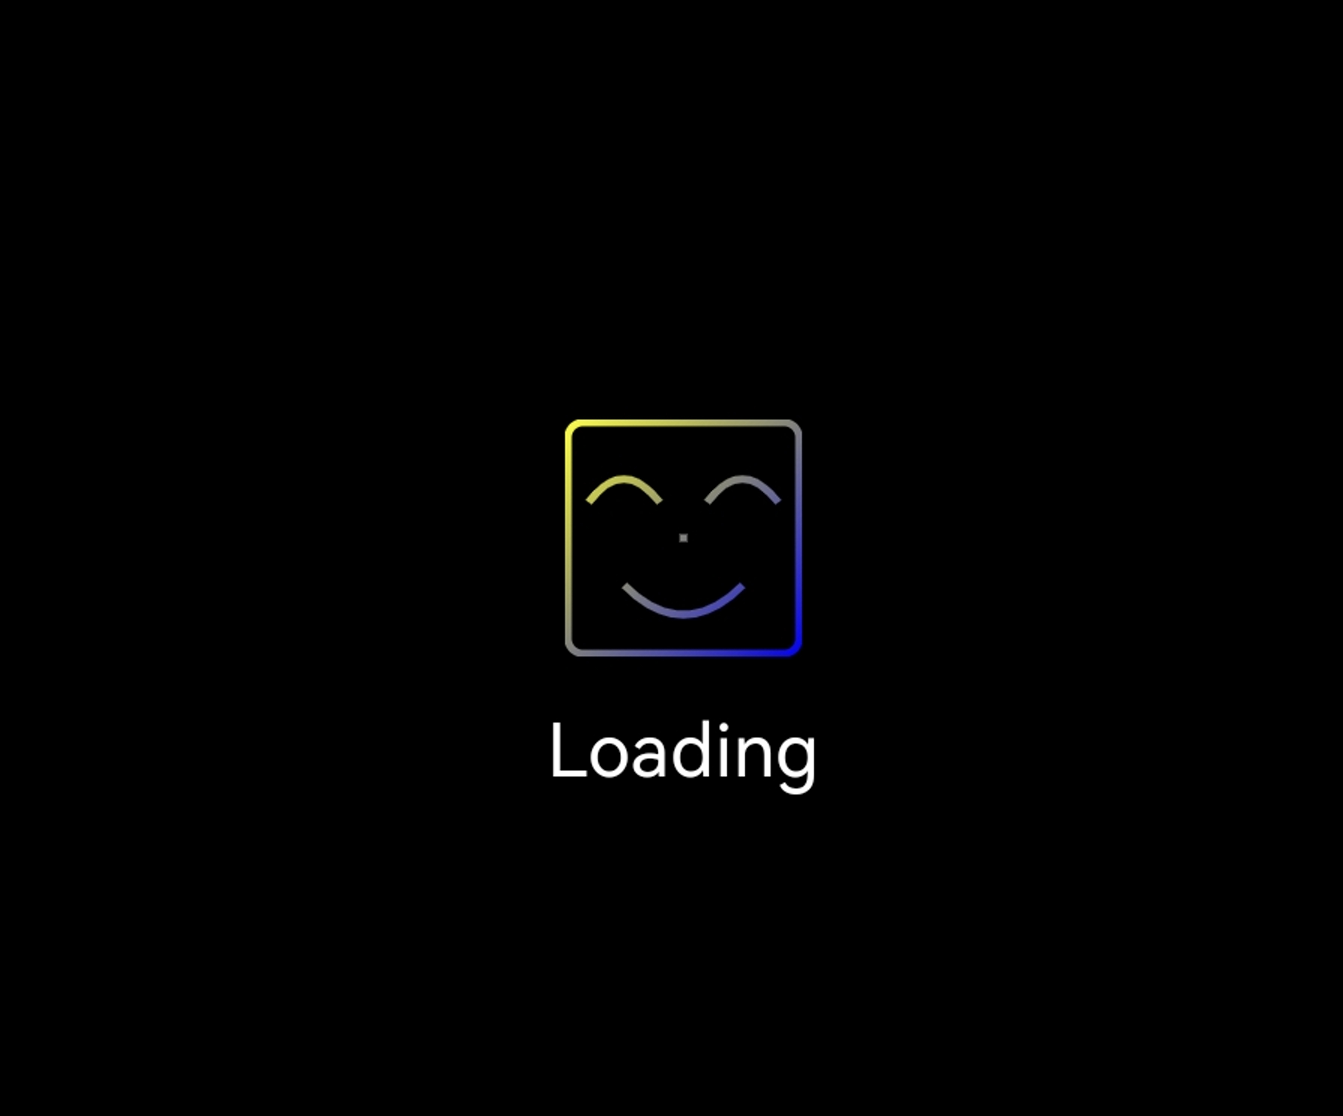
image-20221205204547298

主要的实现代码在onDraw中,如下:

1
2
3
4
5
6
7
8
9
10
11
12
13
14
15
16
17
18
19
20
21
22
23
24
25
26
27
28
29
30
31
32
33
34
35
36
37
38
39
40
41
42
43
44
45
46
47
48
49
50
51
52
53
54
55
56
57
58
59
60
61
62
63
64
65
66
67
68
69
70
71
72
73
74
75
76
77
78
79
80
81
82
83
84
85
86
87
88
89
90
91
92
93
94
95
96
97
98
99
100
101
102
103
104
105
106
107
108
109
110
111
112
113
114
115
116
117
118
119
120
121
122
123
124
125
126
127
128
129
130
131
132
133
134
135
136
137
138
139
140
141
142
143
144
145
146
147
148
149
150
151
152
153
154
155
156
157
158
159
160
161
162
163
164
165
166
167
168
169
170
171
172
173
174
175
176
177
178
179
180
181
182
183
184
185
186
187
188
189
190
191
192
193
194
195
196
197
198
199
200
201
202
203
204
205
206
207
208
209
210
211
212
213
214
215
216
217
218
219
220
221
222
223
224
225
226
227
228
229
230
231
232
233
234
235
236
237
238
239
240
241
242
243
244
245
246
247
248
249
250
251
252
253
254
255
256
257
258
259
260
261
262
263
264
265
266
267
268
269
270
271
272
273
274
/**
* Created by Taurus on 2018/1/21.
*/

public class SmileView extends View {

final int DEFAULT_BORDER_WIDTH = 5;
final long ANIMATION_DURATION = 400;

private int mWidth, mHeight;
private int mCenterX, mCenterY;

private Paint mBorderPaint;
private Paint mFacePaint;

private int borderWidth;
private int borderColor;
private int faceColor;

private Path mLeftPath;
private Path mRightPath;
private Path mBottomPath;

/**
* 左眼坐标
*/
private float[] leftPoint;

/**
* 右眼坐标
*/
private float[] rightPoint;

/**
* 嘴巴坐标
*/
private float[] bottomPoint;

/**
* 左眼控制点范围
*/
private float[] leftControlLimit;

/**
* 右眼控制点范围
*/
private float[] rightControlLimit;

/**
* 嘴巴控制点范围
*/
private float[] bottomControlLimit;

private float leftControlY;
private float rightControlY;
private float bottomControlY;

private ValueAnimator mValueAnimator01;
private ValueAnimator mValueAnimator02;
private boolean hasAttach;

private void startAnimation01(){
final float dValueTop = leftControlLimit[1] - leftControlLimit[0];
final float dValueBottom = bottomControlLimit[1] - bottomControlLimit[0];
mValueAnimator01 = ValueAnimator.ofFloat(0f, 1.0f);
mValueAnimator01.addUpdateListener(new ValueAnimator.AnimatorUpdateListener() {
@Override
public void onAnimationUpdate(ValueAnimator animation) {
float value = (float) animation.getAnimatedValue();
leftControlY = rightControlY = leftControlLimit[0] + (dValueTop * value);
bottomControlY = bottomControlLimit[1] - (dValueBottom * value);
invalidate();
}
});
mValueAnimator01.addListener(new AnimatorListenerAdapter() {
@Override
public void onAnimationEnd(Animator animation) {
super.onAnimationEnd(animation);
startAnimation02();
}
});
mValueAnimator01.setDuration(ANIMATION_DURATION);
mValueAnimator01.start();
}

private void startAnimation02(){
final float dValueTop = leftControlLimit[1] - leftControlLimit[0];
final float dValueBottom = bottomControlLimit[1] - bottomControlLimit[0];
mValueAnimator02 = ValueAnimator.ofFloat(1.0f, 0f);
mValueAnimator02.addUpdateListener(new ValueAnimator.AnimatorUpdateListener() {
@Override
public void onAnimationUpdate(ValueAnimator animation) {
float value = (float) animation.getAnimatedValue();
leftControlY = rightControlY = leftControlLimit[0] + (dValueTop * value);
bottomControlY = bottomControlLimit[1] - (dValueBottom * value);
invalidate();
}
});
mValueAnimator02.addListener(new AnimatorListenerAdapter() {
@Override
public void onAnimationEnd(Animator animation) {
super.onAnimationEnd(animation);
startAnimation01();
}
});
mValueAnimator02.setDuration(ANIMATION_DURATION);
mValueAnimator02.start();
}

private void cancelAnimator01(){
if(mValueAnimator01!=null){
mValueAnimator01.removeAllListeners();
mValueAnimator01.removeAllUpdateListeners();
mValueAnimator01.cancel();
mValueAnimator01 = null;
}
}

private void cancelAnimator02(){
if(mValueAnimator02!=null){
mValueAnimator02.removeAllListeners();
mValueAnimator02.removeAllUpdateListeners();
mValueAnimator02.cancel();
mValueAnimator02 = null;
}
}

public SmileView(Context context) {
this(context, null);
}

public SmileView(Context context, @Nullable AttributeSet attrs) {
this(context, attrs, 0);
}

public SmileView(Context context, @Nullable AttributeSet attrs, int defStyleAttr) {
super(context, attrs, defStyleAttr);
init(context, attrs, defStyleAttr);
}

private void init(Context context, AttributeSet attrs, int defStyleAttr) {

borderWidth = DEFAULT_BORDER_WIDTH;
borderColor = Color.YELLOW;
faceColor = borderColor;

leftPoint = new float[4];
rightPoint = new float[4];
bottomPoint = new float[4];

leftControlLimit = new float[2];
rightControlLimit = new float[2];
bottomControlLimit = new float[2];

mLeftPath = new Path();
mRightPath = new Path();
mBottomPath = new Path();

mBorderPaint = new Paint();
mBorderPaint.setColor(borderColor);
mBorderPaint.setStrokeWidth(borderWidth);
mBorderPaint.setStyle(Paint.Style.STROKE);

mFacePaint = new Paint();
mFacePaint.setColor(faceColor);
mFacePaint.setStrokeWidth(borderWidth);
mFacePaint.setStyle(Paint.Style.STROKE);
}

@Override
protected void onSizeChanged(int w, int h, int oldw, int oldh) {
super.onSizeChanged(w, h, oldw, oldh);
mWidth = w;
mHeight = h;
mCenterX = mWidth/2;
mCenterY = mHeight/2;

mBorderPaint.setShader(new LinearGradient(0, 0, mWidth, mHeight, Color.YELLOW, Color.BLUE, Shader.TileMode.MIRROR));
mFacePaint.setShader(new LinearGradient(0, 0, mWidth, mHeight, Color.YELLOW, Color.BLUE, Shader.TileMode.MIRROR));

float dVH = 0.2f;
float dVV = 0.3f;
float topV1 = 0.3f;
float topV2 = 1.1f;

leftPoint[0] = mCenterX * dVH;
leftPoint[1] = mCenterY - (mCenterY * dVV);

leftPoint[2] = mCenterX - (mCenterX * dVH);
leftPoint[3] = leftPoint[1];

leftControlLimit[0] = rightControlLimit[0] = mCenterY * topV1;
leftControlLimit[1] = rightControlLimit[1] = mCenterY * topV2;

rightPoint[0] = mCenterX + (mCenterX * dVH);
rightPoint[1] = leftPoint[1];

rightPoint[2] = mWidth - (mCenterX * dVH);
rightPoint[3] = rightPoint[1];

float dVH1 = 0.5f;
float dVV1 = 0.4f;
float bottomV1 = 0f;
float bottomV2 = 0.9f;

bottomPoint[0] = mCenterX - (mCenterX * dVH1);
bottomPoint[1] = mCenterY + (mCenterY * dVV1);

bottomPoint[2] = mCenterX + (mCenterY * dVH1);
bottomPoint[3] = bottomPoint[1];

bottomControlLimit[0] = mCenterY + (mCenterY * bottomV1);
bottomControlLimit[1] = mCenterY + (mCenterY * bottomV2);
}

public void setBorderWidth(int borderWidth) {
this.borderWidth = borderWidth;
}

public void setBorderColor(int borderColor) {
this.borderColor = borderColor;
}

public void setFaceColor(int faceColor) {
this.faceColor = faceColor;
}

@Override
protected void onAttachedToWindow() {
super.onAttachedToWindow();
hasAttach = true;
startAnimation01();
}

@Override
protected void onDetachedFromWindow() {
super.onDetachedFromWindow();
cancelAnimator01();
cancelAnimator02();
}

@Override
protected void onDraw(Canvas canvas) {
super.onDraw(canvas);
if(!hasAttach)
return;
drawBorder(canvas);
drawFace(canvas);
}

private void drawBorder(Canvas canvas) {
canvas.drawRoundRect(new RectF(borderWidth/2, borderWidth/2, mWidth - (borderWidth/2), mHeight - (borderWidth/2)), 10, 10, mBorderPaint);
}

private void drawFace(Canvas canvas) {
canvas.drawPoint(mCenterX, mCenterY ,mFacePaint);

mLeftPath.reset();
mRightPath.reset();
mBottomPath.reset();

mLeftPath.moveTo(leftPoint[0], leftPoint[1]);
mLeftPath.quadTo(mCenterX/2, leftControlY, leftPoint[2], leftPoint[3]);
canvas.drawPath(mLeftPath, mFacePaint);

mRightPath.moveTo(rightPoint[0], rightPoint[1]);
mRightPath.quadTo(mCenterX + (mCenterX/2), rightControlY, rightPoint[2], rightPoint[3]);
canvas.drawPath(mRightPath, mFacePaint);

mBottomPath.moveTo(bottomPoint[0], bottomPoint[1]);
mBottomPath.quadTo(mCenterX, bottomControlY, bottomPoint[2], bottomPoint[3]);
canvas.drawPath(mBottomPath, mFacePaint);
}
}

View的绘制流程

View 的绘制主要有以下一些核心内容:

  1. 三大流程:View 绘制主要包含如下三大流程:

    • measure:测量流程,主要负责对 View 进行测量,其核心逻辑位于View#measure(...),真正的测量处理由View#onMeasure(...)负责。默认的测量规则为:如果 View 的布局参数为LayoutParams.WRAP_CONTENTLayoutParams.MATCH_PARENT,那么其测量大小为 SpecSize;如果其布局参数为LayoutParams.UNSPECIFIED,那么其测量大小为android:minWidth/android:minHeight和其背景之间的较大值。

    自定义View 通常覆写onMeasure(...)方法,在其内一般会对WRAP_CONTENT预设一个默认值,区分WARP_CONTENTMATCH_PARENT效果,最终完成自己的测量宽/高。而ViewGrouponMeasure(...)方法中,通常都是先测量子View,收集到相应数据后,才能最终测量自己。

    • layout:布局流程,主要完成对 View 的位置放置,其核心逻辑位于View#layout(...),该方法内部主要通过View#setFrame(...)记录自己的四个顶点坐标(记录与对应成员变量中即可),完成自己的位置放置,最后会回调View#onLayout(...)方法,在其内完成对 子View 的布局放置。

      :不同于 measure 流程首先对 子View 进行测量,最后才测量自己,layout 流程首先是先定位自己的布局位置,然后才处理放置 子View 的布局位置。

    • draw:绘制流程,就是将 View 绘制到屏幕上,其核心逻辑位于View#draw(...),主要就是对 背景自身内容(onDraw(...)子View(dispatchDraw(...)装饰(滚动条、前景等) 进行绘制。

      :通常自定义View 覆写onDraw(...)方法,完成自己的绘制即可,ViewGroup 一般充当容器使用,因此通常无需覆写onDraw(...)

  2. Activity 的根视图(即DecorView)最终是绑定到ViewRootImpl,具体是由ViewRootImpl#setView(...)进行绑定关联的,后续 View 绘制的三大流程都是均有ViewRootImpl负责执行的。

  3. 对 View 的测量流程中,最关键的一步是求取 View 的MeasureSpec,View 的MeasureSpec是在其父容器MeasureSpec的约束下,结合自己的LayoutParams共同测量得到的,具体的测量逻辑由ViewGroup#getChildMeasureSpec(...)负责。
    DecorViewMeasureSpec取决于自己的LayoutParams和屏幕尺寸,具体的测量逻辑位于ViewRootImpl#getRootMeasureSpec(...)

最后,稍微总结一下 View 绘制的整个流程:

  1. 首先,当 Activity 启动时,会触发调用到ActivityThread#handleResumeActivity(..),其内部会经历一系列过程,生成DecorViewViewRootImpl等实例,最后通过ViewRootImpl#setView(decor,MATCH_PARENT)设置 Activity 根View。

    ViewRootImpl#setView(...)内容通过将其成员属性ViewRootImpl#mView指向DecorView,完成两者之间的关联。

  2. ViewRootImpl成功关联DecorView后,其内部会设置同步屏障并发送一个CALLBACK_TRAVERSAL异步渲染消息,在下一次 VSYNC 信号到来时,CALLBACK_TRAVERSAL就会得到响应,从而最终触发执行ViewRootImpl#performTraversals(...),真正开始执行 View 绘制流程。

  3. ViewRootImpl#performTraversals(...)内部会依次调用ViewRootImpl#performMeasure(...)ViewRootImpl#performLayout(...)ViewRootImpl#performDraw(...)三大绘制流程,其中:

    • **performMeasure(..)**:内部主要就是对DecorView执行测量流程:DecorView#measure(...)DecorView是一个FrameLayout,其布局特性是层叠布局,所占的空间就是其 子View 占比最大的宽/高,因此其测量逻辑(onMeasure(...))是先对所有 子View 进行测量,具体是通过ViewGroup#measureChildWithMargins(...)方法对 子View 进行测量,子View 测量完成后,记录最大的宽/高,设置为自己的测量大小(通过View#setMeasuredDimension(...)),如此便完成了DecorView的测量流程。
    • **performLayout(...)**:内部其实就是调用DecorView#layout(...),如此便完成了DecorView的布局位置,最后会回调DecorView#onLayout(...),负责 子View 的布局放置,核心逻辑就是计算出各个 子View 的坐标位置,最后通过child.layout(...)完成 子View 布局。
    • performDraw():内部最终调用到的是DecorView#draw(...),该方法内部并未对绘制流程做任何修改,因此最终执行的是View#draw(...),所以主要就是依次完成对DecorView背景子View(dispatchDraw(...)视图装饰(滚动条、前景等) 的绘制。

参考