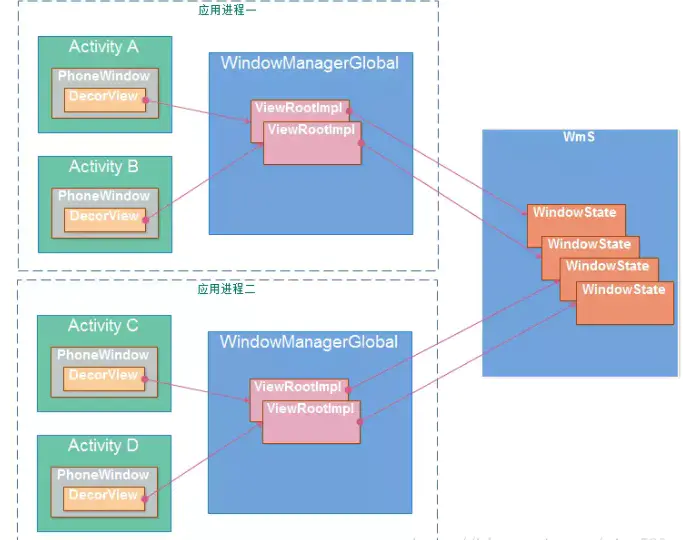
WMS(WindowManagerService)窗口管理服务,是系统核心服务。简单来讲,它是窗口管理员。窗口是一个抽象的概念,从用户的角度来讲,它是一个界面。从SufaceFlinger的角度来讲,它是一个Layer,承载着和界面有关的数据和属性。所以它是一个WindowState,用于管理和界面有关的状态。
WMS也是系统服务,由SystemServer启动。直到关机时才会退出。发生异常时必须重启。
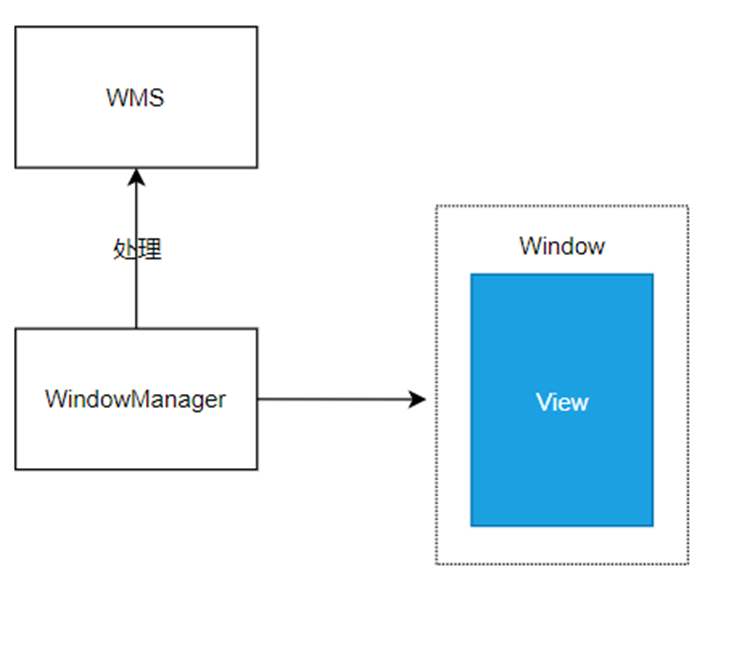
WMS主体描述 Window :在Android视图体系中Window就是一个窗口的概念。Android中所有的视图都是依赖于Window显示的。
WindowManager :对Window的管理,包括新增、更新和删除等。
WMS :窗口的最终管理者,它负责窗口的启动、添加和删除,另外窗口的大小和层级也是由WMS进行管理。
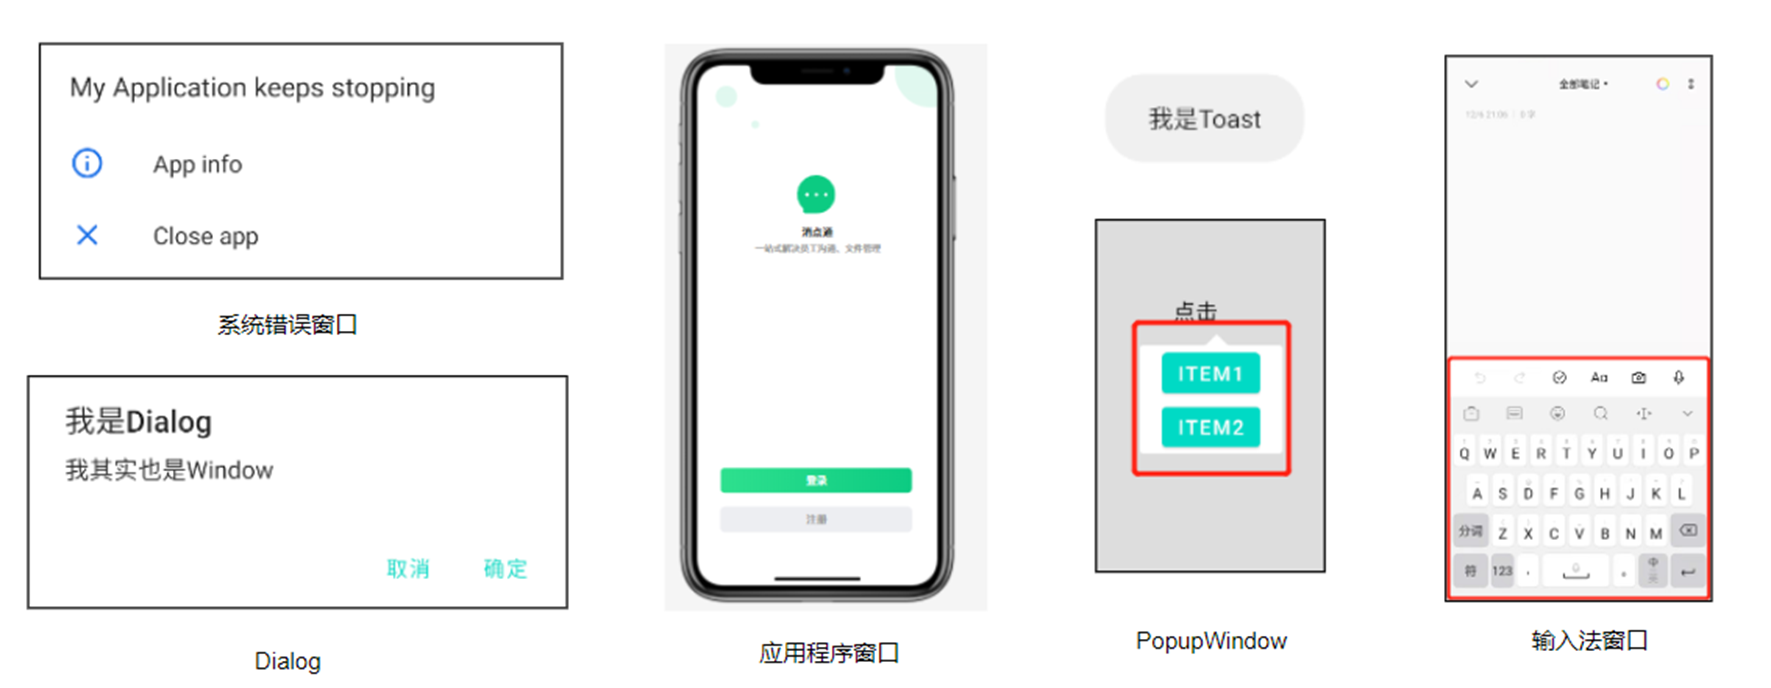
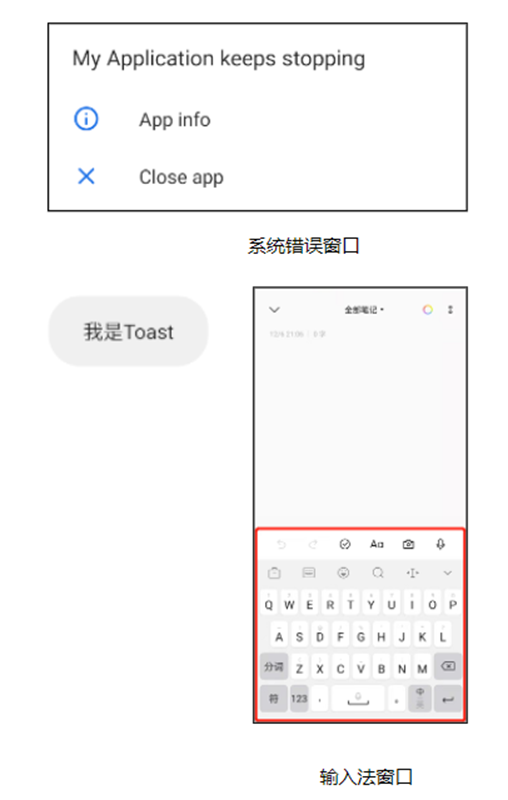
Window 常见的window
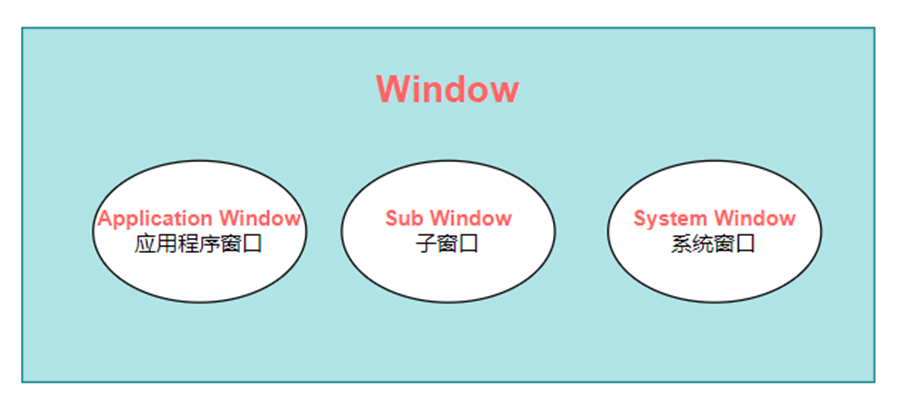
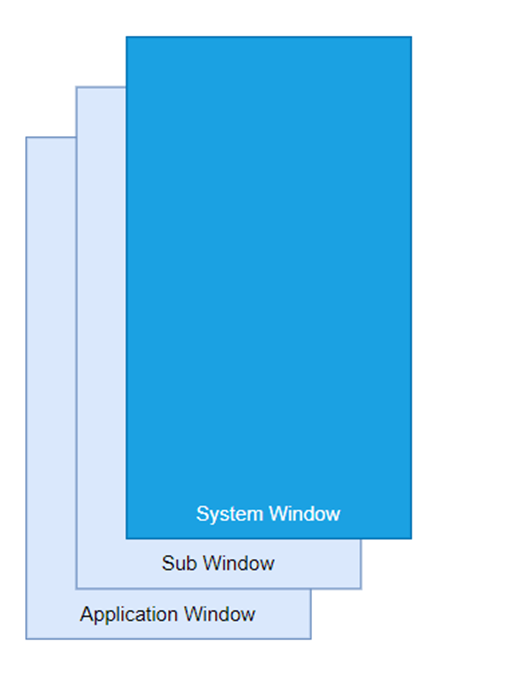
Window的分类
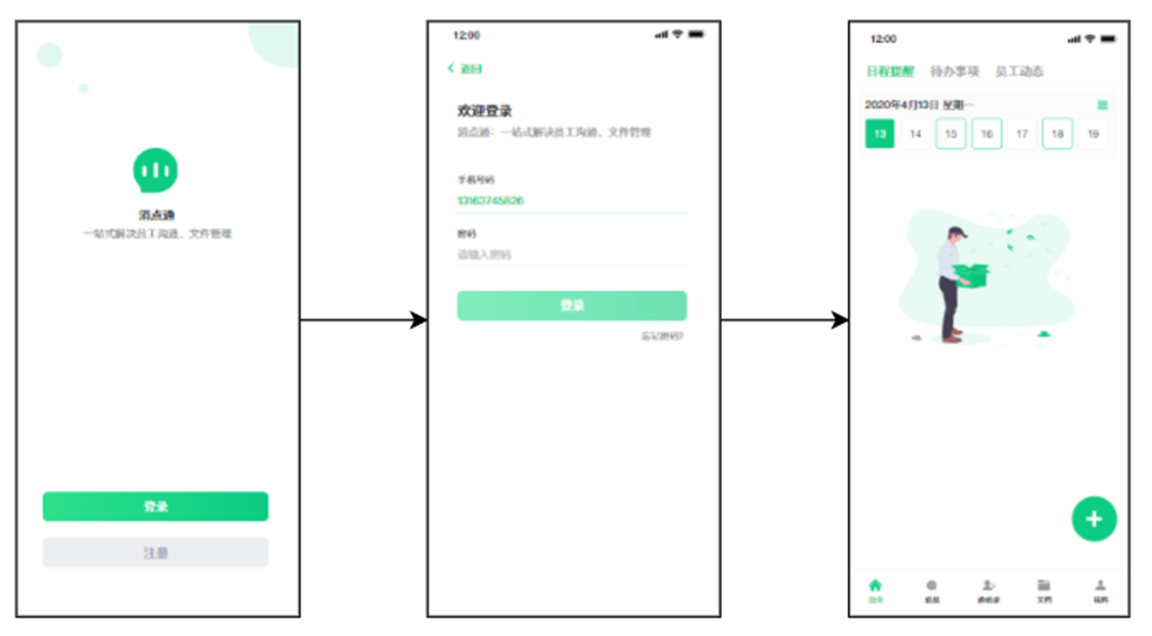
Application Window :Activity就是一个典型的应用程序窗口。
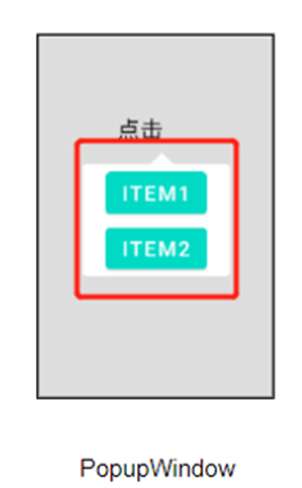
Sub Window :子窗口,顾名思义,它不能独立存在,需要附着在其他窗口才可以,PopupWindow就属于子窗口。
System Window :输入法窗口、系统音量条窗口、系统错误窗口都属于系统窗口。
Application Window
如代码中的以下类型
1
2
3
4
5
6
7
8
9
10
11
public static final int FIRST_APPLICATION_WINDOW = 1 ;public static final int TYPE_BASE_APPLICATION = 1 ;public static final int TYPE_APPLICATION = 2 ;public static final int TYPE_APPLICATION_STARTING = 3 ;public static final int TYPE_DRAWN_APPLICATION = 4 ;public static final int LAST_APPLICATION_WINDOW = 99 ;
Sub Window 什么是子窗口?
在 PhoneWindow 与 WindowManagerImpl 创建好了以后,我们自己也可以调用 WindowManagerImpl#addView 来添加一个 View 树,也叫添加窗口。
当它的窗口类型处于 WindowManager.LayoutParams.FIRST_SUB_WINDOW 与 WindowManager.LayoutParams.LAST_SUB_WINDOW 之间时,我们称这个直接添加的窗口为子窗口。
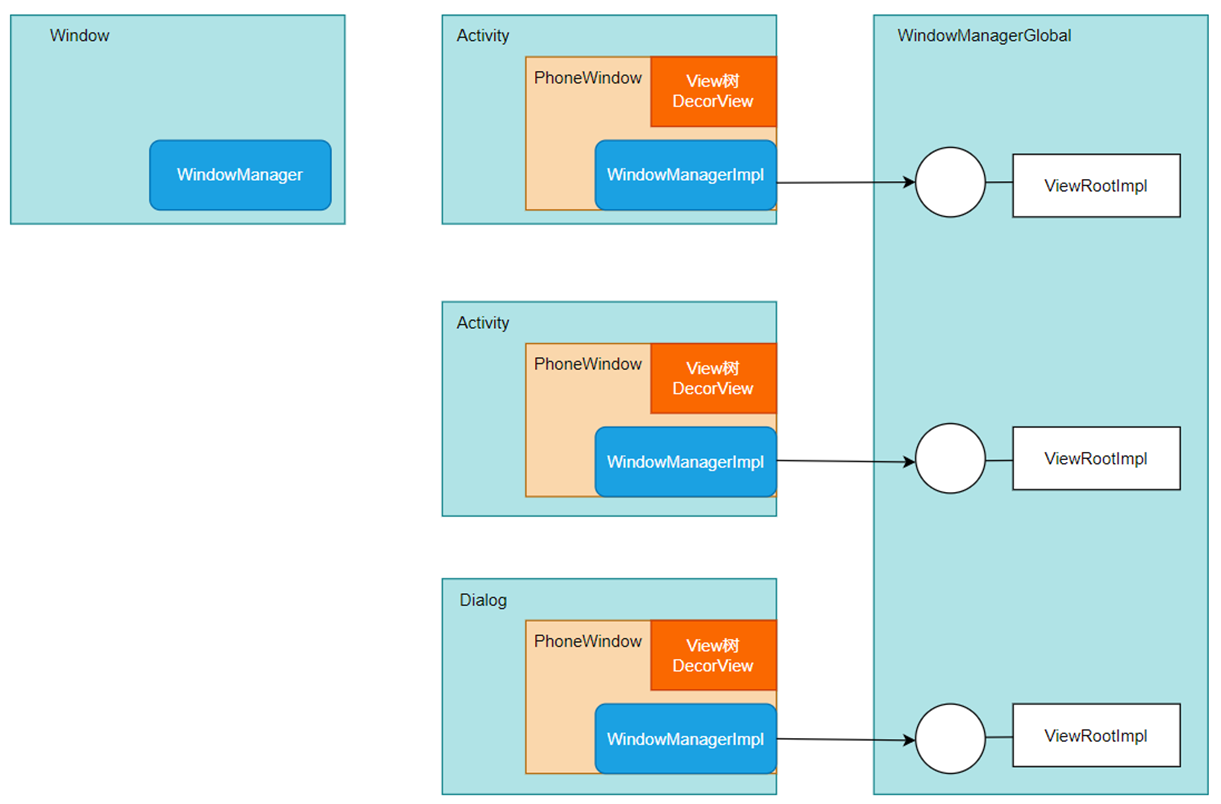
那这些直接通过 WindowManagerImpl#addView 创建的窗口,共用同一个 PhoneWindow 以及 WindowManagerImpl 对象,窗口类型不同决定了它们在 WMS 上的一个 z-order 顺序。
典型的子窗口PopupWindow
如代码中的以下类型
1
2
3
4
5
6
7
8
9
10
11
12
13
14
15
public static final int FIRST_SUB_WINDOW = 1000 ;public static final int TYPE_APPLICATION_PANEL = FIRST_SUB_WINDOW;public static final int TYPE_APPLICATION_MEDIA = FIRST_SUB_WINDOW + 1 ;public static final int TYPE_APPLICATION_SUB_PANEL = FIRST_SUB_WINDOW + 2 ; public static final int TYPE_APPLICATION_ATTACHED_DIALOG = FIRST_SUB_WINDOW + 3 ; public static final int TYPE_APPLICATION_MEDIA_OVERLAY = FIRST_SUB_WINDOW + 4 ;public static final int TYPE_APPLICATION_ABOVE_SUB_PANEL = FIRST_SUB_WINDOW + 5 ; public static final int LAST_SUB_WINDOW = 1999 ;
接下来让我们看看子窗口是如何添加的,以 PopupWindow 为例:
1 2 3 4 5 6 7 8 9 10 11 12 13 14 15 16 17 18 19 20 21 22 23 24 25 26 27 28 29 30 31 32 33 34 35 36 37 38 39 40 41 42 43 44 45 46 47 48 49 50 51 52 53 54 55 56 57 private int mWindowLayoutType = WindowManager.LayoutParams.TYPE_APPLICATION_PANEL; public void showAtLocation (View parent, int gravity, int x, int y) mParentRootView = new WeakReference<>(parent.getRootView()); showAtLocation(parent.getWindowToken(), gravity, x, y); } public void showAtLocation (IBinder token, int gravity, int x, int y) if (isShowing() || mContentView == null ) { return ; } detachFromAnchor(); mIsShowing = true ; mIsDropdown = false ; mGravity = gravity; final WindowManager.LayoutParams p = createPopupLayoutParams(token); preparePopup(p); p.x = x; p.y = y; invokePopup(p); } protected final WindowManager.LayoutParams createPopupLayoutParams (IBinder token) { final WindowManager.LayoutParams p = new WindowManager.LayoutParams(); p.gravity = computeGravity(); p.flags = computeFlags(p.flags); p.type = mWindowLayoutType; p.token = token; p.softInputMode = mSoftInputMode; p.windowAnimations = computeAnimationResource(); return p; } private void invokePopup (WindowManager.LayoutParams p) if (mContext != null ) { p.packageName = mContext.getPackageName(); } final PopupDecorView decorView = mDecorView; decorView.setFitsSystemWindows(mLayoutInsetDecor); setLayoutDirectionFromAnchor(); mWindowManager.addView(decorView, p); if (mEnterTransition != null ) { decorView.requestEnterTransition(mEnterTransition); } }
可以看到 PopupWindow 通过 WindowManagerImpl 直接添加了一个类型为 WindowManager.LayoutParams.TYPE_APPLICATION_PANEL 类型的窗口。
1 2 public static final int TYPE_APPLICATION_PANEL = FIRST_SUB_WINDOW;
那么问题来了,Dialog是子窗口吗?
接下来看看Dialog的部分源码
1 2 3 4 5 6 7 8 9 10 11 12 13 14 15 16 17 18 19 20 21 22 23 24 25 26 27 28 29 30 31 32 33 34 35 36 37 38 Dialog(@NonNull Context context, @StyleRes int themeResId, boolean createContextThemeWrapper) { mWindowManager = (WindowManager) context.getSystemService(Context.WINDOW_SERVICE); final Window w = new PhoneWindow(mContext); mWindow = w; w.setCallback(this ); w.setOnWindowDismissedCallback(this ); w.setOnWindowSwipeDismissedCallback(() -> { if (mCancelable) { cancel(); } }); w.setWindowManager(mWindowManager, null , null ); w.setGravity(Gravity.CENTER); mListenersHandler = new ListenersHandler(this ); } public void show () if (mShowing) { if (mDecor != null ) { if (mWindow.hasFeature(Window.FEATURE_ACTION_BAR)) { mWindow.invalidatePanelMenu(Window.FEATURE_ACTION_BAR); } mDecor.setVisibility(View.VISIBLE); } return ; } ...... onStart(); mDecor = mWindow.getDecorView(); WindowManager.LayoutParams l = mWindow.getAttributes(); mWindowManager.addView(mDecor, l); }
可以看到,Dialog 与 PopupWindow 不同,它有自己的 PhoneWindow 对象,同时 Dialog 的窗口类型为 TYPE_APPLICATION,所以Dialog不能视为一个子窗口。
System Window
如代码中的以下类型
1
2
3
4
5
6
7
8
9
10
11
12
13
14
15
public static final int FIRST_SYSTEM_WINDOW = 2000 ;public static final int TYPE_STATUS_BAR = FIRST_SYSTEM_WINDOW;public static final int TYPE_SEARCH_BAR = FIRST_SYSTEM_WINDOW+1 ;public static final int TYPE_PHONE = FIRST_SYSTEM_WINDOW+2 ;public static final int TYPE_SYSTEM_ALERT = FIRST_SYSTEM_WINDOW+3 ;public static final int TYPE_KEYGUARD = FIRST_SYSTEM_WINDOW+4 ;public static final int TYPE_TOAST = FIRST_SYSTEM_WINDOW+5 ;... public static final int LAST_SYSTEM_WINDOW = 2999 ;
Window的次序
Window Flag Window的Flag是跟随Window的显示并控制了一些特征与属性
1 2 3 4 5 6 7 8 9 10 11 12 13 14 15 16 17 18 19 FLAG_NOT_FOCUSABLE = 0x00000008 ; FLAG_NOT_TOUCH_MODAL = 0x00000020 ; FLAG_SHOW_WHEN_LOCKED = 0x00080000 ;
WindowManager
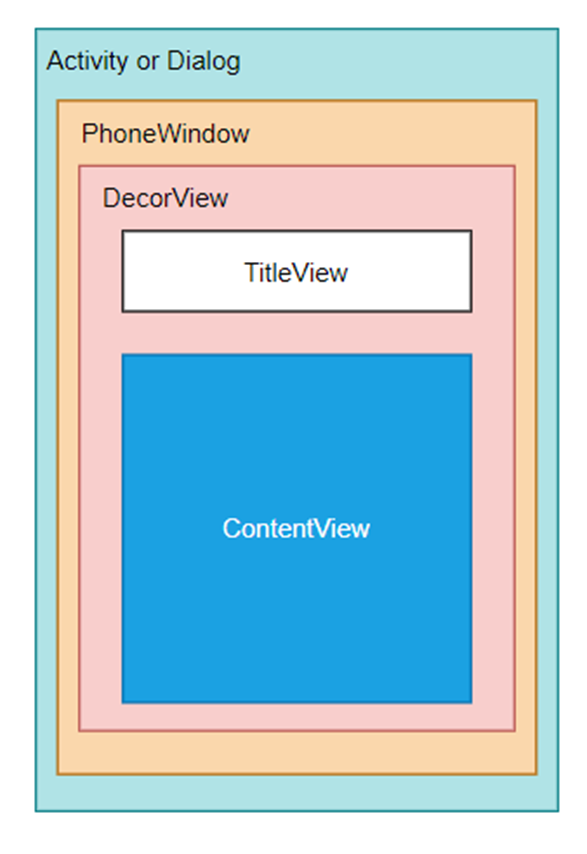
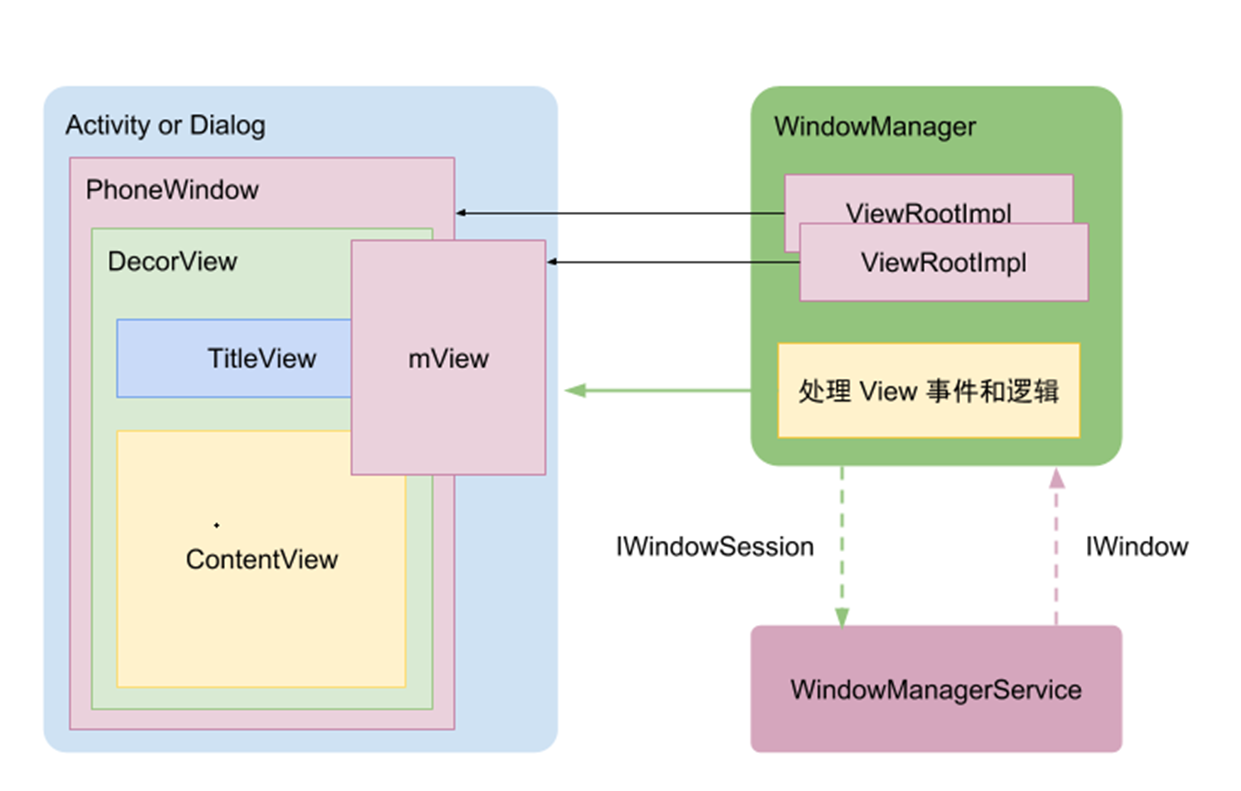
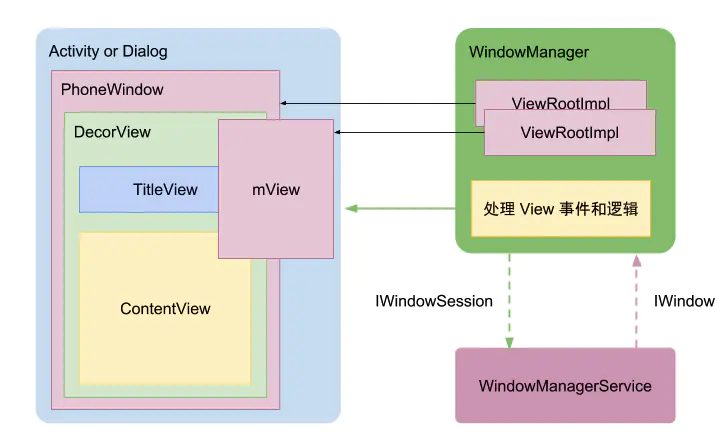
Activity与 PhoneWindow与DecorView关系 Activity是系统可视化交互组件,四大组件都由AMS统一管理生命周期,事实上它的职责只是生命周期的管理,由设计模式的单一职责的原则,那势必需要将Activity和其上的视图View进行解耦,那么就引入Window的概念,它是个抽象类,对于Activity来说,它的具体实现类是PhoneWindow,在Activity执行attach的时候,会创建一个PhoneWindow对象。PhoneWindow作为装载根视图DecorView的顶级容器,Activity通过setContentView实际上是调用PhoneWindow来创建DecorView,并解析xml布局加载到DecorView的contentView部分。
DecorView是FrameLayout的子类,它可以被认为是Android视图树的根节点视图
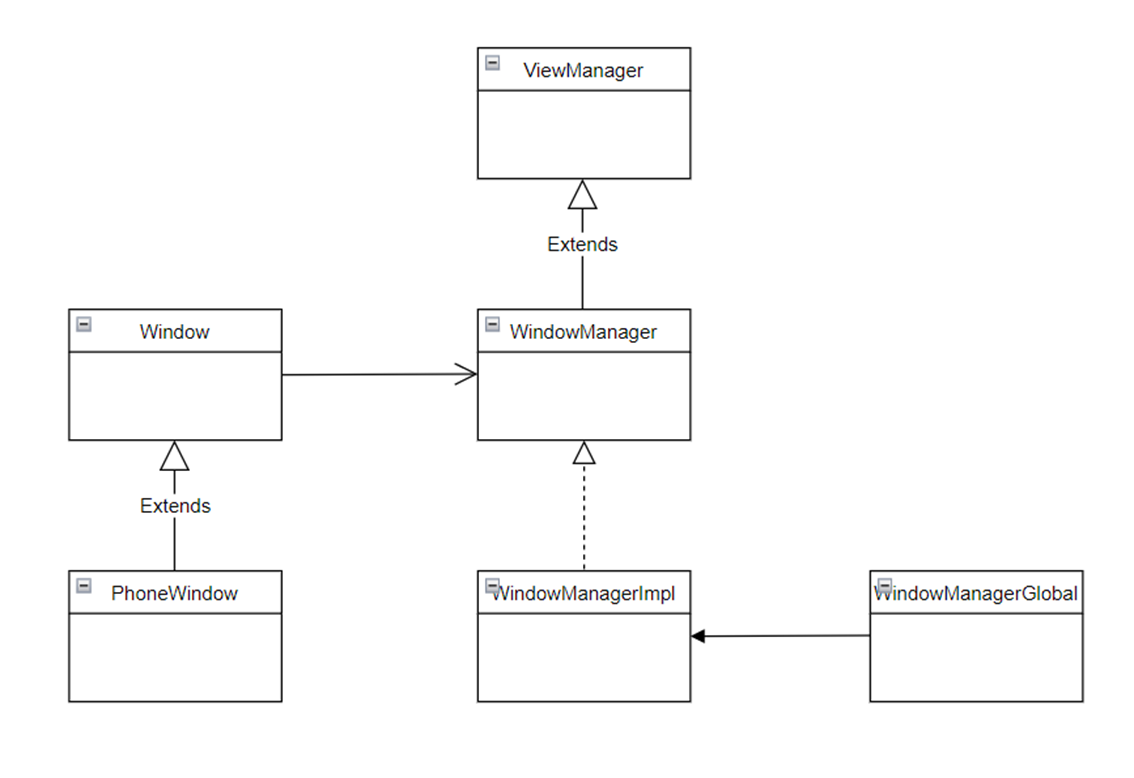
WindowManager、WindowManagerImpl、WindowManagerGlobal WindowManager是一个接口类,继承自接口ViewManager,负责窗口的管理(增、删、改)。它的实现类是WindowManagerImpl,而具体操作实际上又会交给WindowManagerGlobal来处理,它是个单例,进程唯一。WindowManagerGlobal执行addView的方法中会传入DecorView, 还会初始化一个ViewRootImpl。WindowManagerGlobal因为是单例的,它内部会有两个List来分别保存这两个对象,来统一管理。
ViewRootImpl与WindowManagerService ViewRootImpl是View树的树根并管理View树,触发View的测量、布局和绘制,输入响应的中转站,负责与WMS进行进程间通信。
WindowManagerGlobal负责对DecorView和对应的ViewRootImpl进行统一管理,而具体功能是由ViewRootImpl来处理。
Activity与Window关联分析 Activity与Window联系是非常紧密,很多显示相关操作需要两者密切配合,那么如何保证他们的一致性呢?Android通过token来保证两者的一致性校验:
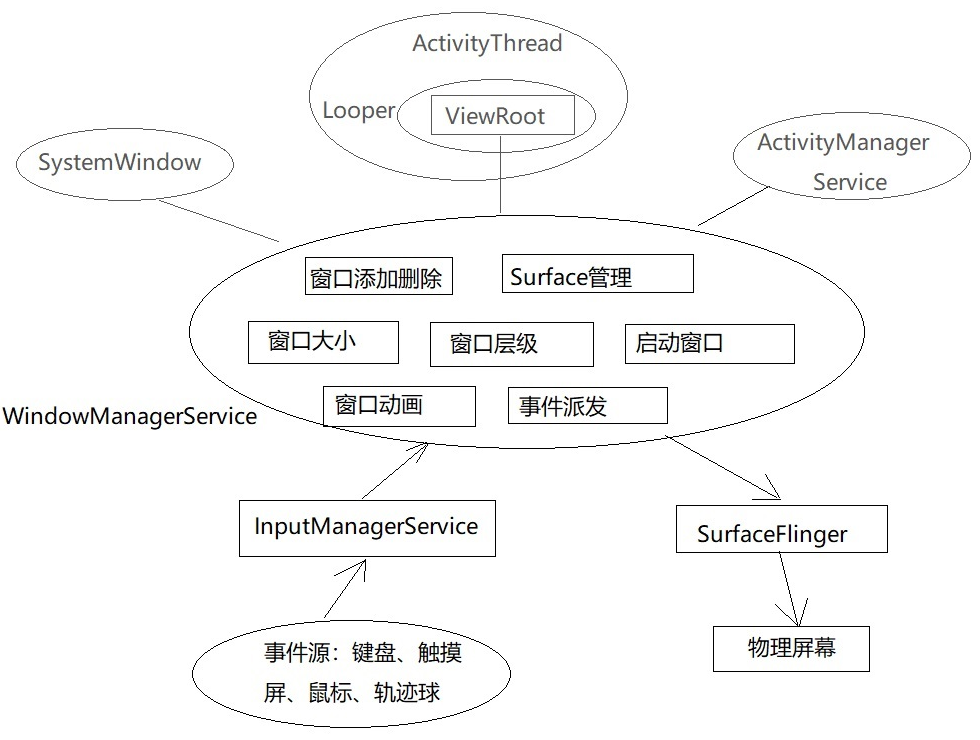
WindowManagerService 该系统服务是集窗口管理、窗口动画、输入系统中转站、Surface管理等功能于一体的综合管理。
窗口管理 WMS 进行管理的。窗口动画 WMS 的动画子系统来负责,动画子系统的管理者为 WindowAnimator 。输入系统中转站 InputManagerService(IMS) 会对触摸事件进行处理,它会寻找一个最合适的窗口来处理触摸反馈信息,WMS 是窗口的管理者,它作为输入系统的中转站再合适不过了。Surface 管理 Surface 来供自己绘制,为每个窗口分配 Surface 是由WMS 来完成的。
从上图我们了解到 WMS 整个是很复杂的,与它关联的有窗口管理、窗口动画、输入系统中转站和 Surface 管理, 它们每一个都是重要且复杂的系统,本章就对窗口管理来进行分析,因为它跟我们应用开发关系真的是太紧密了。长相 和表情 ,取决于它们各自的条件与努力。导演 ,它要负责话剧的舞台效果、演员站位;摄像机 ,它只负责客观的捕捉当前的画面,然后真实的呈现给观众;
WMS的重要成员 1. mPolicy:WindowManagerPolicy WindowManagerPolicy(WMP)类型的变量。WindowManagerPolicy是窗口管理策略的接口类,用来定义一个窗口策略所要遵循的通用规范,并提供了WindowManager所有的特定的UI行为。它的具体实现类为PhoneWindowManager,这个实现类在WMS创建时被创建。WMP允许定制窗口层级和特殊窗口类型以及关键的调度和布局。
2. mSessions:ArraySet<**Session**> ArraySet类型的变量,元素类型为Session。它主要用于进程间通信,其他的应用程序进程想要和WMS进程进行通信就需要经过Session,并且每个应用程序进程都会对应一个Session,WMS保存这些Session用来记录所有向WMS提出窗口管理服务的客户端。
3. mWindowMap:WindowHashMap WindowHashMap类型的变量,WindowHashMap继承了HashMap,它限制了HashMap的key值的类型为IBinder,value值的类型为WindowState。WindowState用于保存窗口的信息,在WMS中它用来描述一个窗口。综上得出结论,mWindowMap就是用来保存WMS中各种窗口的集合。
4.mFinishedStarting:ArrayList<**AppWindowToken**> ArrayList类型的变量,元素类型为AppWindowToken,它是WindowToken的子类。要想理解mFinishedStarting的含义,需要先了解WindowToken是什么。WindowToken :
可以理解为窗口令牌,当应用程序想要向WMS申请新创建一个窗口,则需要向WMS出示有效的WindowToken。AppWindowToken作为WindowToken的子类,主要用来描述应用程序的
WindowToken结构,WindowState :
5.mResizingWindows:ArrayList<**WindowState**> ArrayList类型的变量,元素类型为WindowState。
InputManagerService类型的变量,输入系统的管理者。InputManagerService(IMS)会对触摸事件进行处理,它会寻找一个最合适的窗口来处理触摸反馈信息,WMS是窗口的管理者,因此,WMS“理所应当”的成为了输入系统的中转站,
WindowManagerService的启动 WMS的知识点非常多,在了解这些知识点前,我们十分有必要知道WMS是如何产生的。WMS是在SyetemServer进程中启动的。
frameworks/base/services/java/com/android/server/SystemServer.java
1
2
3
public static void main (String[] args) new SystemServer().run(); }
main方法中只调用了SystemServer的run方法,如下所示。frameworks/base/services/java/com/android/server/SystemServer.java
1
2
3
4
5
6
7
8
9
10
11
12
13
14
15
16
17
18
19
20
21
22
23
24
25
26
27
private void run () try { System.loadLibrary("android_servers" ); ... mSystemServiceManager = new SystemServiceManager(mSystemContext); mSystemServiceManager.setRuntimeRestarted(mRuntimeRestart); LocalServices.addService(SystemServiceManager.class, mSystemServiceManager); SystemServerInitThreadPool.get(); } finally { traceEnd(); } try { traceBeginAndSlog("StartServices" ); startBootstrapServices(); startCoreServices(); startOtherServices(); SystemServerInitThreadPool.shutdown(); } catch (Throwable ex) { Slog.e("System" , "******************************************" ); Slog.e("System" , "************ Failure starting system services" , ex); throw ex; } finally { traceEnd(); } ... }
run方法代码很多,这里截取了关键的部分,在注释1处加载了libandroid_servers.so。在注释2处创建SystemServiceManager,它会对系统的服务进行创建、启动和生命周期管理。接下来的代码会启动系统的各种服务,在注释3中的startBootstrapServices方法中用SystemServiceManager启动了ActivityManagerService、PowerManagerService、PackageManagerService等服务。在注释4处的方法中则启动了BatteryService、UsageStatsService和WebViewUpdateService。注释5处的startOtherServices方法中则启动了CameraService、AlarmManagerService、VrManagerService等服务,这些服务的父类为SystemService。从注释3、4、5的方法名称可以看出,官方把大概80多个系统服务分为了三种类型,分别是引导服务、核心服务和其他服务,其中其他服务为一些非紧要和一些不需要立即启动的服务,WMS就是其他服务的一种。
frameworks/base/services/java/com/android/server/SystemServer.java
1
2
3
4
5
6
7
8
9
10
11
12
13
14
15
16
17
18
19
20
21
22
23
24
25
26
27
28
29
30
31
32
33
private void startOtherServices () ... traceBeginAndSlog("InitWatchdog" ); final Watchdog watchdog = Watchdog.getInstance(); watchdog.init(context, mActivityManagerService); traceEnd(); traceBeginAndSlog("StartInputManagerService" ); inputManager = new InputManagerService(context); traceEnd(); traceBeginAndSlog("StartWindowManagerService" ); ConcurrentUtils.waitForFutureNoInterrupt(mSensorServiceStart, START_SENSOR_SERVICE); mSensorServiceStart = null ; wm = WindowManagerService.main(context, inputManager, mFactoryTestMode != FactoryTest.FACTORY_TEST_LOW_LEVEL, !mFirstBoot, mOnlyCore, new PhoneWindowManager()); ServiceManager.addService(Context.WINDOW_SERVICE, wm); ServiceManager.addService(Context.INPUT_SERVICE, inputManager); traceEnd(); ... try { wm.displayReady(); } catch (Throwable e) { reportWtf("making display ready" , e); } ... try { wm.systemReady(); } catch (Throwable e) { reportWtf("making Window Manager Service ready" , e); } ... }
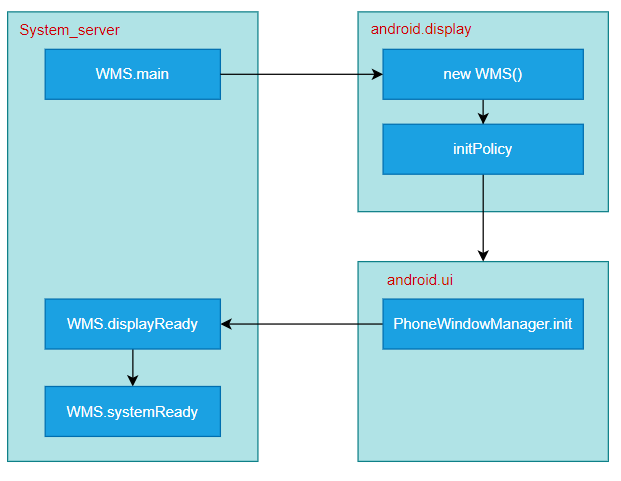
startOtherServices方法用于启动其他服务,其他服务大概有70多个,上面的代码只列出了WMS以及和它相关的IMS的启动逻辑,剩余的其他服务的启动逻辑也都大同小异。在注释1、2处分别得到Watchdog实例并对它进行初始化,Watchdog用来监控系统的一些关键服务的运行状况,后文会再次提到它。在注释3处创建了IMS,并赋值给IMS类型的inputManager对象。注释4处执行了WMS的main方法,其内部会创建WMS,需要注意的是main方法其中一个传入的参数就是注释1处创建的IMS,WMS是输入事件的中转站,其内部包含了IMS引用并不意外。结合上文,我们可以得知WMS的main方法是运行在SystemServer的run方法中,换句话说就是运行在”system_server”线程”中,后面会再次提到”system_server”线程。注释5和注释6处分别将WMS和IMS注册到ServiceManager中,这样如果某个客户端想要使用WMS,就需要先去ServiceManager中查询信息,然后根据信息与WMS所在的进程建立通信通路,客户端就可以使用WMS了。注释7处用来初始化显示信息,注释8处则用来通知WMS,系统的初始化工作已经完成,其内部调用了WindowManagerPolicy的systemReady方法。我们来查看注释4处WMS的main方法,如下所示。
frameworks/base/services/core/java/com/android/server/wm/WindowManagerService .java
1
2
3
4
5
6
7
8
public static WindowManagerService main (final Context context, final InputManagerService im, final boolean haveInputMethods, final boolean showBootMsgs, final boolean onlyCore, WindowManagerPolicy policy) DisplayThread.getHandler().runWithScissors(() -> sInstance = new WindowManagerService(context, im, haveInputMethods, showBootMsgs, onlyCore, policy), 0 ); return sInstance; }
在注释1处调用了DisplayThread的getHandler方法,用来得到DisplayThread的Handler实例。DisplayThread是一个单例的前台线程,这个线程用来处理需要低延时显示的相关操作,并只能由WindowManager、DisplayManager和InputManager实时执行快速操作。注释1处的runWithScissors方法中使用了Java8中的Lambda表达式,它等价于如下代码:
1 2 3 4 5 6 7 DisplayThread.getHandler().runWithScissors(new Runnable() { @Override public void run () sInstance = new WindowManagerService(context, im, haveInputMethods, showBootMsgs, onlyCore, policy); } }, 0 );
在注释2处创建了WMS的实例,这个过程运行在Runnable的run方法中,而Runnable则传入到了DisplayThread对应Handler的runWithScissors方法中,说明WMS的创建是运行在“android.display”线程中。需要注意的是,runWithScissors方法的第二个参数传入的是0,后面会提到。来查看Handler的runWithScissors方法里做了什么:frameworks/base/core/java/android/os/Handler.java
1
2
3
4
5
6
7
8
9
10
11
12
13
14
15
public final boolean runWithScissors (final Runnable r, long timeout) if (r == null ) { throw new IllegalArgumentException("runnable must not be null" ); } if (timeout < 0 ) { throw new IllegalArgumentException("timeout must be non-negative" ); } if (Looper.myLooper() == mLooper) { r.run(); return true ; } BlockingRunnable br = new BlockingRunnable(r); return br.postAndWait(this , timeout); }
开头对传入的Runnable和timeout进行了判断,如果Runnable为null或者timeout小于0则抛出异常。注释1处根据每个线程只有一个Looper的原理来判断当前的线程(”system_server”线程)是否是Handler所指向的线程(”android.display”线程),如果是则直接执行Runnable的run方法,如果不是则调用BlockingRunnable的postAndWait方法,并将当前线程的Runnable作为参数传进去 ,BlockingRunnable是Handler的内部类,代码如下所示。frameworks/base/core/java/android/os/Handler.java
1
2
3
4
5
6
7
8
9
10
11
12
13
14
15
16
17
18
19
20
21
22
23
24
25
26
27
28
29
30
31
32
33
34
35
36
37
38
39
40
41
42
43
44
45
46
47
private static final class BlockingRunnable implements Runnable private final Runnable mTask; private boolean mDone; public BlockingRunnable (Runnable task) mTask = task; } @Override public void run () try { mTask.run(); } finally { synchronized (this ) { mDone = true ; notifyAll(); } } } public boolean postAndWait (Handler handler, long timeout) if (!handler.post(this )) { return false ; } synchronized (this ) { if (timeout > 0 ) { final long expirationTime = SystemClock.uptimeMillis() + timeout; while (!mDone) { long delay = expirationTime - SystemClock.uptimeMillis(); if (delay <= 0 ) { return false ; } try { wait(delay); } catch (InterruptedException ex) { } } } else { while (!mDone) { try { wait(); } catch (InterruptedException ex) { } } } } return true ; } }
注释2处将当前的BlockingRunnable添加到Handler的任务队列中。前面runWithScissors方法的第二个参数为0,因此timeout等于0,这样如果mDone为false的话会一直调用注释3处的wait方法使得当前线程(”system_server”线程)进入等待状态,那么等待的是哪个线程呢?我们往上看,注释1处,执行了传入的Runnable的run方法(运行在”android.display”线程),执行完毕后在finally代码块中将mDone设置为true,并调用notifyAll方法唤醒处于等待状态的线程,这样就不会继续调用注释3处的wait方法。因此得出结论,”system_server”线程线程等待的就是”android.display”线程,一直到”android.display”线程执行完毕再执行”system_server”线程,这是因为”android.display”线程内部执行了WMS的创建,显然WMS的创建优先级更高些。WMS的创建就讲到这,最后我们来查看WMS的构造方法:frameworks/base/services/core/java/com/android/server/wm/WindowManagerService .java
1
2
3
4
5
6
7
8
9
10
11
12
13
14
15
16
17
18
19
20
21
22
private WindowManagerService (Context context, InputManagerService inputManager, boolean haveInputMethods, boolean showBootMsgs, boolean onlyCore) ... mInputManager = inputManager; ... mDisplayManager = (DisplayManager)context.getSystemService(Context.DISPLAY_SERVICE); mDisplays = mDisplayManager.getDisplays(); for (Display display : mDisplays) { createDisplayContentLocked(display); } ... mActivityManager = ActivityManagerNative.getDefault(); ... mAnimator = new WindowAnimator(this ); mAllowTheaterModeWakeFromLayout = context.getResources().getBoolean( com.android.internal.R.bool.config_allowTheaterModeWakeFromWindowLayout); LocalServices.addService(WindowManagerInternal.class, new LocalService()); initPolicy(); Watchdog.getInstance().addMonitor(this ); ... }
注释1处用来保存传进来的IMS,这样WMS就持有了IMS的引用。注释2处通过DisplayManager的getDisplays方法得到Display数组(每个显示设备都有一个Display实例),接着遍历Display数组,在注释3处的createDisplayContentLocked方法会将Display封装成DisplayContent,DisplayContent用来描述一快屏幕。注释4处得到AMS实例,并赋值给mActivityManager ,这样WMS就持有了AMS的引用。注释5处创建了WindowAnimator,它用于管理所有的窗口动画。注释6处初始化了窗口管理策略的接口类WindowManagerPolicy(WMP),它用来定义一个窗口策略所要遵循的通用规范。注释7处将自身也就是WMS通过addMonitor方法添加到Watchdog中,Watchdog用来监控系统的一些关键服务的运行状况(比如传入的WMS的运行状况),这些被监控的服务都会实现Watchdog.Monitor接口。Watchdog每分钟都会对被监控的系统服务进行检查,如果被监控的系统服务出现了死锁,则会杀死Watchdog所在的进程,也就是SystemServer进程。
查看注释6处的initPolicy方法,如下所示。frameworks/base/services/core/java/com/android/server/wm/WindowManagerService.java
1
2
3
4
5
6
7
8
9
private void initPolicy () UiThread.getHandler().runWithScissors(new Runnable() { @Override public void run () WindowManagerPolicyThread.set(Thread.currentThread(), Looper.myLooper()); mPolicy.init(mContext, WindowManagerService.this , WindowManagerService.this ); } }, 0 ); }
initPolicy方法和此前讲的WMS的main方法的实现类似,注释1处执行了WMP的init方法,WMP是一个接口,init方法的具体实现在PhoneWindowManager(PWM)中。PWM的init方法运行在”android.ui”线程中,它的优先级要高于initPolicy方法所在的”android.display”线程,因此”android.display”线程要等PWM的init方法执行完毕后,处于等待状态的”android.display”线程才会被唤醒从而继续执行下面的代码。
“system_server”线程中会调用WMS的main方法,main方法中会创建WMS,创建WMS的过程运行在”android.display”线程中,它的优先级更高一些,因此要等创建WMS完毕后才会唤醒处于等待状态的”system_server”线程。
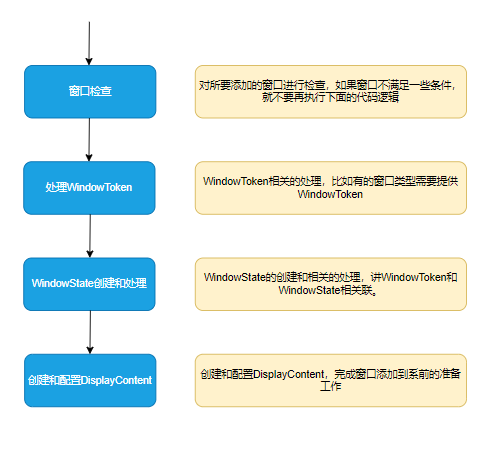
Window的添加与删除 Window的添加 WMS#addWindow方法返回的是addWindow的各种状态,比如添加Window成功,无效的Display等,这些状态被定义在WindowManagerGlobal中。在方法里面主要做了四个事情,如果所示:
窗口检查 对参数进行进行检查是非常有必要的第一个步骤,大部分函数中都是这样做的,这个很好理解,毕竟如果传入的参数都是错的,后面做过多的内容都是无用功。
1
2
int res = mPolicy.checkAddPermission(attrs.type, isRoundedCornerOverlay, attrs.packageName, appOp);
mPolicy是窗口管理策略的接口,实现类是PhoneWindowManager。在PhoneWindowManager中对窗口的type合法性做了检查。
1
2
3
4
5
if (!((type >= FIRST_APPLICATION_WINDOW && type <= LAST_APPLICATION_WINDOW) || (type >= FIRST_SUB_WINDOW && type <= LAST_SUB_WINDOW) || (type >= FIRST_SYSTEM_WINDOW && type <= LAST_SYSTEM_WINDOW))) { return WindowManagerGlobal.ADD_INVALID_TYPE; }
接下来的话通过DisplayId来获取窗口要添加到哪个DisplayContentshang,如果没有找到DisplayContent, 则返回错误状态。
1 final DisplayContent displayContent = getDisplayContentOrCreate(displayId, attrs.token);
如果窗口是子窗口类型,然后是对父窗口的信息做一些检查,如果为空或者父窗口也是子窗口类型则检查不通过,返回错误类型
1
2
3
4
5
6
7
8
9
10
11
12
13
14
15
16
17
if (type >= FIRST_SUB_WINDOW && type <= LAST_SUB_WINDOW) { parentWindow = windowForClientLocked(null , attrs.token, false ); if (parentWindow == null ) { ProtoLog.w(WM_ERROR, "Attempted to add window with token that is not a window: " + "%s. Aborting." , attrs.token); return WindowManagerGlobal.ADD_BAD_SUBWINDOW_TOKEN; } if (parentWindow.mAttrs.type >= FIRST_SUB_WINDOW && parentWindow.mAttrs.type <= LAST_SUB_WINDOW) { ProtoLog.w(WM_ERROR, "Attempted to add window with token that is a sub-window: " + "%s. Aborting." , attrs.token); return WindowManagerGlobal.ADD_BAD_SUBWINDOW_TOKEN; } }
WindowToken相关处理 在WindowToken相关处理这部分内容中,我们先通过DisplayContent尝试获取WindowToken,token为空且有父窗口,则用父窗口的token,token为空没有父窗口自己新建。
1 2 3 4 5 6 7 8 9 10 11 12 13 14 15 16 17 18 19 WindowToken token = displayContent.getWindowToken( hasParent ? parentWindow.mAttrs.token : attrs.token); .......... if (token == null ) { ......... if (hasParent) { token = parentWindow.mToken; } else { final IBinder binder = attrs.token != null ? attrs.token : client.asBinder(); token = new WindowToken(this , binder, type, false , displayContent, session.mCanAddInternalSystemWindow, isRoundedCornerOverlay); } }
WindowState的创建和处理 WindowState是WMS端的事实窗口,通过new的方式新建好一个WindowState之后就进行了相关的判断,比如请求添加窗口的客户端是否死亡、窗口的DisplayContent是否失效。
1
2
3
4
5
6
7
8
9
10
11
12
13
14
15
final WindowState win = new WindowState(this , session, client, token, parentWindow, appOp[0 ], seq, attrs, viewVisibility, session.mUid, userId, session.mCanAddInternalSystemWindow); if (win.mDeathRecipient == null ) { ProtoLog.w(WM_ERROR, "Adding window client %s" + " that is dead, aborting." , client.asBinder()); return WindowManagerGlobal.ADD_APP_EXITING; } if (win.getDisplayContent() == null ) { ProtoLog.w(WM_ERROR, "Adding window to Display that has been removed." ); return WindowManagerGlobal.ADD_INVALID_DISPLAY; }
1
2
3
4
5
6
7
8
9
10
11
12
....... displayPolicy.adjustWindowParamsLw(win, win.mAttrs, callingPid, callingUid); ....... res = displayPolicy.validateAddingWindowLw(attrs, callingPid, callingUid); ....... mWindowMap.put(client.asBinder(), win); ....... win.mToken.addWindow(win);
Display的创建和配置 创建和配置DisplayContent,完成窗口添加到系统前的准备工作。
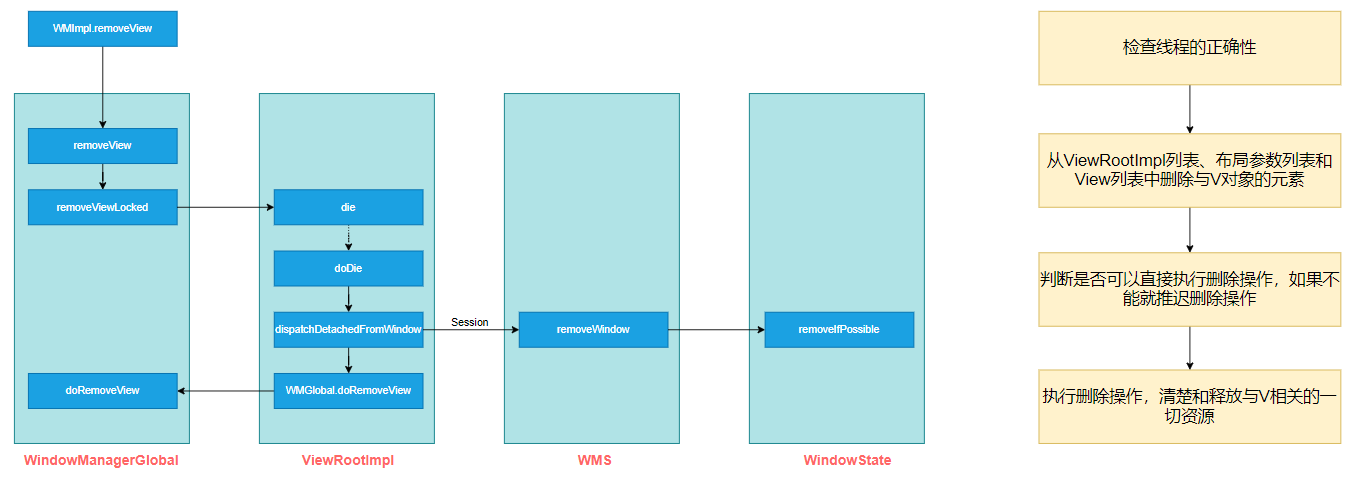
Window的删除 Window的删除过程,本文中从WindowManagerImpl开始讲起,主要做了四个事情如图右所示。
检查线程的正确性 1 2 3 4 5 6 void checkThread () if (mThread != Thread.currentThread()) { throw new CalledFromWrongThreadException( "Only the original thread that created a view hierarchy can touch its views." ); } }
ViewRootImpl相关数据删除 在WindowManagerGlobal方法中,会删除相关的一些数据,如ViewRootImpl、LayoutParams、DecorView,并将DecorView加入到死亡列表中。
1 2 3 4 5 6 7 8 9 10 11 12 13 14 15 16 17 18 void doRemoveView (ViewRootImpl root) synchronized (mLock) { final int index = mRoots.indexOf(root); if (index >= 0 ) { mRoots.remove(index); mParams.remove(index); final View view = mViews.remove(index); mDyingViews.remove(view); } ...... } ...... }
判断是否立即执行删除 这ViewRootImpl中die方法中,会先判断是否立即执行删除,如果被判处死刑且立即执行则调用doDie方法,如果不是则通过Handler方法执行死刑的信号,判个缓刑。
1 2 3 4 5 6 7 8 9 10 11 12 13 14 boolean die (boolean immediate) if (immediate && !mIsInTraversal) { doDie(); return false ; } ...... mHandler.sendEmptyMessage(MSG_DIE); return true ; }
1 2 3 4 5 6 7 8 9 10 11 12 13 14 15 16 17 18 19 20 21 22 23 24 25 26 27 28 29 30 31 32 33 34 35 36 37 38 39 40 41 42 43 44 45 void doDie () checkThread(); if (LOCAL_LOGV) Log.v(mTag, "DIE in " + this + " of " + mSurface); synchronized (this ) { if (mRemoved) { return ; } mRemoved = true ; if (mAdded) { dispatchDetachedFromWindow(); } if (mAdded && !mFirst) { destroyHardwareRenderer(); if (mView != null ) { int viewVisibility = mView.getVisibility(); boolean viewVisibilityChanged = mViewVisibility != viewVisibility; if (mWindowAttributesChanged || viewVisibilityChanged) { try { if ((relayoutWindow(mWindowAttributes, viewVisibility, false ) & WindowManagerGlobal.RELAYOUT_RES_FIRST_TIME) != 0 ) { mWindowSession.finishDrawing( mWindow, null ); } } catch (RemoteException e) { } } destroySurface(); } } mAdded = false ; } WindowManagerGlobal.getInstance().doRemoveView(this ); }
在ViewRootImpl的dispatchDetachedFromWindow方法中会调用Session与WMS进行通信,然后执行移除的操作。
1 2 3 4 5 6 7 8 9 10 11 12 13 14 void removeWindow (Session session, IWindow client) synchronized (mGlobalLock) { WindowState win = windowForClientLocked(session, client, false ); if (win != null ) { win.removeIfPossible(); return ; } mEmbeddedWindowController.remove(client); } }
win.removeIfPossible方法和它的名字一样,并不是直接执行删除操作,而是进行多个条件判断过滤,满足其中一个条件就会return,推迟删除操作。比如V正在运行一个动画,这是就会推迟删除操作知道动画完成。然后调用removeImmediately方法。
1 2 3 4 5 6 7 8 9 10 11 12 13 14 15 16 17 18 19 20 21 22 23 24 25 26 27 28 void removeImmediately () super .removeImmediately(); if (mRemoved) { ProtoLog.v(WM_DEBUG_ADD_REMOVE, "WS.removeImmediately: %s Already removed..." , this ); return ; } mRemoved = true ; ...... final DisplayContent dc = getDisplayContent(); ...... dc.getDisplayPolicy().removeWindowLw(this ); disposeInputChannel(); mWinAnimator.destroyDeferredSurfaceLocked(); mWinAnimator.destroySurfaceLocked(); mSession.windowRemovedLocked(); ..... mWmService.postWindowRemoveCleanupLocked(this ); }
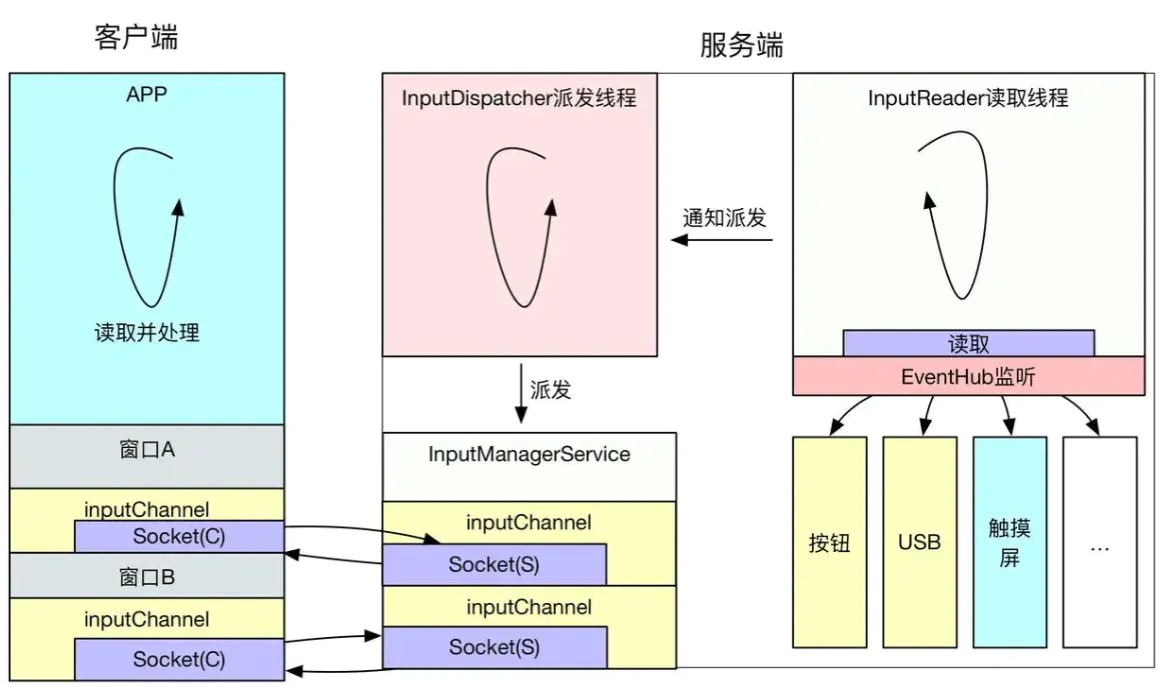
输入事件处理 安卓输入事件整体流程 Android 系统是由事件驱动的,而 input 是最常见的事件之一,用户的点击、滑动、长按等操作,都属于 input 事件驱动,其中的核心就是 InputReader 和 InputDispatcher。
在SystemServer的startOtherServices函数中,会新建一个InputManagerService对象,然后会作为参数传入到WMS中去。
1 2 3 4 inputManager = new InputManagerService(context); ...... wm = WindowManagerService.main(context, inputManager, !mFirstBoot, mOnlyCore, new PhoneWindowManager(), mActivityManagerService.mActivityTaskManager);
在ViewRootImpl的setView函数中,会先建立一个InputChannel对象。inputChannel是输入事件的信道,它ViewRootImpl和InputManagerService的沟通桥梁。
1 2 3 4 5 InputChannel inputChannel = null ; if ((mWindowAttributes.inputFeatures & WindowManager.LayoutParams.INPUT_FEATURE_NO_INPUT_CHANNEL) == 0 ) { inputChannel = new InputChannel(); }
inputChannel会通过mWindowSession.addToDisplayAsUser方法传入到WMS侧,并且与当前新建窗口WindowState建立起关系
1 2 3 4 if (openInputChannels) { //WindowState与InputChannel关联上了 win.openInputChannel(outInputChannel); }
之后代码运行到ViewRootImpl侧,这个时候就开始生成监听对象
1 2 3 4 5 6 7 8 9 10 11 if (inputChannel != null ) { if (mInputQueueCallback != null ) { mInputQueue = new InputQueue(); mInputQueueCallback.onInputQueueCreated(mInputQueue); } mInputEventReceiver = new WindowInputEventReceiver(inputChannel, Looper.myLooper()); } }
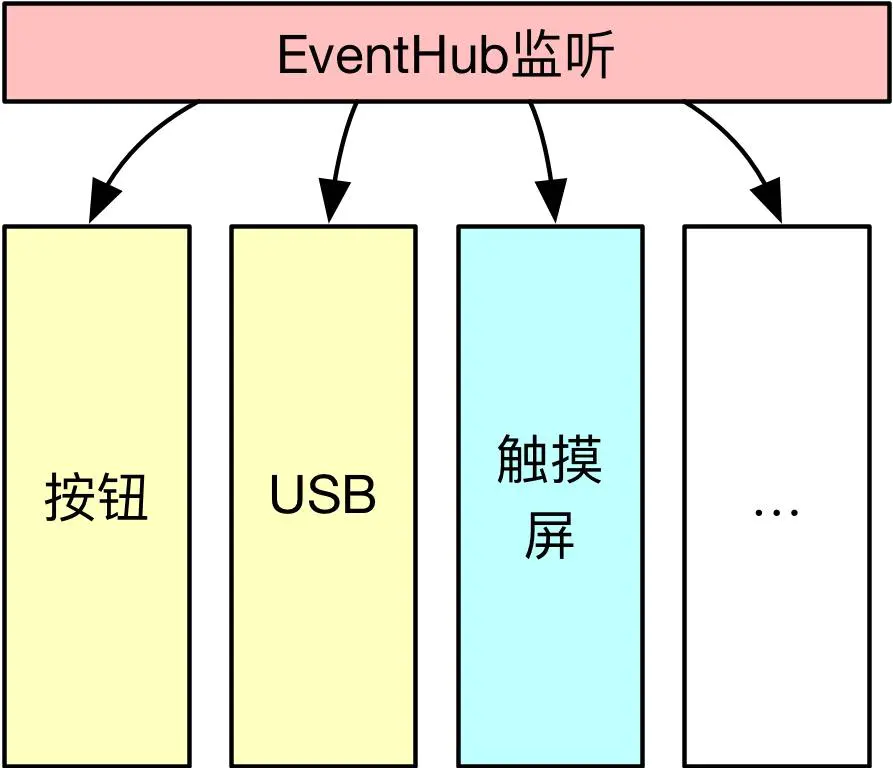
EventHub设备事件监听 它主要是利用Linux的inotify和epoll机制,监听设备事件:包括设备插拔及各种触摸、按钮事件等,可以看做是一个不同设备的集线器,主要面向的是/dev/input目录下的设备节点,比如说/dev/input/event0上的事件就是输入事件:
InputReader主要是负责不断的从EventHub读取事件,通知派发给InputDispatcher。
1 2 3 4 5 6 7 8 9 10 11 12 13 void InputReader::loopOnce () int32_t oldGeneration; int32_t timeoutMillis; bool inputDevicesChanged = false ; std ::vector <InputDeviceInfo> inputDevices; { ...... size_t count = mEventHub->getEvents(timeoutMillis, mEventBuffer, EVENT_BUFFER_SIZE); ...... mQueuedListener->flush(); }
1 2 3 4 5 6 7 8 9 10 11 12 13 14 void InputDispatcher::dispatchOnce () nsecs_t nextWakeupTime = LONG_LONG_MAX; { ...... if (runCommandsLockedInterruptible()) { nextWakeupTime = LONG_LONG_MIN; } ..... int timeoutMillis = toMillisecondTimeoutDelay(currentTime, nextWakeupTime); mLooper->pollOnce(timeoutMillis); }
以上就是派发线程的模型,dispatchOnceInnerLocked是具体的派发处理逻辑,这里看其中一个分支,触摸事件:
1 2 3 4 5 6 7 8 9 10 11 12 13 14 15 16 17 18 19 20 21 22 23 24 25 26 27 28 29 void InputDispatcher::dispatchOnceInnerLocked (nsecs_t * nextWakeupTime) ... case EventEntry::TYPE_MOTION: { MotionEntry* typedEntry = static_cast <MotionEntry*>(mPendingEvent); ... done = dispatchMotionLocked(currentTime, typedEntry, &dropReason, nextWakeupTime); break ; } bool InputDispatcher::dispatchMotionLocked ( nsecs_t currentTime, MotionEntry* entry, DropReason* dropReason, nsecs_t * nextWakeupTime) ... Vector<InputTarget> inputTargets; bool conflictingPointerActions = false ; int32_t injectionResult; if (isPointerEvent) { <!--关键点1 找到目标Window--> injectionResult = findTouchedWindowTargetsLocked(currentTime, entry, inputTargets, nextWakeupTime, &conflictingPointerActions); } else { injectionResult = findFocusedWindowTargetsLocked(currentTime, entry, inputTargets, nextWakeupTime); } ... <!--关键点2 派发--> dispatchEventLocked(currentTime, entry, inputTargets); return true ; }
从以上代码可以看出,对于触摸事件会首先通过findTouchedWindowTargetsLocked找到目标Window,进而通过dispatchEventLocked将消息发送到目标窗口,下面看一下如何找到目标窗口,以及这个窗口列表是如何维护的。
寻找目标窗口 Android系统能够同时支持多块屏幕,每块屏幕被抽象成一个DisplayContent对象,内部维护一个WindowList列表对象,用来记录当前屏幕中的所有窗口,包括状态栏、导航栏、应用窗口、子窗口等。对于触摸事件,我们比较关心可见窗口根据触摸事件的位置及窗口的属性来确定将事件发送到哪个窗口 ,当然其中的细节比一句话复杂的多,跟窗口的状态、透明、分屏等信息都有关系,下面简单瞅一眼,达到主观理解的流程就可以了,然后会调用到InputDispatcher#findTouchedWindowAtLocked
1 2 3 4 5 6 7 8 9 10 11 12 13 14 15 16 17 18 19 20 for (const sp<InputWindowHandle>& windowHandle : windowHandles) { const InputWindowInfo* windowInfo = windowHandle->getInfo(); if (windowInfo->displayId == displayId) { int32_t flags = windowInfo->layoutParamsFlags; if (windowInfo->visible) { if (!(flags & InputWindowInfo::FLAG_NOT_TOUCHABLE)) { bool isTouchModal = (flags & (InputWindowInfo::FLAG_NOT_FOCUSABLE | InputWindowInfo::FLAG_NOT_TOUCH_MODAL)) == 0 ; if (isTouchModal || windowInfo->touchableRegionContainsPoint(x, y)) { int32_t portalToDisplayId = windowInfo->portalToDisplayId; ...... return windowHandle; } } } }
mWindowHandles代表着所有窗口,找到了目标窗口,同时也将事件封装好了,剩下的就是通知目标窗口,可是有个最明显的问题就是,目前所有的逻辑都是在SystemServer进程,而要通知的窗口位于APP端的用户进程,那么如何通知呢?这里面采用的都是Socket的通信方式。
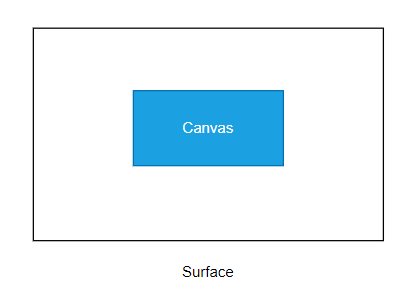
Surface的创建与操作 Surface的创建 在Android系统中每个Activity都有一个独立的画布(在应用侧称为Surface,在SurfaceFlinger侧称为Layer), 无论这个Activity安排了多么复杂的view结构,它们最终都是被画在了所属Activity的这块画布上。
Surface在应用端的新建 在 ViewRootImpl 创建时同时会 new 一个 Surface 对象
1 private final Surface mSurface = new Surface();
1 2 3 4 5 6 7 8 9 public class Surface implements Parcelable ...... private final Canvas mCanvas = new CompatibleCanvas();...... }
ViewRootImpl直接新建的Surface并没有直接大小
SurfaceControl SurfaceControl是创建Surface的辅助管理类,它在ViewRootImpl创建。
1 private final SurfaceControl mSurfaceControl = new SurfaceControl();
在setView的时候会调用relayoutWindow函数,由mWindowSession将内容传递给WMS端
1 2 3 4 5 6 7 8 9 10 11 12 private int relayoutWindow (WindowManager.LayoutParams params, int viewVisibility, boolean insetsPending) throws RemoteException ...... int relayoutResult = mWindowSession.relayout(mWindow, mSeq, params, (int ) (mView.getMeasuredWidth() * appScale + 0.5f ), (int ) (mView.getMeasuredHeight() * appScale + 0.5f ), viewVisibility, insetsPending ? WindowManagerGlobal.RELAYOUT_INSETS_PENDING : 0 , frameNumber, mTmpFrame, mTmpRect, mTmpRect, mTmpRect, mPendingBackDropFrame, mPendingDisplayCutout, mPendingMergedConfiguration, mSurfaceControl, mTempInsets, mTempControls, mSurfaceSize, mBlastSurfaceControl); ...... }
随着代码的执行让我们把视角切换到system_server进程(WMS的relayoutWindow函数),这里会调用createSurfaceControl去创建一个SurfaceControl:
1 2 3 4 5 6 7 8 9 10 11 12 public int relayoutWindow (Session session, IWindow client, int seq, LayoutParams attrs, int requestedWidth, int requestedHeight, int viewVisibility, int flags, long frameNumber, Rect outFrame, Rect outContentInsets, Rect outVisibleInsets, Rect outStableInsets, Rect outBackdropFrame, DisplayCutout.ParcelableWrapper outCutout, MergedConfiguration mergedConfiguration, SurfaceControl outSurfaceControl, InsetsState outInsetsState, InsetsSourceControl[] outActiveControls, Point outSurfaceSize, SurfaceControl outBLASTSurfaceControl) ...... result = createSurfaceControl(outSurfaceControl, outBLASTSurfaceControl, result, win, winAnimator); ...... }
SurfaceControl的创建过程,注意这里创建工作是调用winAnimator来完成的,注意下面那句surfaceController.getSurfaceControl会把创建出来的SurfaceControl通过形参outSurfaceControl传出去:
frameworks/base/services/core/java/com/android/server/wm/WindowManagerService.java
1 2 3 4 5 6 7 8 9 10 11 12 13 14 15 16 17 private int createSurfaceControl (SurfaceControl outSurfaceControl, SurfaceControl outBLASTSurfaceControl, int result, WindowState win, WindowStateAnimator winAnimator) ...... WindowSurfaceController surfaceController; try { Trace.traceBegin(TRACE_TAG_WINDOW_MANAGER, "createSurfaceControl" ); surfaceController = winAnimator.createSurfaceLocked(win.mAttrs.type, win.mOwnerUid); } finally { Trace.traceEnd(TRACE_TAG_WINDOW_MANAGER); } if (surfaceController != null ) { surfaceController.getSurfaceControl(outSurfaceControl); ...... } ...... }
我们先看下创建过程,创建了一个WindowSurfaceController,进而再创建SurfaceControll:
1 2 3 4 5 6 7 WindowSurfaceController createSurfaceLocked (int windowType, int ownerUid) { ...... mSurfaceController = new WindowSurfaceController(attrs.getTitle().toString(), width, height, format, flags, this , windowType, ownerUid); ...... }
WindowSurfaceController.java (frameworks\base\services\core\java\com\android\server\wm)
1 2 3 4 5 6 7 8 9 10 11 12 13 14 WindowSurfaceController(String name, int w, int h, int format, int flags, WindowStateAnimator animator, int windowType, int ownerUid) { ...... final SurfaceControl.Builder b = win.makeSurface() .setParent(win.getSurfaceControl()) .setName(name) .setBufferSize(w, h) .setFormat(format) .setFlags(flags) .setMetadata(METADATA_WINDOW_TYPE, windowType) .setMetadata(METADATA_OWNER_UID, ownerUid) .setCallsite("WindowSurfaceController" ); ...... }
在WMS端SurfaceControl以形参outSurfaceControl传出,然后在ViewRootImpl侧,通过Surface的copyFrom方法,将内容写入到mSurface,此时surface正式新建完毕。
1 2 3 4 5 6 7 8 9 10 private int relayoutWindow (WindowManager.LayoutParams params, int viewVisibility, boolean insetsPending) throws RemoteException ...... if (mSurfaceControl.isValid()) { if (!useBLAST()) { mSurface.copyFrom(mSurfaceControl); } } ...... }
图层Layer创建 具体流程如下:
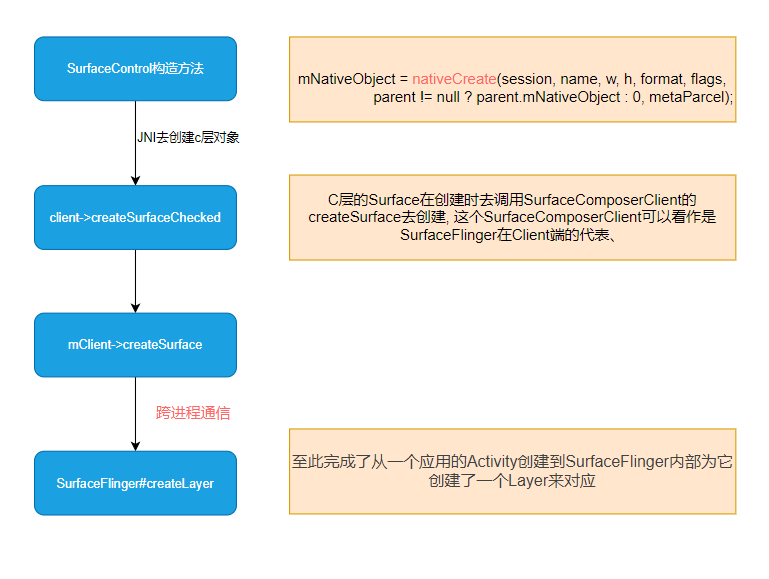
1 2 3 4 5 6 7 8 private SurfaceControl (SurfaceSession session, String name, int w, int h, int format, int flags, SurfaceControl parent, SparseIntArray metadata, WeakReference<View> localOwnerView, String callsite ) ...... mNativeObject = nativeCreate(session, name, w, h, format, flags, parent != null ? parent.mNativeObject : 0 , metaParcel); ...... }
android_view_SurfaceControl.cpp (frameworks\base\core\jni)
1 2 3 4 5 6 7 8 9 10 11 static jlong nativeCreate (JNIEnv* env, jclass clazz, jobject sessionObj, jstring nameStr, jint w, jint h, jint format, jint flags, jlong parentObject, jobject metadataParcel) ScopedUtfChars name (env, nameStr) ; ...... sp<SurfaceComposerClient> client; ...... status_t err = client->createSurfaceChecked ( String8 (name.c_str ()), w, h, format, &surface, flags, parent, std::move (metadata)); ...... }
C层的Surface在创建时去调用SurfaceComposerClient的createSurface去创建, 这个SurfaceComposerClient可以看作是SurfaceFlinger在Client端的代表
android_view_SurfaceControl.cpp (frameworks\base\core\jni)
1 2 3 4 5 6 7 8 9 10 status_t SurfaceComposerClient::createSurfaceChecked (const String8& name, uint32_t w, uint32_t h, PixelFormat format, sp<SurfaceControl>* outSurface, uint32_t flags, SurfaceControl* parent, LayerMetadata metadata, uint32_t * outTransformHint) ...... err = mClient->createSurface (name, w, h, format, flags, parentHandle, std::move (metadata), &handle, &gbp, &transformHint); ...... }
SurfaceComposerClient.cpp (frameworks\native\libs\gui)
1 2 3 4 5 6 7 8 9 10 11 12 13 14 15 16 17 18 19 20 sp<SurfaceControl> SurfaceComposerClient::createSurface (const String8& name, uint32_t w, uint32_t h, PixelFormat format, uint32_t flags, SurfaceControl* parent, LayerMetadata metadata, uint32_t * outTransformHint) sp<SurfaceControl> s; createSurfaceChecked (name, w, h, format, &s, flags, parent, std::move (metadata), outTransformHint); return s; } status_t SurfaceComposerClient::createSurfaceChecked (const String8& name, uint32_t w, uint32_t h, PixelFormat format, sp<SurfaceControl>* outSurface, uint32_t flags, SurfaceControl* parent, LayerMetadata metadata, uint32_t * outTransformHint) ....... err = mClient->createSurface (name, w, h, format, flags, parentHandle, std::move (metadata), &handle, &gbp, &transformHint); ....... }
跨进程呼叫SurfaceFlinger:
ISurfaceComposerClient.cpp (frameworks\native\libs\gui)
1 2 3 4 5 6 7 8 9 10 11 status_t createSurface (const String8& name, uint32_t width, uint32_t height, PixelFormat format, uint32_t flags, const sp<IBinder>& parent, LayerMetadata metadata, sp<IBinder>* handle, sp<IGraphicBufferProducer>* gbp, uint32_t * outTransformHint) override return callRemote<decltype (&ISurfaceComposerClient::createSurface)>(Tag::CREATE_SURFACE, name, width, height, format, flags, parent, std::move (metadata), handle, gbp, outTransformHint); }
然后流程就来到了SurfaceFlinger进程,由于SurfaceFlinger支持很多不同类型的Layer, 这里我们只以BufferQueueLayer为例, 当SurfaceFlinger收到这个远程调用后会new 一个BufferQueueLayer出来。
SurfaceFlinger.cpp (frameworks\native\services\surfaceflinger)
1 2 3 4 5 6 7 8 9 10 11 12 tatus_t SurfaceFlinger::createLayer (const String8& name, const sp<Client>& client, uint32_t w, uint32_t h, PixelFormat format, uint32_t flags, LayerMetadata metadata, sp<IBinder>* handle, sp<IGraphicBufferProducer>* gbp, const sp<IBinder>& parentHandle, const sp<Layer>& parentLayer, uint32_t * outTransformHint) ...... case ISurfaceComposerClient::eFXSurfaceBufferQueue: result = createBufferQueueLayer (client, std::move (uniqueName), w, h, flags, std::move (metadata), format, handle, gbp, &layer); ...... }
Surface的操作 Surface操作简介 Surface对象后怎么就能拿到帧缓冲区的操作接口呢?我们来看Surface的实现:
1 2 3 4 5 6 7 public class Surface implements Parcelable ...... private static native long nativeLockCanvas (long nativeObject, Canvas canvas, Rect dirty) throws OutOfResourcesException ; private static native void nativeUnlockCanvasAndPost (long nativeObject, Canvas canvas) ...... }
nativeLockCanvas这个方法对应的是出队dequeueBuffer,从队列中取到Buffer也就是画布;
对画布操作 当我们接收到同步信号的时候会调用ViewRootImpl的performTraversals,最后会调用到drawSoftware,在这个函数中会拿到画布然后分发draw事件,之后的内容就是WMS第一堂课中10.1。
1 2 3 4 5 6 7 8 9 10 private boolean drawSoftware (Surface surface, AttachInfo attachInfo, int xoff, int yoff, boolean scalingRequired, Rect dirty, Rect surfaceInsets) ...... canvas = mSurface.lockCanvas(dirty); ...... mView.draw(canvas); ...... }
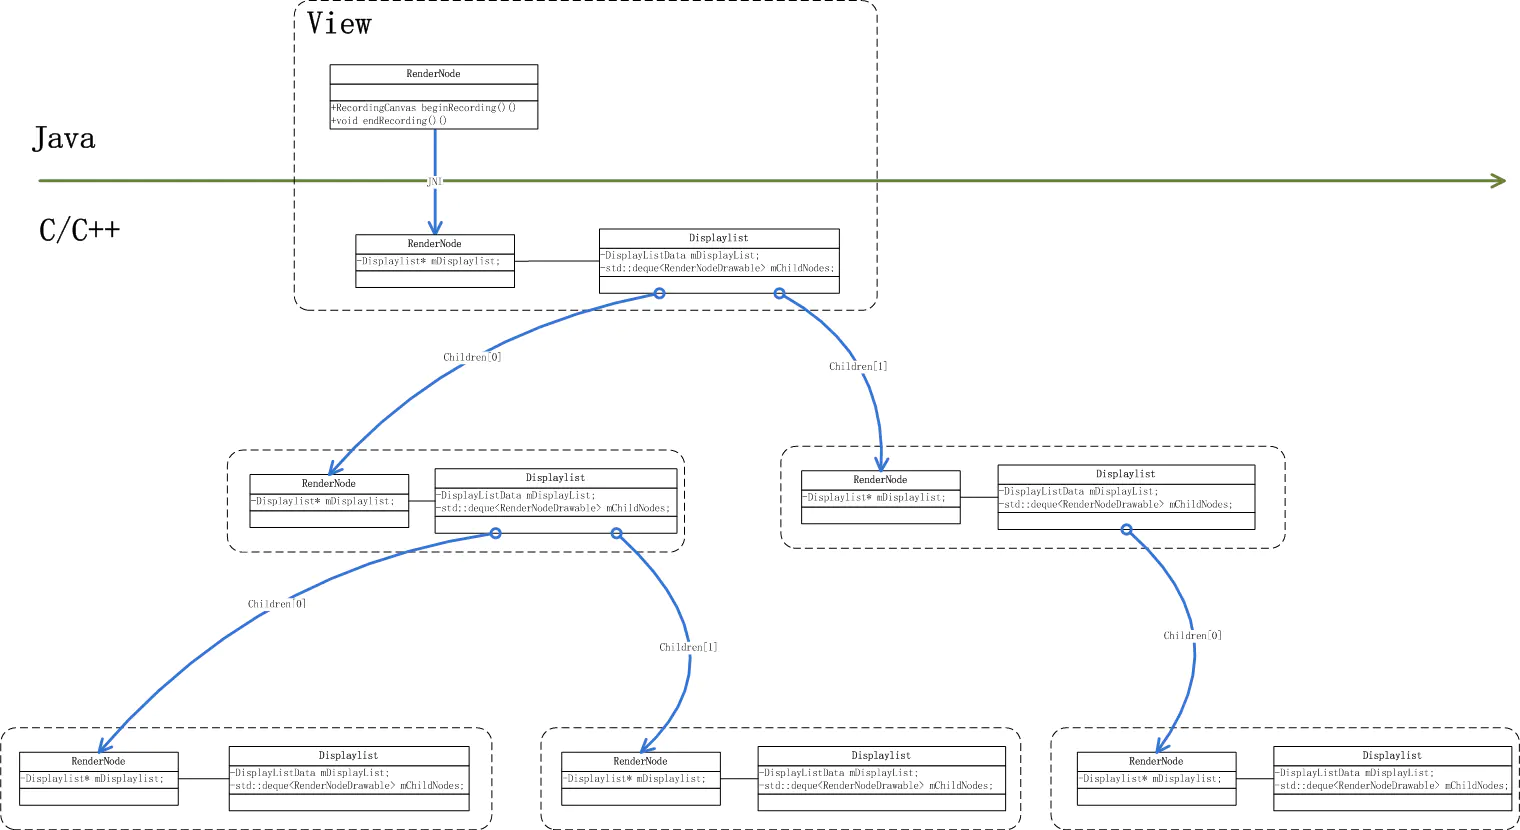
在View的onDraw方法中,会将界面信息转化为RenderNode,类似于Html的Element。
1 2 3 4 5 6 7 8 public RenderNode updateDisplayListIfDirty () ...... final RecordingCanvas canvas = renderNode.beginRecording(width, height); ...... draw(canvas); ...... }
上面的RecordingCanvas就是扮演一个绘图指令的记录员角色,它会将这个View通过draw函数绘制的指令以displaylist形式记录下来。
1 2 3 4 5 6 7 8 9 10 11 12 13 14 class DisplayListData final { ...... void drawPath (const SkPath&, const SkPaint&) void drawRect (const SkRect&, const SkPaint&) void drawRegion (const SkRegion&, const SkPaint&) void drawOval (const SkRect&, const SkPaint&) void drawArc (const SkRect&, SkScalar, SkScalar, bool , const SkPaint&) ...... template <typename T, typename ... Args> void * push (size_t , Args&&...) ...... SkAutoTMalloc<uint8_t > fBytes; ...... }
它的组成大体可以看成三个部分,第一部分是一堆以draw打头的函数,它们是最基本的绘图指令,比如画一条线, 画一个矩形,画一段圆弧等等,上面我们摘取了其中几个,后面我们将以drawRect为例来看它是如何工作的; 第二部分是一个push模版函数,后面我们会看到它的作用; 第三个是一块存储区fBytes,它会根据需要放大存储区的大小。
提交画布内容 当所有的View的displaylist建立完成后,代码会来到:
1 2 3 int RenderProxy::syncAndDrawFrame () return mDrawFrameTask.drawFrame (); }
DrawFrameTask.cpp (frameworks\base\libs\hwui\renderthread)
1 2 3 4 5 void DrawFrameTask::postAndWait () AutoMutex _lock(mLock); mRenderThread->queue ().post ([this ]() { run (); }); mSignal.wait (mLock); }
这边可以看到UI线程的工作到此结束,它丢了一个叫DrawFrameTask的任务到RenderThread线程中去,之后画面绘制的工作转移到RenderThread中来:
1 2 3 4 5 void DrawFrameTask::run () ..... context->draw (); ..... }
CanvasContext.cpp (frameworks\base\libs\hwui\renderthread)
1 2 3 4 5 6 7 8 9 10 11 12 13 14 void CanvasContext::draw() { ...... Frame frame = mRenderPipeline->getFrame(); ...... bool drew = mRenderPipeline->draw(frame, windowDirty, dirty, mLightGeometry, &mLayerUpdateQueue, mContentDrawBounds, mOpaque, mLightInfo, mRenderNodes, &(profiler())); ...... waitOnFences(); ...... bool didSwap = mRenderPipeline->swapBuffers(frame, drew, windowDirty, mCurrentFrameInfo, &requireSwap); ...... }
在这个函数中完成了三个重要的动作,一个是通过getFrame调到了Surface的dequeueBuffer向SurfaceFlinger申请了画布, 第二是通过mRenderPipeline->draw将画面画到申请到的画布上, 第三是通过调mRenderPipeline->swapBuffers把画布提交到SurfaceFlinger去显示。
