热修复是指,在应用上线后出现 bug 需要及时修复时,不用再发新的安装包,只需要发布补丁包,在客户无感知下修复掉 bug。补丁包需要由开发者生成,由服务器管理并下发补丁包到用户的设备上执行热修复。
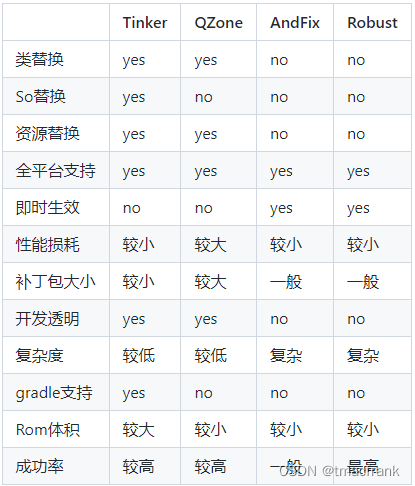
热修复方案 热修复解决方案对比:
框架都会用到反射 + 类加载技术,只不过使用方式不同呈现的效果也不同。通过类替换实现的热修复方案都不是即时生效的,需要重启应用后才能生效,而非类替换的方案可以做到即时生效,但实现方式有所不同,下面简单看看各方案的实现原理。
AndFix AndFix 会在 native 层动态替换 Java 层的方法属性,通过 native 层 hook Java 层的代码。
首先,在补丁包的源文件中要对需要修改的方法打上 @MethodReplace 注解,注明要替换的类名和方法名:
1
2
3
4
5
6
7
@Target(ElementType.METHOD) @Retention(RetentionPolicy.RUNTIME) public @interface MethodReplace { String clazz () ; String method () ; }
方法写好后编译生成 class 再打包成 dex 文件。然后 AndFix 会在 Java 层通过 DexFile 加载这个补丁包中的 dex 文件,遍历其中的 Class:
1 2 3 4 5 6 7 8 9 10 11 12 13 14 15 16 17 18 19 20 21 22 23 24 25 26 27 28 29 30 31 32 33 34 35 36 37 38 39 40 41 42 43 44 45 46 47 48 49 50 51 52 53 54 55 public synchronized void fix (File file, ClassLoader classLoader, List<String> classes) ... try { File optfile = new File(mOptDir, file.getName()); ... final DexFile dexFile = DexFile.loadDex(file.getAbsolutePath(), optfile.getAbsolutePath(), Context.MODE_PRIVATE); ClassLoader patchClassLoader = new ClassLoader(classLoader) { @Override protected Class<?> findClass(String className) throws ClassNotFoundException { Class<?> clazz = dexFile.loadClass(className, this ); if (clazz == null && className.startsWith("com.alipay.euler.andfix" )) { return Class.forName(className); } if (clazz == null ) { throw new ClassNotFoundException(className); } return clazz; } }; Enumeration<String> entrys = dexFile.entries(); Class<?> clazz = null ; while (entrys.hasMoreElements()) { String entry = entrys.nextElement(); if (classes != null && !classes.contains(entry)) { continue ; } clazz = dexFile.loadClass(entry, patchClassLoader); if (clazz != null ) { fixClass(clazz, classLoader); } } } catch (IOException e) { Log.e(TAG, "pacth" , e); } }
遍历类里面声明的所有方法,筛选出被 @MethodReplace 注解标记的方法,从中获得要替换的类名+方法名,以便进行替换:
1
2
3
4
5
6
7
8
9
10
11
12
13
14
15
16
17
18
19
20
private void fixClass (Class<?> clazz, ClassLoader classLoader) Method[] methods = clazz.getDeclaredMethods(); MethodReplace methodReplace; String clz; String meth; for (Method method : methods) { methodReplace = method.getAnnotation(MethodReplace.class); if (methodReplace == null ) continue ; clz = methodReplace.clazz(); meth = methodReplace.method(); if (!isEmpty(clz) && !isEmpty(meth)) { replaceMethod(classLoader, clz, meth, method); } } }
replaceMethod() 会对已经修复过的类做缓存处理,真正执行修复操作的是 addReplaceMethod():
1 2 3 4 5 6 7 8 9 10 11 12 13 14 15 16 17 18 19 20 21 22 23 24 25 26 27 28 29 30 31 32 33 34 private static Map<String, Class<?>> mFixedClass = new ConcurrentHashMap<String, Class<?>>();private void replaceMethod (ClassLoader classLoader, String clz, String meth, Method method) try { String key = clz + "@" + classLoader.toString(); Class<?> clazz = mFixedClass.get(key); if (clazz == null ) { Class<?> clzz = classLoader.loadClass(clz); clazz = AndFix.initTargetClass(clzz); } if (clazz != null ) { mFixedClass.put(key, clazz); Method src = clazz.getDeclaredMethod(meth, method.getParameterTypes()); AndFix.addReplaceMethod(src, method); } } catch (Exception e) { Log.e(TAG, "replaceMethod" , e); } }
在 addReplaceMethod() 中会通过一个 native 方法执行方法体的替换:
1 2 3 4 5 6 7 8 9 10 11 12 13 14 15 16 17 18 19 public static void addReplaceMethod (Method src, Method dest) try { replaceMethod(src, dest); initFields(dest.getDeclaringClass()); } catch (Throwable e) { Log.e(TAG, "addReplaceMethod" , e); } } private static native void replaceMethod (Method dest, Method src)
ative 的 replaceMethod() 主要是对 ArtMethod 结构体的属性进行替换:
1
2
3
4
5
6
7
8
9
10
11
12
13
14
15
16
17
18
19
20
21
22
23
24
25
26
27
28
29
30
31
32
33
34
35
36
37
38
39
40
void replace_4_4 (JNIEnv* env, jobject src, jobject dest) art::mirror::ArtMethod* smeth = (art::mirror::ArtMethod*) env->FromReflectedMethod (src); art::mirror::ArtMethod* dmeth = (art::mirror::ArtMethod*) env->FromReflectedMethod (dest); dmeth->declaring_class_->class_loader_ = smeth->declaring_class_->class_loader_; dmeth->declaring_class_->clinit_thread_id_ = smeth->declaring_class_->clinit_thread_id_; dmeth->declaring_class_->status_ = smeth->declaring_class_->status_-1 ; reinterpret_cast <art::mirror::Class*>(dmeth->declaring_class_)->super_class_ = 0 ; smeth->declaring_class_ = dmeth->declaring_class_; smeth->dex_cache_initialized_static_storage_ = dmeth->dex_cache_initialized_static_storage_; smeth->access_flags_ = dmeth->access_flags_ | 0x0001 ; smeth->dex_cache_resolved_types_ = dmeth->dex_cache_resolved_types_; smeth->dex_cache_resolved_methods_ = dmeth->dex_cache_resolved_methods_; smeth->dex_cache_strings_ = dmeth->dex_cache_strings_; smeth->code_item_offset_ = dmeth->code_item_offset_; smeth->core_spill_mask_ = dmeth->core_spill_mask_; smeth->fp_spill_mask_ = dmeth->fp_spill_mask_; smeth->method_dex_index_ = dmeth->method_dex_index_; smeth->mapping_table_ = dmeth->mapping_table_; smeth->method_index_ = dmeth->method_index_; smeth->gc_map_ = dmeth->gc_map_; smeth->frame_size_in_bytes_ = dmeth->frame_size_in_bytes_; smeth->native_method_ = dmeth->native_method_; smeth->vmap_table_ = dmeth->vmap_table_; smeth->entry_point_from_compiled_code_ = dmeth->entry_point_from_compiled_code_; smeth->entry_point_from_interpreter_ = dmeth->entry_point_from_interpreter_; smeth->method_index_ = dmeth->method_index_; }
从 AndFix 的源码中能看出,ART 虚拟机(从 4.4 开始)上的每一个系统版本都需要对 ArtMethod 结构体进行适配,在适配到 7.0 之后 AndFix 便停更了。
Robust Robust 也是会即时生效的热修复框架,但是它是在 Java 层实现的,并没有 native 的处理。
Robust 会在编译打包阶段对每个方法自动插入一段代码(字节码插桩),类似于代理,将方法执行的代码重定向到其它方法,这个插入过程对业务开发是完全透明的。
比如说 State.java 的 getIndex() 内容如下:
1
2
3
public long getIndex () return 100 ; }
经过 Robust 处理后变成下面这样:
1
2
3
4
5
6
7
8
9
10
11
public static ChangeQuickRedirect changeQuickRedirect; public long getIndex () if (changeQuickRedirect != null ) { if (PatchProxy.isSupport(new Object[0 ], this , changeQuickRedirect, false )) { return ((Long)PatchProxy.accessDispatch(new Object[0 ], this , changeQuickRedirect, false )).longValue(); } } return 100L ; }
Robust 为每个 class 增加了一个类型为 ChangeQuickRedirect 的静态成员,在每个方法前都插入了使用 changeQuickRedirect 相关的逻辑。当 changeQuickRedirect 不为 null 时,可能会执行到 accessDispatch 从而替换掉之前老的逻辑,达到 fix 的目的。
想要修改 getIndex() 的返回值,补丁包中需要包含如下两个源文件:
1
2
3
4
5
6
7
8
9
public class PatchesInfoImpl implements PatchesInfo public List<PatchedClassInfo> getPatchedClassesInfo () List<PatchedClassInfo> patchedClassesInfos = new ArrayList<PatchedClassInfo>(); PatchedClassInfo patchedClass = new PatchedClassInfo("com.meituan.sample.d" , StatePatch.class.getCanonicalName()); patchedClassesInfos.add(patchedClass); return patchedClassesInfos; } }
1
2
3
4
5
6
7
8
9
10
11
12
13
14
15
16
17
18
19
20
public class StatePatch implements ChangeQuickRedirect @Override public Object accessDispatch (String methodSignature, Object[] paramArrayOfObject) String[] signature = methodSignature.split(":" ); if (TextUtils.equals(signature[1 ], "a" )) { return 106 ; } return null ; } @Override public boolean isSupport (String methodSignature, Object[] paramArrayOfObject) String[] signature = methodSignature.split(":" ); if (TextUtils.equals(signature[1 ], "a" )) { return true ; } return false ; } }
打补丁的主要过程为:
ClassLoader 加载补丁的 dex 文件,拿到 PatchesInfoImpl.class 并创建一个对应的 Class 对象
反射调用 getPatchedClassesInfo(),拿到需要打补丁的类名,再反射拿到这个类的 Class 对象
反射上一步中 Class 对象的 changeQuickRedirect 字段,并赋值为补丁包 dex 文件中 StatePatch.class new 出来的对象。
以上过程没有动系统的 ClassLoader,都是直接使用,兼容性得以保证。
更详细内容可以直接参考美团技术团队对 Robust 的介绍文章链接Android热更新方案Robust 。
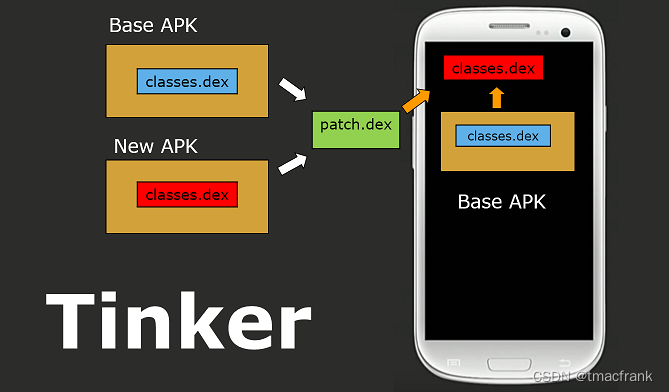
Tinker Tinker 的补丁包与前两者不同,它是一个差分包而不是完整的 dex 文件。这个差分包是计算了指定的 base apk(一般就是设备正在运行的 apk)的 dex 与修改后 apk 的 dex 的区别的描述,运行时将 base apk 的 dex 与差分包进行合成,重启后加载全新合成的 dex 文件:
图片来源:微信Tinker的一切都在这里,包括源码(一)
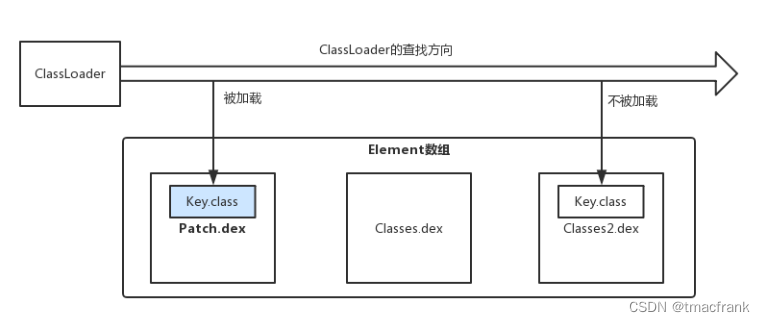
Tinker 实现热修复的原理,是将补丁包的 dex 文件存放到系统的 PathClassLoader 的 pathList 字段的 dexElements 数组的前面:
由于 ClassLoader 加载 dexElements 数组中的类是按照由先到后的顺序,且加载过的类不会重复加载,所以补丁包的 Key.class 生效,原本 Classes2.dex 中的 Key.class 不会被加载,使得修复生效。参考 Tinker 代码:
1 2 3 4 5 6 7 8 9 10 11 12 13 14 15 16 17 18 19 20 21 22 23 24 25 26 27 28 29 30 31 32 33 34 35 36 37 38 39 40 41 42 43 44 45 46 47 48 49 50 51 52 53 54 55 56 57 58 59 60 61 62 63 64 65 66 67 68 69 70 static void injectDexesInternal (ClassLoader cl, List<File> dexFiles, File optimizeDir) throws Throwable if (Build.VERSION.SDK_INT >= 23 ) { V23.install(cl, dexFiles, optimizeDir); } else if (Build.VERSION.SDK_INT >= 19 ) { V19.install(cl, dexFiles, optimizeDir); } else if (Build.VERSION.SDK_INT >= 14 ) { V14.install(cl, dexFiles, optimizeDir); } else { V4.install(cl, dexFiles, optimizeDir); } } private static final class V23 private static void install (ClassLoader loader, List<File> additionalClassPathEntries, File optimizedDirectory) throws IllegalArgumentException, IllegalAccessException, NoSuchFieldException, InvocationTargetException, NoSuchMethodException, IOException { Field pathListField = ShareReflectUtil.findField(loader, "pathList" ); Object dexPathList = pathListField.get(loader); ArrayList<IOException> suppressedExceptions = new ArrayList<IOException>(); ShareReflectUtil.expandFieldArray(dexPathList, "dexElements" , makePathElements(dexPathList, new ArrayList<File>(additionalClassPathEntries), optimizedDirectory, suppressedExceptions)); if (suppressedExceptions.size() > 0 ) { for (IOException e : suppressedExceptions) { ShareTinkerLog.w(TAG, "Exception in makePathElement" , e); throw e; } } } private static Object[] makePathElements( Object dexPathList, ArrayList<File> files, File optimizedDirectory, ArrayList<IOException> suppressedExceptions) throws IllegalAccessException, InvocationTargetException, NoSuchMethodException { Method makePathElements; try { makePathElements = ShareReflectUtil.findMethod(dexPathList, "makePathElements" , List.class, File.class, List.class); } catch (NoSuchMethodException e) { ShareTinkerLog.e(TAG, "NoSuchMethodException: makePathElements(List,File,List) failure" ); try { makePathElements = ShareReflectUtil.findMethod(dexPathList, "makePathElements" , ArrayList.class, File.class, ArrayList.class); } catch (NoSuchMethodException e1) { ShareTinkerLog.e(TAG, "NoSuchMethodException: makeDexElements(ArrayList,File,ArrayList) failure" ); try { ShareTinkerLog.e(TAG, "NoSuchMethodException: try use v19 instead" ); return V19.makeDexElements(dexPathList, files, optimizedDirectory, suppressedExceptions); } catch (NoSuchMethodException e2) { ShareTinkerLog.e(TAG, "NoSuchMethodException: makeDexElements(List,File,List) failure" ); throw e2; } } } return (Object[]) makePathElements.invoke(dexPathList, files, optimizedDirectory, suppressedExceptions); } }
热修复的兼容问题 从上述热修复框架的介绍中不难发现,热修复对兼容性的要求是很高的,最明显的就是,如果反射了系统源码,就要跟随版本对系统源码的变化做兼容处理。除了源码的变化,系统机制的变化也会对热修复的兼容性产生影响。
Android N混合编译 ART 虚拟机是在 Android KitKat(4.4) 被引入的,并从 Android L(5.0) 开始被设为默认运行环境。
Android N(7.0)之前,ART 在安装 apk 时会采用 AOT(Ahead of time:提前编译、静态编译)预编译为机器码。
而从 Android N 开始,使用混合编译模式,即安装 apk 时不编译,运行时解释字节码,同时在 JIT (Just-In-Time:即时编译)编译热点代码(即频繁执行的代码)并将这些代码信息记录至 Profile 文件,在设备空闲时使用 AOT(All-Of-the-Time compilation:全时段编译)编译生成名为 app_image 的 base.art(类对象映像)文件,该文件会在 apk 下次启动时自动加载(相当于缓存)。
根据 Android 的类加载机制,已经被加载过的类无法被替换,使得无法通过热修复修正这些类(启动 apk 时,在 ActivityThread 创建 PathClassLoader 时就会先加载 app_image 中的类,随后才执行热修复的代码,所以被编译进 app_image 的类无法被热修复)。
Tinker 的解决方案是自己创建一个 PathClassLoader 替换掉系统的:
1
2
3
4
5
6
7
8
9
10
11
12
13
14
15
16
17
public class SystemClassLoaderAdder public static void installDexes (Application application, ClassLoader loader, File dexOptDir, List<File> files, boolean isProtectedApp, boolean useDLC) throws Throwable if (!files.isEmpty()) { files = createSortedAdditionalPathEntries(files); ClassLoader classLoader = loader; if (Build.VERSION.SDK_INT >= 24 && !isProtectedApp) { classLoader = NewClassLoaderInjector.inject(application, loader, dexOptDir, useDLC, files); } else { injectDexesInternal(classLoader, files, dexOptDir); } ... } } }
Dalvik 虚拟机的 CLASS_ISPREVERIFIED 标记 我们仿照 Tinker 写一个热修复 Demo,在 4.4 系统上运行(4.4 默认用的还是 Dalvik 虚拟机):
1 2 3 4 5 6 7 8 9 10 11 12 13 14 15 16 17 18 19 20 21 22 23 24 25 26 27 28 29 30 31 32 33 34 35 36 37 38 39 40 41 42 43 44 45 46 47 48 49 50 51 52 53 54 55 56 57 58 59 public static void installPatch (Application application, File patch) ClassLoader classLoader = application.getClassLoader(); if (Build.VERSION.SDK_INT >= Build.VERSION_CODES.N) { try { ClassLoaderInjector.inject(application, classLoader, patchs); } catch (Throwable throwable) { } return ; } try { Field pathListField = ShareReflectUtil.findField(classLoader, "pathList" ); Object pathList = pathListField.get(classLoader); Field dexElementsField = ShareReflectUtil.findField(pathList, "dexElements" ); Object[] oldElements = (Object[]) dexElementsField.get(pathList); Object[] patchElements = null ; if (Build.VERSION.SDK_INT >= Build.VERSION_CODES.M) { Method makePathElements = ShareReflectUtil.findMethod(pathList, "makePathElements" , List.class, File.class, List.class); ArrayList<IOException> ioExceptions = new ArrayList<>(); patchElements = (Object[]) makePathElements.invoke(pathList, patchs, application.getCacheDir(), ioExceptions); } else if (Build.VERSION.SDK_INT >= Build.VERSION_CODES.KITKAT) { Method makePathElements = ShareReflectUtil.findMethod(pathList, "makeDexElements" , ArrayList.class, File.class, ArrayList.class); ArrayList<IOException> ioExceptions = new ArrayList<>(); patchElements = (Object[]) makePathElements.invoke(pathList, patchs, application.getCacheDir(), ioExceptions); } Object[] newElements = (Object[]) Array.newInstance(oldElements.getClass().getComponentType(), oldElements.length + patchElements.length); System.arraycopy(patchElements, 0 , newElements, 0 , patchElements.length); System.arraycopy(oldElements, 0 , newElements, patchElements.length, oldElements.length); dexElementsField.set(pathList, newElements); } catch (Exception e) { e.printStackTrace(); } }
会发现抛出如下错误:
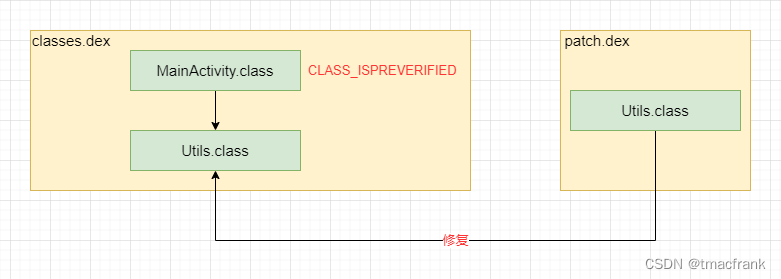
这是因为,被标记了 CLASS_ISPREVERIFIED 的类,引用了不在同一个 dex 文件中的类。如果一个类只引用了(正向调用,反射不算,因为反射不需要一个类的引用就用获取到该类对象)同一个 dex 文件中的类,那么在打包 dex 文件时,这个类就会被打上 CLASS_ISPREVERIFIED 标记(这个机制属于 Dalvik 虚拟机的一个优化):
比如说 MainActivity 只引用了 Utils,且二者在同一个 dex 文件中,那么 MainActivity.class 就会被打上 CLASS_ISPREVERIFIED 标记。
在热修复时,会用 patch.dex 中的 Utils.class 去替换 classes.dex 中的 Utils.class,导致 MainActivity 引用了不同 dex 文件中的类,就会抛出 IllegalAccessError。
如何规避掉这个错误呢?那就尝试让 MainActivity 引用不同 dex 文件中的类,这样它就打不上 CLASS_ISPREVERIFIED 标记,再引用其它 dex 中的类也就不会出错了。具体做法是:
在补丁包中创建一个专门被引用的空类 AntiLazyLoad
通过字节码插桩的方式在 MainActivity.class 的构造方法中添加引用 AntiLazyLoad 的代码
将 AntiLazyLoad 这个类添加到负责加载 classes.dex 的那个 ClassLoader 中
上述过程可以通过打补丁包的方式实现,做法是:
自定义 Gradle 插件打补丁包 我们写一个通过 Gradle 插件 + ASM 字节码插桩的自动化补丁 Demo 来解决上面的问题。
实现自动化补丁需要有两个前置知识:
熟悉 Android Gradle Plugin(AGP)的基础知识(可参考为什么说 Gradle 是 Android 进阶绕不去的坎 )
知道如何通过 ASM 实现字节码插桩(可参考ASM 字节码插桩入门 )
此外,由于 AGP 的向后兼容性很弱,所以这里先声明 Demo 中使用的 Gradle 版本是 4.10.1,AGP 版本是 3.3.1(版本确实老了点),如果你所使用的版本高于上述版本,可能部分 API 不兼容(比如说你的 AS 升级到了 AS BumbleBee,其支持最低的 Gradle 版本为 6.1.1,那么本文章中的示例代码就无法运行),但是处理问题的思路应该是大致相同的。关于 Gradle 与 AGP 的版本对照表,可以参考下图:
此外,下面做 Demo 演示时只会编译 debug 版本,所以涉及到的任务名都是以 debug 为准,比如编译 Java 源文件为 class 文件的任务名,在编译 debug 时为 compileDebugJavaWithJavac,而编译 Release 版本时就为 compileReleaseJavaWithJavac,如果还配置了其它变体,如 Xxx,那么编译该变体的任务就是 compileXxxJavaWithJavac。
实现思路 我们的目的是自定义一个 Gradle 任务,自动为两次编译之间发生了变化的 class 文件进行字节码插桩,再通过 dx/d8 命令将 class 文件打包成 dex 文件后放入补丁包。
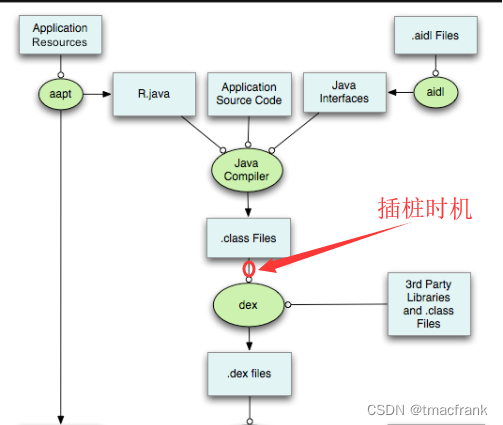
如上图所示,在由 Java 源文件生成 dex 文件的过程中,其实是经过了几个 Gradle 任务处理的:
compileDebugJavaWithJavac 将 Java 源文件编译成 class 文件
transformClassesAndResourcesWithProguardForDebug 对 class 文件进行混淆
transformClassesWithDexBuilderForDebug 将混淆后的 class 文件打包进 dex 文件
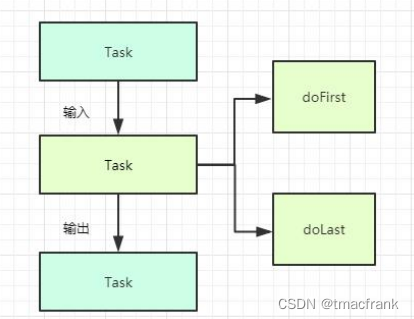
每个任务都有输入和输出,以及 doFirst 和 doLast 两个监听:
比如混淆任务 transformClassesAndResourcesWithProguardForDebug 的输入,是所有模块的 compileDebugJavaWithJavac 任务输出的 class 文件,输出就是混淆后的 class,这些 class 就是 transformClassesWithDexBuilderForDebug 任务的输入。
而 doFirst/doLast 可以理解为任务的入口/出口监听,会分别在刚进入任务还没开始执行任务功能、已经执行完任务功能即将结束任务时回调。在 Demo 中常用 doFirst 来获取上一个任务的输出文件,用 doLast 获取当前任务的输出文件,后面结合具体思路以及代码能看的更清楚些。
此外必须要明确的是,对于热修复而言,我们只需要在补丁包中加入相比于正式版本进行过修改的 class 文件,而不是本次编译生成的所有 class 文件,所以我们在每次编译时都应该用一个文件保存 class 文件的 md5 值,如果本次编译与正式版本的 md5 不同,那么该 class 文件才需要放进补丁包。
还有,如果编译开启了混淆,为了保证每次编译时,同一个文件被混淆成相同的名字,需要保存正式版本编译时使用的 mapping.txt 文件,并在后续编译中使用该 mapping。
经过以上论述呢,我们可以理出一个大致的思路:
如果开启了混淆,transformClassesAndResourcesWithProguardForDebug 任务进行混淆时需要使用之前备份的 mapping 文件,并且在任务的 doLast 中备份本次混淆的 mapping 作为下次的参考
transformClassesWithDexBuilderForDebug 的输入是混淆后的 class/jar 文件,在将它们打包成 dex 之前,即在 doFirst 中,进行插桩,并通过与之前备份的 md5 值文件对比筛选出修改过的 class/jar,对它们用 dx/d8 命令打包成包含 dex 文件的补丁包
创建与使用 AGP 的基本步骤 还是要简单提一下如何创建与使用一个 Android Plugin 插件,如果前面给出的参考链接中的内容已经掌握,可以跳过本节。
我们想在两个任务执行期间加入字节码插桩、补丁打包等操作,需要自定义一个 AGP 来实现。自定义 AGP 的方式有如下三种:
方式
说明
Build script 脚本
把插件写在 build.gradle 文件中,一般用于简单的逻辑,只在该 build.gradle 文件可见
buildSrc 目录
将插件源代码放在 buildSrc/src/main/ 中,只对该项目中可见
独立项目
一个独立的 Java 项目/模块,可以将文件包发布到仓库(Jcenter),使其他项目方便引入
Build script 脚本只能在当前 build.gradle 文件中生效,复用性差;buildSrc 目录对当前项目生效,buildSrc 被作为系统保留的目录,编译时会最先编译该目录下的代码;独立项目的方式复用性最好,可以通过 Maven 实现远程共享。这里我们主要介绍 buildSrc 目录的方式。
确定 Gradle 与 AGP 版本 首先设置合适的 Gradle 与 Gradle 插件版本,Gradle 版本修改 /gradle/wrapper/gradle-wrapper.properties 文件:
1 distributionUrl=https\: //services.gradle.org/distributions/gradle-4.10.1-all.zip
Gradle 插件版本修改项目的 build.gradle:
1
2
3
4
5
buildscript { dependencies { classpath "com.android.tools.build:gradle:3.3.1" } }
创建 buildSrc 目录 在项目根目录下创建 buildSrc 目录(注意不是模块),然后新建 build.gradle 文件添加 Gradle 插件依赖:
1
2
3
4
5
6
7
8
9
10
apply plugin: 'java-library' repositories { google() mavenCentral() } dependencies { implementation 'com.android.tools.build:gradle:3.3.1' }
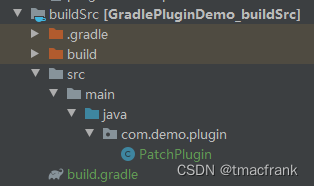
我们使用 Java 语言编写自定义插件(其实用 Groovy 更方便一些),新建 PatchPlugin 实现 Plugin 接口来完成自定义插件,目录结构:
PatchPlugin 实现 Plugin 接口时需要重写入口方法 apply,我们先只在 apply() 中添加一句 log:
1
2
3
4
5
6
7
public class PatchPlugin implements Plugin <Project > @Override public void apply (Project project) System.out.println("Execute apply() in PatchPlugin." ); } }
使用 AGP 插件 当其它模块需要使用 AGP 插件时,需要在模块 build.gradle 中通过 apply plugin 声明插件的全类名:
1 apply plugin: com.demo.plugin.PatchPlugin
然后编译,在编译的输出信息中可以看到我们在 apply() 中加的 log:
导入插件还有另一种形式,就是在 buildSrc 目录下,具体是在 buildSrc/src/main/resources/META-INF/gradle-plugins 目录下新建一个 xxx.properties 文件(xxx 文件名由你自己指定,但是后面在引用的时候要保持一致),并将 implementation-class 属性指定为插件类的全类名:
1 implementation-class=com.demo.plugin.PatchPlugin
然后在 app 模块中就可以通过单引号的方式引入该插件了:
插件功能实现 下面正式进入 Demo 的代码。
创建扩展并进行配置 首先在插件执行的入口方法 apply() 中创建一个名为 patch 的扩展:
1 2 3 4 5 6 7 8 9 10 11 12 13 14 15 16 public class PatchPlugin implements Plugin <Project > @Override public void apply (Project project) if (!project.getPlugins().hasPlugin(AppPlugin.class)) { throw new GradleException("本插件需要结合Android Application插件使用!!!" ); } project.getExtensions().create("patch" , PatchExtension.class); ... } ... }
通过 project 拿到 ExtensionContainer 并调用 create() 创建一个 patch 闭包,PatchExtension 是一个 JavaBean,定义了 patch 支持的属性:
1 2 3 4 5 6 7 8 9 10 11 12 13 14 15 16 17 18 19 20 21 22 public class PatchExtension private boolean debugOn; private String applicationName; private String output; getters and setters... }
这样需要打补丁包的模块就可以这样配置其 build.gradle 来使用我们的插件:
1 2 3 4 5 6 7 8 9 10 11 apply plugin: 'com.android.application' apply plugin: 'com.plugin.patch' patch { debugOn true applicationName 'com.demo.plugin.Application' }
获取配置信息 接下来要获取所有配置信息为编译工作做准备了,这些操作要放在 Project 的 afterEvaluate() 回调中:
1 2 3 4 5 6 7 8 9 10 11 12 13 14 15 16 17 18 19 20 21 22 23 24 25 26 27 28 29 30 31 32 33 34 35 36 37 38 @Override public void apply (Project project) if (!project.getPlugins().hasPlugin(AppPlugin.class)) { throw new GradleException("本插件需要结合Android Application插件使用!!!" ); } project.getExtensions().create("patch" , PatchExtension.class); project.afterEvaluate(new Action<Project>() { @Override public void execute (Project project) PatchExtension patchExtension = project.getExtensions().findByType(PatchExtension.class); if (patchExtension != null ) { boolean debugOn = patchExtension.isDebugOn(); project.getLogger().info("debugOn:" + debugOn + ", ApplicationName:" + patchExtension.getApplicationName()); AppExtension android = project.getExtensions().getByType(AppExtension.class); android.getApplicationVariants().all(new Action<ApplicationVariant>() { @Override public void execute (ApplicationVariant applicationVariant) if (applicationVariant.getName().contains("debug" ) && !debugOn) { return ; } configTasks(project, applicationVariant, patchExtension); } }); } } }); }
如果不在 afterEvaluate() 中获取配置信息,那么会拿不到 patchExtension 中的属性值。因为使用 PatchPlugin 插件的模块,在其 build.gradle 执行到 apply plugin: ‘com.plugin.patch’ 这句话时就去执行其 apply() 去获取 patch 扩展中配置的 patchExtension 的值,而此时 build.gradle 还没解析,所以拿不到 patch 配置的属性值。
configTasks() 作为接下来一系列工作的入口:
1 2 3 4 5 6 7 8 9 10 11 12 13 14 15 16 17 18 19 20 21 private void configTasks (Project project, ApplicationVariant variant, PatchExtension patchExtension) String variantName = variant.getName(); File outputDir = Utils.getOrCreateOutputDir(project, variantName, patchExtension); String variantCapName = Utils.capitalize(variantName); Task proguardTask = project.getTasks().findByName("transformClassesAndResourcesWithProguardFor" + variantCapName); if (proguardTask != null ) { configProguardTask(project, proguardTask); } Task dexTask = getTransformTask(project, patchExtension, outputDir, variantCapName); Task task = project.getTasks().create("patch" + variantCapName); task.setGroup("patch" ); task.dependsOn(dexTask); }
注释已经标明,任务大致分为 4 步,第 1 步比较简单,就是根据配置创建补丁输出目录:
1 2 3 4 5 6 7 8 9 10 11 12 13 14 public static File getOrCreateOutputDir (Project project, String variantName, PatchExtension patchExtension) File outputDir; if (!Utils.isEmpty(patchExtension.getOutput())) { outputDir = new File(patchExtension.getOutput(), variantName); } else { outputDir = new File(project.getBuildDir(), "patch/" + variantName); } project.getLogger().info("补丁输出路径:" + outputDir.getAbsolutePath()); outputDir.mkdirs(); return outputDir; }
后面 3 步下面详解。
处理混淆 我们需要让混淆任务按照上一次混淆的映射关系 mapping.txt 进行(如果有),并且在本次混淆任务结束之后,保存本次混淆的 mapping 文件以备下次混淆时使用:
1 2 3 4 5 6 7 8 9 10 11 12 13 14 15 16 17 18 19 20 21 22 23 24 25 26 27 28 29 30 31 32 33 34 35 36 private void configProguardTask (Project project, Task proguardTask) if (proguardTask == null ) { return ; } File backupMappingFile = new File(project.getBuildDir(), "mapping.txt" ); if (backupMappingFile.exists()) { TransformTask task = (TransformTask) proguardTask; ProGuardTransform transform = (ProGuardTransform) task.getTransform(); transform.applyTestedMapping(backupMappingFile); } proguardTask.doLast(new Action<Task>() { @Override public void execute (Task task) TaskOutputs outputs = proguardTask.getOutputs(); Set<File> files = outputs.getFiles().getFiles(); for (File file : files) { if (file.getName().endsWith("mapping.txt" )) { try { FileUtils.copyFile(file, backupMappingFile); project.getLogger().info("mapping: " + backupMappingFile.getCanonicalPath()); } catch (IOException e) { e.printStackTrace(); } break ; } } } }); }
字节码插桩,生成补丁 1 2 3 4 5 6 7 8 9 10 11 12 13 14 15 16 17 18 19 20 21 22 23 24 25 26 27 28 29 30 31 32 33 34 35 36 37 38 39 40 41 42 43 44 45 46 47 48 49 50 51 @NotNull private Task getTransformTask (Project project, PatchExtension patchExtension, File outputDir, String variantCapName) File hexFile = new File(outputDir, "hex.txt" ); File patchClassFile = new File(outputDir, "patchClass.jar" ); File patchFile = new File(outputDir, "patch.jar" ); Task dexTask = project.getTasks().findByName("transformClassesWithDexBuilderFor" + variantCapName); dexTask.doFirst(new Action<Task>() { @Override public void execute (Task task) String applicationName = patchExtension.getApplicationName(); applicationName = applicationName.replaceAll("\\." , Matcher.quoteReplacement(File.separator)); Map<String, String> newHexes = new HashMap<>(); PatchGenerator patchGenerator = new PatchGenerator(project, patchFile, patchClassFile, hexFile); Set<File> files = dexTask.getInputs().getFiles().getFiles(); for (File file : files) { String filePath = file.getAbsolutePath(); if (filePath.endsWith(".class" )) { processClass(project, applicationName, file, newHexes, patchGenerator); } else if (filePath.endsWith(".jar" )) { processJar(project, applicationName, file, newHexes, patchGenerator); } } Utils.writeHex(newHexes, hexFile); try { patchGenerator.generate(); } catch (Exception e) { e.printStackTrace(); } } }); return dexTask; }
开头三个文件的作用:
hexFile 保存每次编译生成的 class 文件,插桩之后的类名及 md5 值,这样才能比较出哪些文件有改动,进而被放入补丁包
patchClassFile 是所有需要被添加进补丁包的 class 文件打成的 jar 包,是一个中间产物,用来生成最终的补丁包
patchFile 是 dx/d8 命令对 patchClassFile 打包生成的 jar 包,也就是最终需要的补丁包
在拿到 transformClassesWithDexBuilderForDebug 任务的一开始,先拿到模块的 applicationName 对应的全类名路径,因为热修复不会替换 Application,所以在后面处理时要剔除掉。
PatchGenerator 主要用来比较 md5 值以及执行打包的 dx/d8 命令,初始化时要获取 buildToolsVersion 以便动态获取 dx/d8 命令的执行路径,还要读取上次编译时备份的 hexFile:
1 2 3 4 5 6 7 8 9 10 11 12 13 14 15 16 17 18 19 20 21 public PatchGenerator (Project project, File patchFile, File jarFile, File hexFile) this .project = project; this .patchFile = patchFile; this .jarFile = jarFile; buildToolsVersion = project.getExtensions().getByType(AppExtension.class).getBuildToolsVersion(); if (hexFile.exists()) { prevHexes = Utils.readHex(hexFile); project.getLogger().info("从备份文件 " + hexFile.getAbsolutePath() + " 中读取md5值" ); } else { try { if (hexFile.createNewFile()) { project.getLogger().info("创建备份文件成功:" + hexFile.getAbsolutePath()); } } catch (IOException e) { e.printStackTrace(); } } }
接下来就是对所有输入文件进行插桩和 md5 值的比较,由于输入的文件既可能是 class 也可能是 jar 包(没开混淆上一个任务传过来的就是 class,开了混淆传过来的就是 jar 包,具体路径看注释),所以才会用 processClass() 和 processJar() 分别处理:
1 2 3 4 5 6 7 8 9 10 11 12 13 14 15 16 17 18 19 20 21 22 23 24 25 26 27 28 29 30 31 32 33 34 35 36 37 38 39 40 41 42 43 44 45 46 47 48 49 50 51 52 53 54 55 56 57 58 59 60 61 62 63 64 65 66 67 68 69 70 71 72 73 74 75 76 77 78 79 80 81 82 83 84 85 86 87 88 89 90 91 92 93 94 95 96 private void processClass (Project project, String applicationName, File file, Map<String, String> newHexes, PatchGenerator patchGenerator) String filePath = file.getAbsolutePath(); String classPath = filePath.split("classes" )[1 ].substring(1 ); if (classPath.startsWith(applicationName) || Utils.isAndroidClass(classPath)) { return ; } try { project.getLogger().info("开始处理 class 文件:" + filePath); FileInputStream fis = new FileInputStream(filePath); byte [] bytes = ClassUtils.referHackWhenInit(fis); String hex = Utils.hex(bytes); fis.close(); FileOutputStream fos = new FileOutputStream(filePath); fos.write(bytes); fos.close(); newHexes.put(classPath, hex); patchGenerator.checkClass(classPath, hex, bytes); } catch (Exception e) { e.printStackTrace(); } } private void processJar (Project project, String applicationName, File file, Map<String, String> hexes, PatchGenerator patchGenerator) try { applicationName = applicationName.replaceAll(Matcher.quoteReplacement(File.separator), "/" ); File backupJar = new File(file.getParent(), file.getName() + ".bak" ); JarOutputStream jarOutputStream = new JarOutputStream(new FileOutputStream(backupJar)); JarFile jarFile = new JarFile(file); Enumeration<JarEntry> entries = jarFile.entries(); while (entries.hasMoreElements()) { JarEntry jarEntry = entries.nextElement(); String className = jarEntry.getName(); jarOutputStream.putNextEntry(new JarEntry(className)); InputStream inputStream = jarFile.getInputStream(jarEntry); if (className.endsWith(".class" ) && !className.startsWith(applicationName) && !Utils.isAndroidClass(className) && !className.startsWith("com/demo/patch" )) { project.getLogger().info("开始处理 jar 包中的 class 文件:" + className); byte [] bytes = ClassUtils.referHackWhenInit(inputStream); String hex = Utils.hex(bytes); hexes.put(className, hex); patchGenerator.checkClass(className, hex, bytes); jarOutputStream.write(bytes); } else { jarOutputStream.write(IOUtils.toByteArray(inputStream)); } inputStream.close(); jarOutputStream.closeEntry(); } jarOutputStream.close(); jarFile.close(); file.delete(); backupJar.renameTo(file); } catch (Exception e) { e.printStackTrace(); } }
二者的处理思路大致相同,都是先插桩:
1 2 3 4 5 6 7 8 9 10 11 12 13 14 15 16 17 18 19 20 21 22 23 24 25 26 27 public class ClassUtils public static byte [] referHackWhenInit(InputStream inputStream) throws IOException { ClassReader classReader = new ClassReader(inputStream); ClassWriter classWriter = new ClassWriter(ClassWriter.COMPUTE_FRAMES); ClassVisitor classVisitor = new ClassVisitor(Opcodes.ASM6, classWriter) { @Override public MethodVisitor visitMethod (int access, String name, String desc, String signature, String[] exceptions) MethodVisitor methodVisitor = super .visitMethod(access, name, desc, signature, exceptions); methodVisitor = new MethodVisitor(api, methodVisitor) { @Override public void visitInsn (int opcode) if ("<init>" .equals(name) && opcode == Opcodes.RETURN) { super .visitLdcInsn(Type.getType("Lcom/demo/plugin/AntiLazyLoad;" )); } super .visitInsn(opcode); } }; return methodVisitor; } }; classReader.accept(classVisitor, 0 ); return classWriter.toByteArray(); } }
然后将插桩后的 md5 值存入 Map<String, String> newHexes 中,再通过 PatchGenerator 把 newHexes 和 hexFile 中的 md5 作比较:
1 2 3 4 5 6 7 8 9 10 11 12 13 14 15 16 17 18 19 20 21 22 23 24 25 26 27 public void checkClass (String className, String newHex, byte [] bytes) if (Utils.isEmpty(prevHexes)) { return ; } String oldHex = prevHexes.get(className); if (oldHex == null || !oldHex.equals(newHex)) { JarOutputStream jarOutputStream = getJarOutputStream(); try { jarOutputStream.putNextEntry(new JarEntry(className)); jarOutputStream.write(bytes); jarOutputStream.closeEntry(); project.getLogger().info("放入补丁包,文件路径:" + className); } catch (IOException e) { e.printStackTrace(); } } }
md5 不一致的类会被放入 patchClassFile 中,最后再用 generate() 执行 dx/d8 命令,对 patchClassFile 执行打包,生成最终的补丁包:
1 2 3 4 5 6 7 8 9 10 11 12 13 14 15 16 17 18 19 20 21 22 23 24 25 26 27 28 29 30 31 32 33 34 35 36 37 38 39 40 41 42 43 44 45 46 47 48 49 public void generate () throws Exception if (!jarFile.exists()) { return ; } getJarOutputStream().close(); Properties properties = new Properties(); File localPropFile = project.getRootProject().file("local.properties" ); String sdkDir; if (localPropFile.exists()) { properties.load(new FileInputStream(localPropFile)); sdkDir = properties.getProperty("sdk.dir" ); } else { sdkDir = System.getenv("ANDROID_HOME" ); } String cmdExt = Os.isFamily(Os.FAMILY_WINDOWS) ? ".bat" : "" ; String dxPath = sdkDir + "/build-tools/" + buildToolsVersion + "/dx" + cmdExt; String patch = "--output=" + patchFile.getAbsolutePath(); project.exec(new Action<ExecSpec>() { @Override public void execute (ExecSpec execSpec) execSpec.commandLine(dxPath, "--dex" , patch, jarFile.getAbsolutePath()); project.getLogger().info("执行了命令:" + (dxPath + " --dex" + patch + jarFile.getAbsolutePath())); } }); jarFile.delete(); project.getLogger().info("\npatch generated in : " + patchFile); }
创建新任务 最后就是创建一个新任务:
1 2 3 4 Task task = project.getTasks().create("patch" + variantCapName); task.setGroup("patch" ); task.dependsOn(dexTask);
如果编译的是 debug 版本,任务名就是 patchDebug,属于 patch 组别,依赖于将混淆后的 class 打包成 dex 的任务 transformClassesWithDexBuilderForDebug,由于 Gradle 会根据所有任务之间的依赖关系形成一个有向无环图,所以执行 patchDebug 任务,就会按照依赖关系将其前面的编译->混淆->插桩->打补丁包->生成 dex 这一系列任务都执行,进而得到补丁包了:
1
2
3
4
# 执行所有模块的 patchDebug>gradlew patchDebug # 执行 app 模块的 patchDebug>gradlew :app:patchDebug
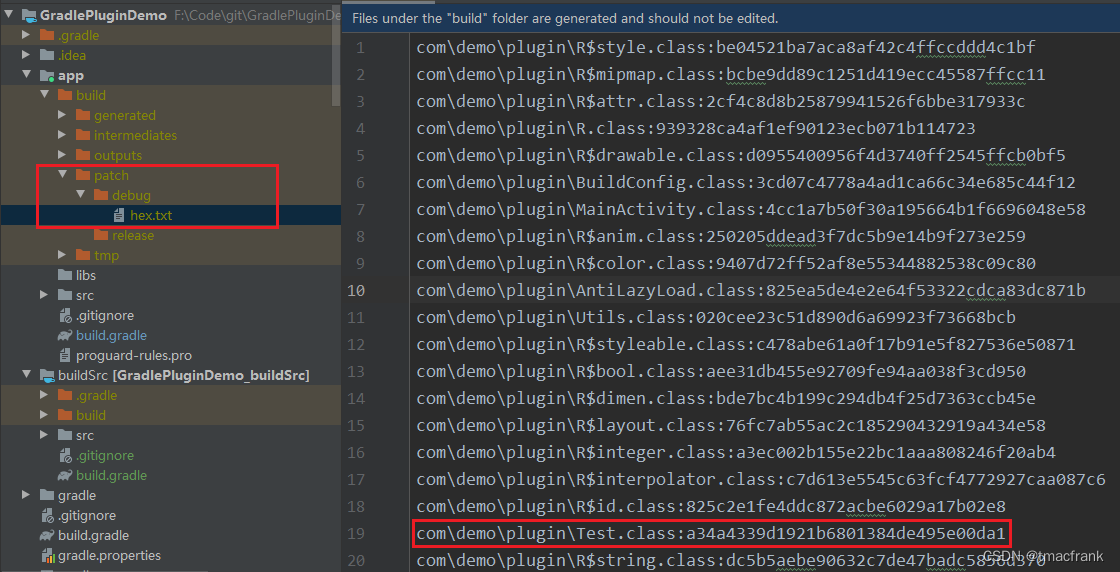
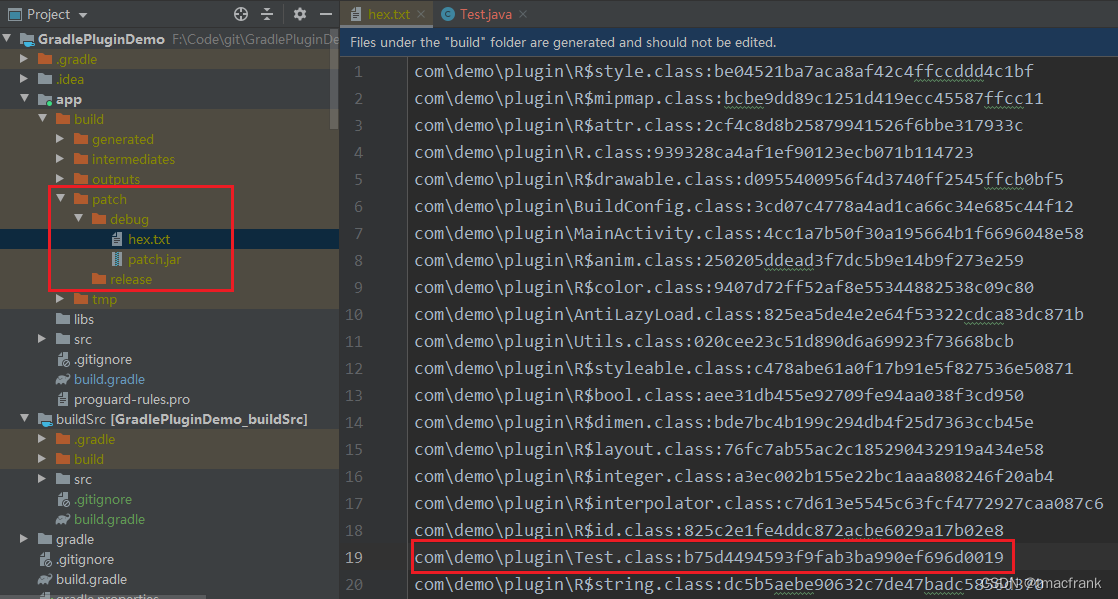
测试结果 设置 debug 编译也生成补丁包,没有开混淆的情况下,初次编译会生成一个 hex.txt 文件:
接着修改 app 模块中的 Test.java 文件,随便增加个测试语句:
1
2
3
4
5
6
7
public class Test public Test () Class clazz = Test.class; } }
再次编译,发现 hex.txt 中 Test.class 的 md5 值发生了变化,并且在 patch/debug 下会生成 patch.jar 文件,也就是补丁包:
使用 jadx 工具打开 patch.jar,发现里面只有 Test 文件,并且在构造方法的尾部被字节码插桩引入了 AntiLazyLoad.class,证明 Demo 的基本功能还是实现了:
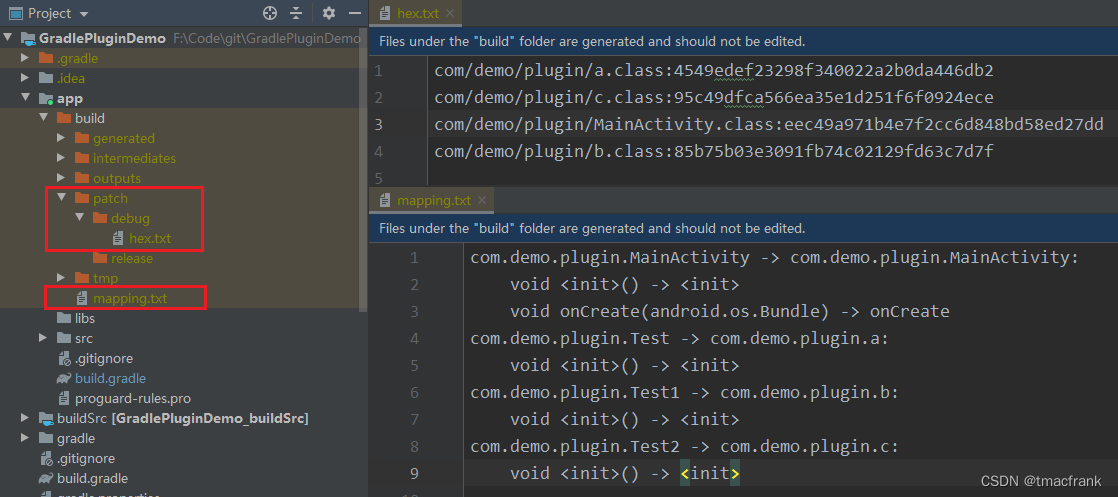
如果开启了混淆,那么 app 模块中的类被编译成 class 文件后,还会再被打包进一个 jar 包,再传递给 transformClassesWithDexBuilderForDebug 任务。首次编译的 hex.txt 以及备份的 mapping.txt 如下:
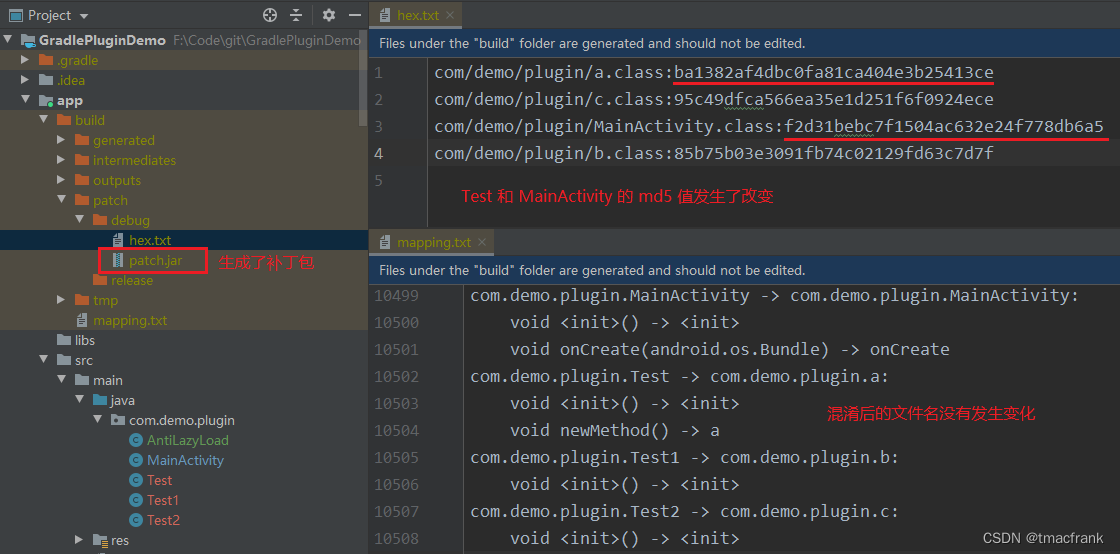
对上述文件做出更改,让 MainActivity 调用 Test 中新增的方法 newMethod() 后再次编译,结果如下:
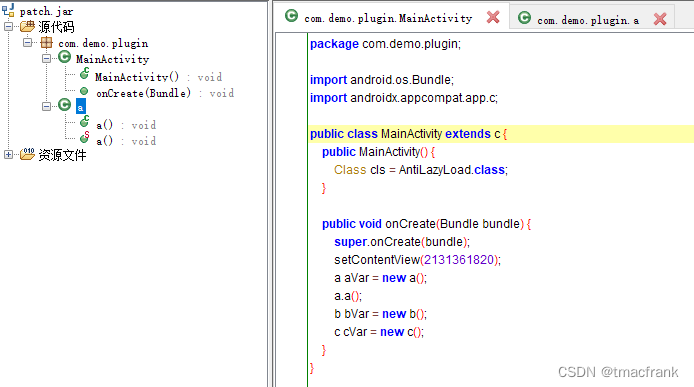
查看 patch.jar 的内容也确实是与修改内容相符,并且两个修改的类的构造方法都被插桩引用了 AntiLazyLoad.class:
调试技巧 主要有二,加 log 和打断点。
Demo 中有很多地方加了类似下面的代码:
1 project.getLogger().info("xxx" );
这是添加了 Gradle log,执行任务时会在控制台输出,log 的级别从低到高为:DEBUG、INFO、LIFECYCLE、WARNING、QUITE、ERROR,默认情况下控制台只会输出 LIFECYCLE 以及更高级别的 log,在执行命令时可以通过添加参数来改变 log 的输出级别:
1
2
# 输出 INFO 及更高级别的 log,还可以 -q、-d 等,分别对应 QUITE、DEBUG> gradlew -i patchDebug
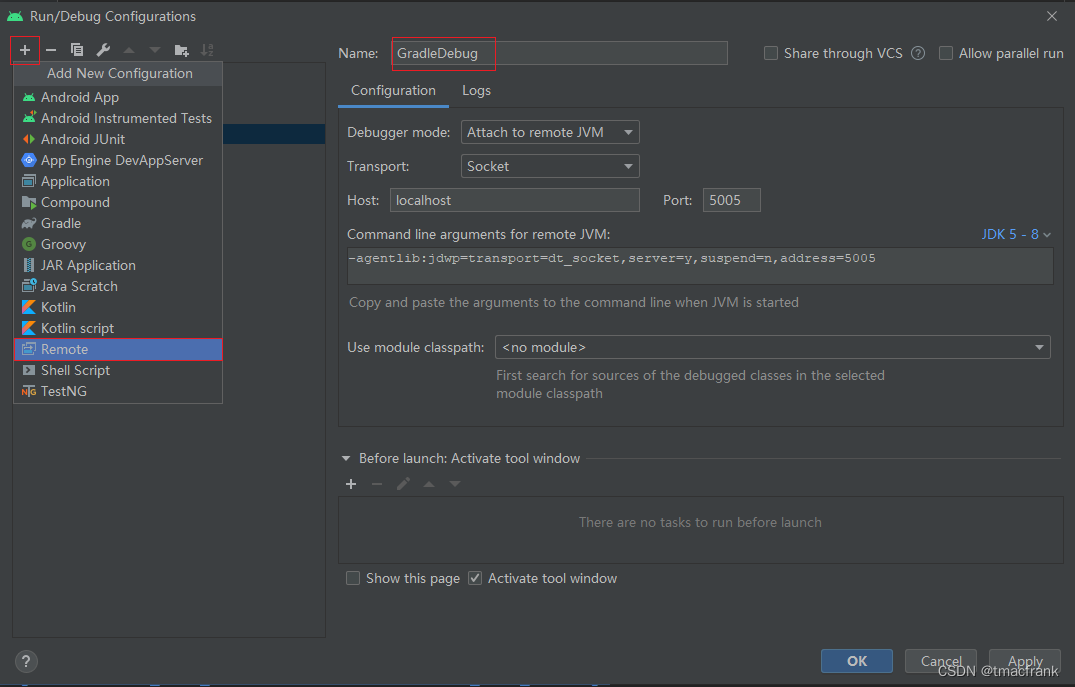
除了加 log 我们还可以打断点,先在 Run/Debug Configurations 中点击 + 添加一个 Remote 类型的 Configuration:
然后在命令行中执行:
1
2
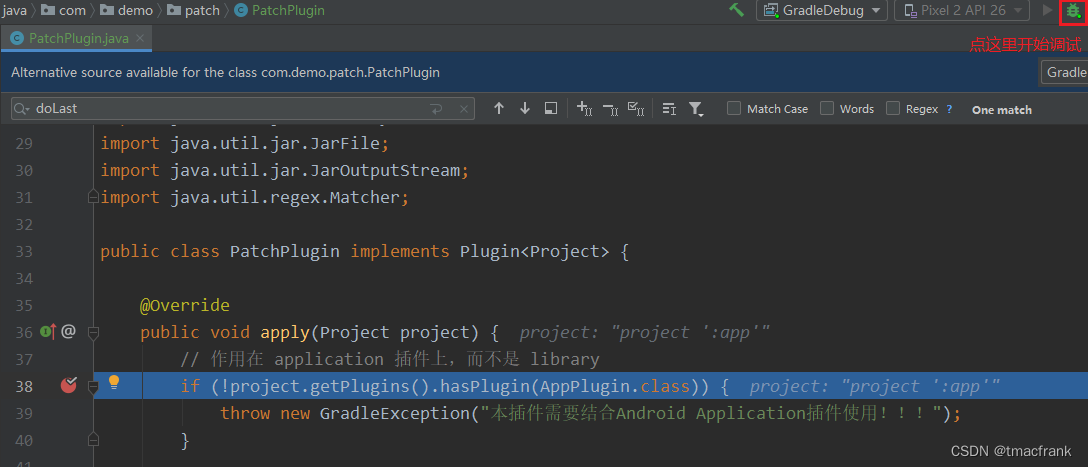
# 比如说上图中新建的 Remote 名字为 GradleDebug,那么 TaskName 填 GradleDebug 即可 > gradlew [TaskName] -Dorg.gradle.debug=true --no-daemon
最后点击 debug 按钮就可以进行断点调试了:
Demo 代码地址:GradlePluginDemo
参考文章:安卓App热补丁动态修复技术介绍 Android N混合编译与对热补丁影响解析 Android热更新方案Robust 微信Tinker的一切都在这里,包括源码(一)
