CarService是车载Android系统的核心服务之一,所有应用都需要通过CarService来查询、控制整车的状态。不仅仅是车辆控制,实际上CarService几乎就是整个车载Framework最核心的组件。
概述 CarService源码位置:/packages/service/Car/service
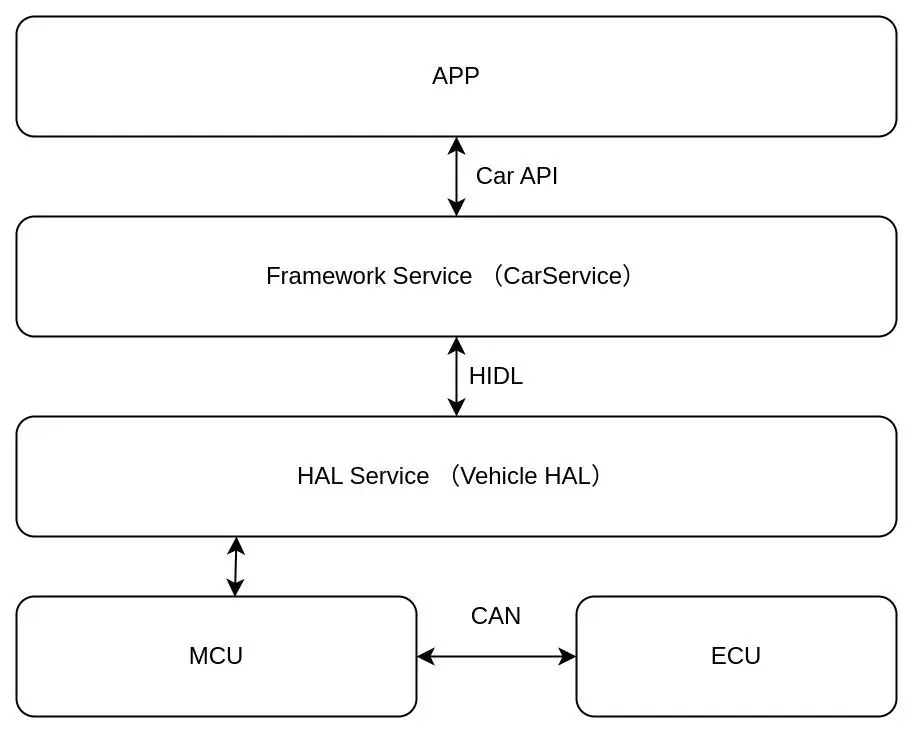
Android系统主要应用于中控和副驾屏幕,原生的车载Android本质上可以看作是Android OS + Automotive Services + Automotive APPs组成的系统。用户会通过显示在中控屏幕上App,将对车辆的操作信息通过Car API 传递给Framework Service,Service再通过HIDL将信息处理后传递给HAL Service,HAL Service再将数据处理后传递给MCU,MCU通过CAN bus将信息传递给汽车上的各个ECU(中间忽略了一些不需要理解的步骤),然后由ECU控制汽车的机械零部件进行活动,这样就完成了一次从Android APP到车辆机械零部件间的通信。
HIDL是一种类似于AIDL的跨进程通信手段,主要应用于HAL层程序的跨进程通信。Google在Android 8中引入并在Android 10中废弃,Android 10 以后被AIDL取代。
以上通信过程起到承上启下作用的Framework Service就是我们的主角 — CarService。
原生Android Automotive 系统里CarService实现的功能非常多,架构图里描述的只是其中的冰山一角,架构图描述的意义只是为了引出CarService。
CarService 的组成 作为 Android Automotive 的核心进程,原生的CarService业务量非常庞大,包含了许多与汽车相关的服务,主要有以下几个:
此类实现ICarProperty的binder接口。有助于更容易地创建处理车辆属性的多个Manager。
CarInputService通过车辆HAL监控和处理输入事件。
此服务在车辆停放时存储LocationManager中最后一个已知位置,并在车辆通电时恢复该位置。
CarMediaService管理汽车应用程序的当前活动媒体源。这与MediaSessionManager的活动会话不同,因为同一时间内车内只能有一个活动源。
在车内,活动的媒体源不一定有活动的MediaSession,例如,如果只是在浏览它。但是,该源仍然被视为活动源,并且应该是任何媒体相关UI(媒体中心、主屏幕等)中显示的源。
CarPowerManagementService
汽车电源管理服务。控制电源状态并与系统的其他部分交互以确保其自身状态。
汽车投屏服务。
负责与汽车音响系统交互的服务。
应用程序焦点服务确保一次只有一个应用程序类型的实例处于活动状态。
车库模式。车库模式启用车内空闲时间。
负责与汽车仪表盘交互的服务。
汽车包管理服务。
汽车多用户服务。在启动时管理用户。包括:
创建用作驱动程序的用户。
创建用作乘客的用户。
首次运行时创建辅助管理员用户。
切换驾驶员。
CarStorageMonitoringService
提供存储监视数据(如I/O统计数据)的服务。为了接收此类数据,用户需要实现IIoStatsListener并根据此服务注册自己。
车载蓝牙服务-维护当前用户的蓝牙设备和配置文件连接。
监控显示器顶部的Activity,并确保在固定模式下的Activity在崩溃或因任何原因进入后台时重新启动。此组件还监视目标包的更新,并在更新完成后重新启动它。
CarBugreportManagerService
Bug report服务
该服务将查看系统上的默认JSON配置文件并解析其结果。该服务将查找映射到R.raw.car_config的JSON文件。如果此值不存在或格式不正确,则此服务不会失败;相反,它返回各种配置的默认值。
汽车诊断服务。工程模式会用到此服务。
推断车辆当前驾驶状态的服务。它通过侦听CarPropertyService的相关属性来计算驾驶状态。
CarExperimentalFeatureServiceController
控制与ExperimentalCarService的绑定以及实验功能的接口。
控制汽车特性的部件。
用于处理用于将车辆设置为夜间模式的事件。
用于实现CarOccupantZoneManagerAPI的服务。
允许测试/模拟车辆HAL的服务。该服务直接使用车辆HAL API,因为车辆HAL模拟无论如何都需要直接访问该级别。
CarUxRestrictionsManagerService
用户体验限制的服务。根据监听到的车辆当前驾驶状态,限制HMI显示。
一种服务,通过HAL边界监听占用者感知检测系统,并通过OccupantAwarenessManager将数据暴露给Android中的系统客户端。
SystemActivityMonitoringService
监控AMS新Activity或Service启动的服务。
SystemStateControllerService
系统状态控制服务。原生系统中是一个空服务,并没有实现。
监视应用程序资源使用情况的服务。
汽车服务中启用受信任设备功能的部分。可信设备是一项功能,其中远程设备注册为可信设备,可以授权Android用户而不是用户输入密码或PIN。
向用户显示初始通知UI的服务。它仅在启用设置时启动它,并根据用户的请求通知UI自行关闭。
VMS客户端实现,使用HAL特定消息编码将VmsPublisher/VmsSubscriber API调用代理到车辆HAL。
实现CarWatchdogManagerAPI的服务。CarWatchdogService作为汽车监控中介运行,它检查客户端的健康状况,并将结果报告给汽车监控服务器。
加粗的各个Service属于CarService中比较重要的功能,以后都会单独开坑讲。
往简单地说,车载Framework的功能性开发基本就是围绕着CarService中的这些服务做增改,如果能把所有这些服务和背后原理都理解透彻,车载Framework基本就算完事了。当然可能也有些过于理想化了,因为还有android自身的Framework需要修改,比如网络系统、蓝牙协议栈等等。
以上就是Android Automotive中CarService支持的所有功能,虽然冠名了xxxService但这些服务其实并不是四大组件意义上的Service,它们没有继承自android.app.Service,相反它们都继承自ICarxxxx.Stub,本质上属于AIDL接口的实现类。到这一步也可以看出CarService本质上只是作为这些服务的容器而存在的,本身并没有实现业务逻辑上的功能。
既然这些Service都是AIDL接口的实现类,本质上就是AIDL的Server端,那应用就还需要通过相应的API SDK才能调用Server的方法,这个API SDK就是Car API。
Car API 使用方式 不同的公司或车机系统项目对于Car API的定位、实现并不相同,本文主要从原生Android Automotive的角度介绍。
Car API 源码位置/packages/service/Car/car-lib
Car API 简介 在上面的介绍中,我们提到CarService中各个服务本质上是AIDL接口的实现类,属于Server端,而对应的Client端就需要一个IBinder对象来访问Server端的方法,这些IBinder对象在Car API中被封装在一个个XXXManager类中。
Car API与CarService中的服务,名称上存在对应关系,所以很好理解。例如:CarWatchdogManager对应CarWatchdogService,CarMediaManager对应CarMediaService。
不过也有例外:CarInfoManager、CarSensorManager、CarHvacManager、CarCabinManager、CarVendorExtensionManager都对应CarPropertyService。但是在Android 11中这些Manager都已经过时,Google建议统一使用CarPropertyManager。
实际项目中我们不一定要按照Google建议的那样编写Car API,可以按实际情况实施。我个人也经历过某个把Car API源码整个移除,从头重写CarService的项目。
编译 Car API 在使用Car API之前,我们需要先将Car API编译成jar也就是CarLib,这样才能让其它的系统应用使用。
编译CarLib有三种不同指令:
1)make android.car
编译成功后的jar存放在/out/soong/.intermediates/packages/services/Car/car-lib/android.car/android_common/javac/目录下。
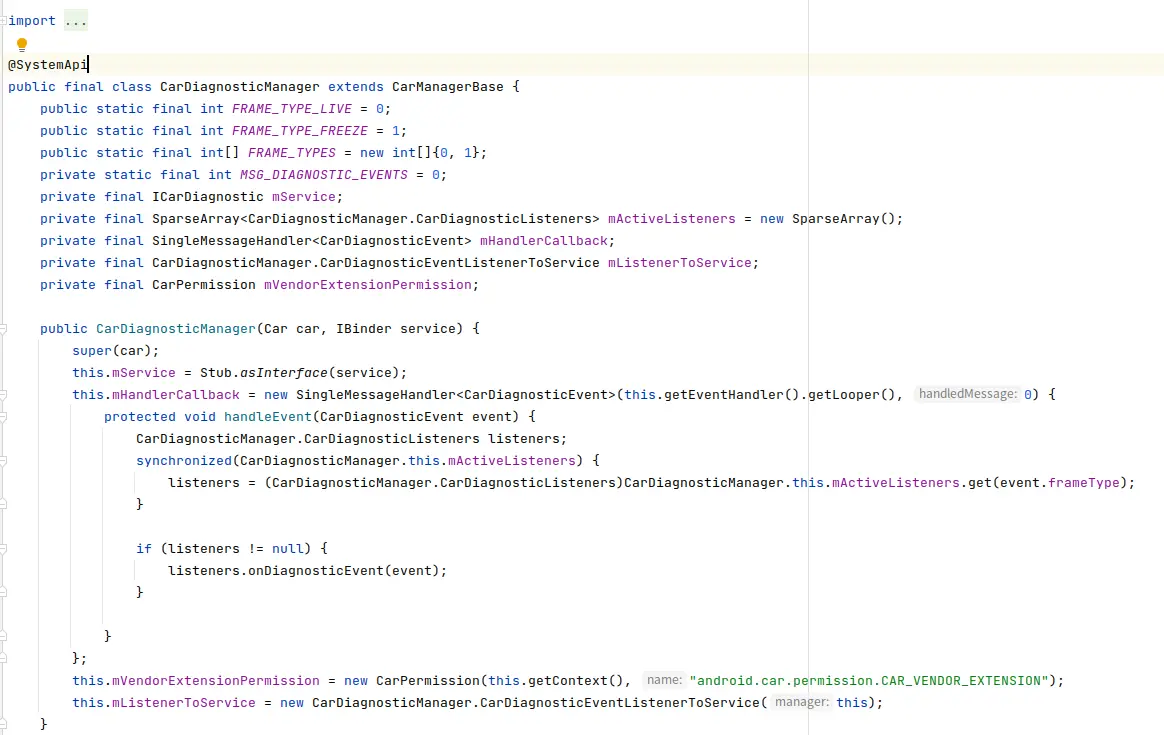
编译出的CarLib库包含Car API中定义的所有方法以及实现细节 。导入到android studio中打开后,如下所示:
2)make android.car-system-stubs
编译成功后的jar存放在/out/soong/.intermediates/packages/services/Car/car-lib/android.car-system-stubs/android_common/javac/目录下。
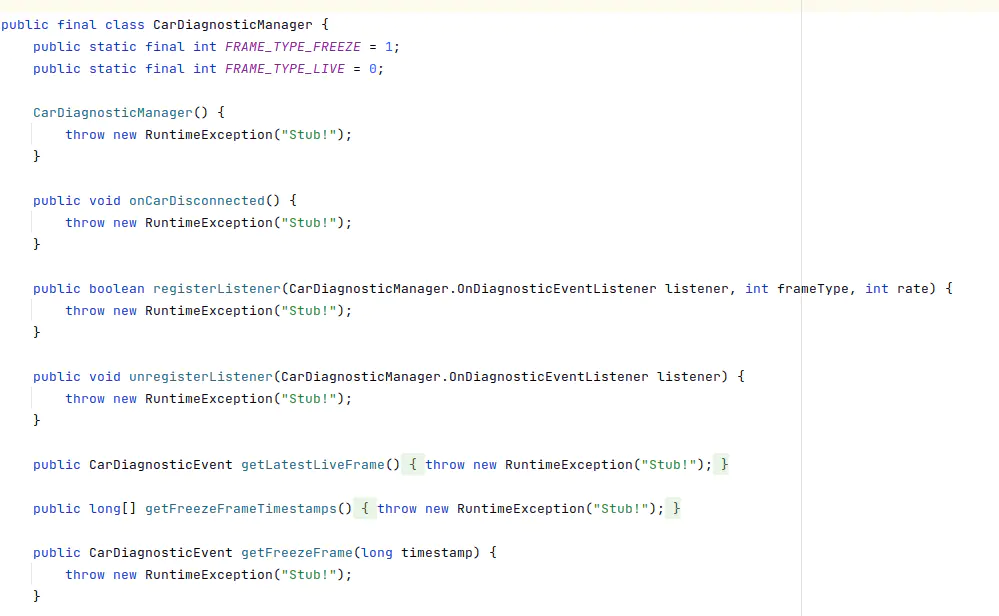
编译出的CarLib库包含CarAPI中定义的所有方法,但是不包含实现细节,一些与实现细节有关的变量也会被隐藏。实际项目中这种模式较为常用。导入到android studio中打开后,如下所示:
3)make android.car-stubs
编译成功后的jar存放在/out/soong/.intermediates/packages/services/Car/car-lib/android.car-stubs/android_common/javac/目录下。
编译出的CarLib库仅包含没有被@SystemApi修饰方法,而且方法同样不包含实现细节,是最严格的编译模式 。此模式下编译出的CarLib甚至已经没有CarDiagnosticManager这个系统API了。
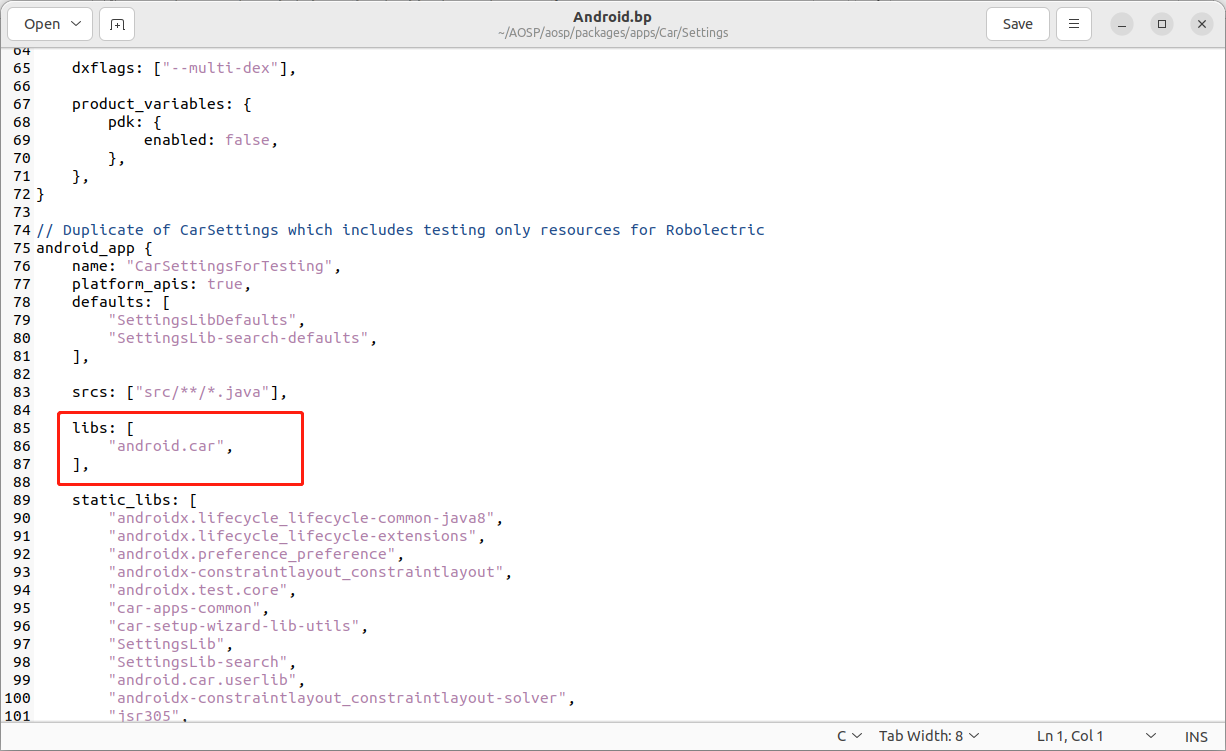
上述的编译步骤对应的是使用Android Studio开发的系统应用。原生android automotive中的系统应用则是直接在android.bp中将CarLib引入,可以参考Settings/Android.bp的引入方式。
使用 Car API Car API 的使用并不复杂,大致有以下几个步骤。
通过Car.createCar()方法可以创建出Car的对象。
1
2
3
if (getPackageManager().hasSystemFeature(PackageManager.FEATURE_AUTOMOTIVE)) { Car carApiClient = Car.createCar(context, mCarServiceConnection); }
通过getPackageManager().hasSystemFeature(String string)判断系统是否支持特定的模块功能
Car.createCar()需要传入ServiceConnection,并在service连接成功后,获取想要的Manager实例,实现方式如下:
1
2
3
4
5
6
7
8
9
10
11
12
13
14
private final ServiceConnection mCarServiceConnection = new ServiceConnection() { @Override public void onServiceConnected (ComponentName name, IBinder service) try { CarHvacManager manager = (CarHvacManager) mCarApiClient.getCarManager(Car.HVAC_SERVICE); } catch (CarNotConnectedException e) { Log.e(TAG, "Car not connected in onServiceConnected" ); } } @Override public void onServiceDisconnected (ComponentName name) } };
构建出Car对象后还需要调用connect()才会连接到CarService上。
connect()只能调用一次,如果当前已经处于连接状态,再次调用connect()会抛出异常,client如果没有捕获该异常,则会引起client端程序崩溃(血的教训!)。
1
2
3
4
5
6
7
8
9
10
@Deprecated public void connect () throws IllegalStateException synchronized (mLock) { if (mConnectionState != STATE_DISCONNECTED) { throw new IllegalStateException("already connected or connecting" ); } mConnectionState = STATE_CONNECTING; startCarService(); } }
与connect()对应的还有disconnect()。
1 carApiClient.disconnect ();
不知道你有没有注意到,connect()被标记为Deprecated过时的方法了。
这是因为在android 10 以后,Google改写了Car API的使用方式,Android 10以后构建Car对象不再建议传入ServiceConnection而是使用下面的方法:
1
2
3
4
if (getPackageManager().hasSystemFeature(PackageManager.FEATURE_AUTOMOTIVE)) { Car carApiClient = Car.createCar(context); CarHvacManager manager = (CarHvacManager) mCarApiClient.getCarManager(Car.HVAC_SERVICE); }
Android 10以后Car Api的调用方式由异步方法改为了同步方法,保留了disconnect(),但是不再需要调用connect(),这样使用起来更简单。
这种调用方式是乐观的认为CarService不会发生异常,与CarService的连接也不会断开。但是如果CarService发生异常,连接被断开的话,client端调用方就会直接被杀死,使用下面这种调用方式可以避免这种情况。
1
2
3
4
5
6
7
8
9
10
11
Car car = Car.createCar(this , workThreadHandler, 2000 , new Car.CarServiceLifecycleListener() { @Override public void onLifecycleChanged (@NonNull Car car, boolean ready) if (ready) { } else { } } });
为什么上面的那种调用方式会导致client端的进程被杀死呢?这就需要我们继续深入的探究一下Car Api是如何实现的。
Car API 实现原理 探讨Car API的实现原理我们可以它的入口类Car开始。源码位置:
/packages/services/Car/car-lib/src/android/car/Car.java
createCar有三个不同的重载方法,分别如下所示:
1
2
3
4
5
6
public static Car createCar(Context context) public static Car createCar(Context context, @Nullable Handler handler) public static Car createCar(@NonNull Context context, @Nullable Handler handler, long waitTimeoutMs, @NonNull CarServiceLifecycleListener statusChangeListener)
createCar(context)在实现上是直接调用了createCar(context, handler),如下所示:
1
2
3
public static Car createCar (Context context ) return createCar(context, (Handler) null ); }
createCar(context, handler)与createCar(context, handler, waitTimeoutMs, statusChangeListener)之间则没有调用关系,各自有各自的实现方式,但是逻辑上大致相同,并且第三种的createCar(context, handler, waitTimeoutMs, statusChangeListener)逻实现上要更复杂一些。所以我们直接看createCar(context, handler, waitTimeoutMs, statusChangeListener)是实现的就可以了。
createCar(context, handler, waitTimeoutMs, statusChangeListener)
Handler handler :将所有CarXXXManager事件发送到此handler。但是statusChangeListener将始终调度到主线程。传递null会导致将所有CarXXXManager回调发送到主线程。
long waitTimeoutMs :将其设置为CAR_WAIT_TIMEOUT_DO_NOT_WAIT则不等待CarService连接就绪。将此设置为CAR_WAIT_TIMEOUT_WAIT_FOREVER将阻塞调用,直到CarService连接成功为止。
设置的值大于0则为超时时间,当存在有限的超时时间时,返回的Car对象不能保证是可用的。
CarServiceLifecycleListener statusChangeListener: 监听CarService是否连接就绪。
createCar在实现流程上可以分为三个部分:
第一步,计算出绑定CarService的最大重试次数。这个次数决定了后面,多久会显示连接异常的日志。
1
2
3
4
5
6
7
8
9
10
11
12
13
14
15
public static Car createCar (@NonNull Context context, @Nullable Handler handler, long waitTimeoutMs, @NonNull CarServiceLifecycleListener statusChangeListener) long maxRetryCount = 0 ; if (waitTimeoutMs > 0 ) { maxRetryCount = waitTimeoutMs / CAR_SERVICE_BINDER_POLLING_INTERVAL_MS; if (maxRetryCount == 0 ) { maxRetryCount = 1 ; } } ... }
第二步也是最关键的一步,构造出Car对象并返回给调用方,同时将状态通过statusChangeListener回调给调用方。正常流程下到createCar()方法执行到这里就已经结束了。
1
2
3
4
5
6
7
8
9
10
11
12
13
14
15
16
17
18
19
20
21
22
23
24
25
26
27
28
29
30
31
32
33
34
35
36
37
38
39
40
41
42
43
44
45
46
47
48
49
50
51
52
53
54
55
56
57
58
59
60
61
62
63
public static Car createCar (@NonNull Context context, @Nullable Handler handler, long waitTimeoutMs, @NonNull CarServiceLifecycleListener statusChangeListener) ... Car car = null ; IBinder service = null ; boolean started = false ; int retryCount = 0 ; ... boolean isMainThread = Looper.myLooper() == Looper.getMainLooper(); while (true ) { service = ServiceManager.getService(CAR_SERVICE_BINDER_SERVICE_NAME); if (car == null ) { car = new Car(context, ICar.Stub.asInterface(service), null , statusChangeListener, handler); } if (service != null ) { if (!started) { car.dispatchCarReadyToMainThread(isMainThread); car.startCarService(); return car; } break ; } if (!started) { car.startCarService(); started = true ; } retryCount++; if (waitTimeoutMs < 0 && retryCount >= CAR_SERVICE_BINDER_POLLING_MAX_RETRY && retryCount % CAR_SERVICE_BINDER_POLLING_MAX_RETRY == 0 ) { Log.w(TAG_CAR, "car_service not ready, waited for car service (ms):" + retryCount * CAR_SERVICE_BINDER_POLLING_INTERVAL_MS, new RuntimeException()); } else if (waitTimeoutMs >= 0 && retryCount > maxRetryCount) { if (waitTimeoutMs > 0 ) { Log.w(TAG_CAR, "car_service not ready, waited for car service (ms):" + waitTimeoutMs, new RuntimeException()); } return car; } try { Thread.sleep(CAR_SERVICE_BINDER_POLLING_INTERVAL_MS); } catch (InterruptedException e) { Thread.currentThread().interrupt(); Log.w(TAG_CAR, "interrupted" , new RuntimeException()); return car; } }
最后一步,主要是应对一些异常情况,正常情况不会触发。
1
2
3
4
5
6
7
8
9
10
11
12
13
14
15
16
17
18
19
20
21
22
23
24
public static Car createCar (@NonNull Context context, @Nullable Handler handler, long waitTimeoutMs, @NonNull CarServiceLifecycleListener statusChangeListener) ... synchronized (car.mLock) { Log.w(TAG_CAR, "waited for car_service (ms):" + retryCount * CAR_SERVICE_BINDER_POLLING_INTERVAL_MS, new RuntimeException()); if (car.mService != null ) { return car; } car.mService = ICar.Stub.asInterface(service); car.mConnectionState = STATE_CONNECTED; } car.dispatchCarReadyToMainThread(isMainThread); return car; }
在createCar()方法中分发Car实例状态时,会调用startCarService()绑定CarService。
1
2
3
4
5
6
7
8
9
10
11
12
13
14
15
16
17
18
19
20
21
22
23
24
25
26
27
28
29
30
31
32
33
34
35
36
37
38
39
40
41
private void startCarService () Intent intent = new Intent(); intent.setPackage(CAR_SERVICE_PACKAGE); intent.setAction(Car.CAR_SERVICE_INTERFACE_NAME); boolean bound = mContext.bindServiceAsUser(intent, mServiceConnectionListener, Context.BIND_AUTO_CREATE, UserHandle.CURRENT_OR_SELF); synchronized (mLock) { if (!bound) { mConnectionRetryCount++; if (mConnectionRetryCount > CAR_SERVICE_BIND_MAX_RETRY) { Log.w(TAG_CAR, "cannot bind to car service after max retry" ); mMainThreadEventHandler.post(mConnectionRetryFailedRunnable); } else { mEventHandler.postDelayed(mConnectionRetryRunnable, CAR_SERVICE_BIND_RETRY_INTERVAL_MS); } } else { mEventHandler.removeCallbacks(mConnectionRetryRunnable); mMainThreadEventHandler.removeCallbacks(mConnectionRetryFailedRunnable); mConnectionRetryCount = 0 ; mServiceBound = true ; } } } private final Runnable mConnectionRetryRunnable = new Runnable() { @Override public void run () startCarService(); } }; private final Runnable mConnectionRetryFailedRunnable = new Runnable() { @Override public void run () mServiceConnectionListener.onServiceDisconnected(new ComponentName(CAR_SERVICE_PACKAGE, CAR_SERVICE_CLASS)); } };
在绑定CarService时,需要使用ServiceConnection监听与CarService的连接状态,并处理service连接成功与连接断开的情况。
1)连接成功:由于在createCar中已经创建好了mService,所以正常流程下,执行到return就结束了,后面流程基本都是出现异常触发了重连。
1
2
3
4
5
6
7
8
9
10
11
12
13
14
15
16
17
18
19
20
21
22
23
24
25
26
27
28
private final ServiceConnection mServiceConnectionListener = new ServiceConnection() { @Override public void onServiceConnected (ComponentName name, IBinder service) synchronized (mLock) { ICar newService = ICar.Stub.asInterface(service); if (newService == null ) { Log.wtf(TAG_CAR, "null binder service" , new RuntimeException()); return ; } if (mService != null && mService.asBinder().equals(newService.asBinder())) { return ; } mConnectionState = STATE_CONNECTED; mService = newService; } if (mStatusChangeCallback != null ) { mStatusChangeCallback.onLifecycleChanged(Car.this , true ); } else if (mServiceConnectionListenerClient != null ) { mServiceConnectionListenerClient.onServiceConnected(name, service); } } ... };
2)连接断开:分发Car对象的状态,此时Client不应该再使用Car的实例。所以如果Client端调用createCar()时没有监听连接状态,Car Api会触发finishClient(),直接杀死client端。
1
2
3
4
5
6
7
8
9
10
11
12
13
14
15
16
17
18
19
20
21
22
23
private final ServiceConnection mServiceConnectionListener = new ServiceConnection() { ... @Override public void onServiceDisconnected (ComponentName name) mFeatures.resetCache(); synchronized (mLock) { if (mConnectionState == STATE_DISCONNECTED) { return ; } handleCarDisconnectLocked(); } if (mStatusChangeCallback != null ) { mStatusChangeCallback.onLifecycleChanged(Car.this , false ); } else if (mServiceConnectionListenerClient != null ) { mServiceConnectionListenerClient.onServiceDisconnected(name); } else { finishClient(); } } };
在finishClient()中会根据传入client传入的context类型,执行不同的操作。
情景一:context = null,在Client端抛出异常。
情景二:context 是 Activity,结束该Activity,不会终止Client端的进程。
情景三:context 是 Service,终止Client端的进程。
情景四:context 不是以上的情况,终止Client端的进程。
1
2
3
4
5
6
7
8
9
10
11
12
13
14
15
16
17
18
19
20
21
22
23
24
25
26
27
28
29
private void finishClient() { if (mContext == null) { throw new IllegalStateException("Car service has crashed, null Context"); } if (mContext instanceof Activity) { Activity activity = (Activity) mContext; if (!activity.isFinishing()) { Log.w ( TAG_CAR, "Car service crashed, client not handling it, finish Activity, created " + "from " + mConstructionStack); activity.finish(); } return; } else if (mContext instanceof Service) { Service service = (Service) mContext; killClient(service.getPackageName() + "," + service.getClass().getSimpleName()); } else { killClient(/ * clientInfo= */ null); } } private void killClient(@Nullable String clientInfo) { Log.w ( TAG_CAR, "**Car service has crashed. Client(" + clientInfo + ") is not handling it." + " Client should use Car.createCar(..., CarServiceLifecycleListener, .." + ".) to handle it properly. Check pritned callstack to check where other " + "version of Car.createCar() was called. Killing the client process**", mConstructionStack); Process.killProcess( Process.myPid( )); }
正是由于finishClient()这种机制的存在,所以调用方应该要监听CarService的连接状态。
最后我们再看一下getCarManager()这个方法是如何实现的。
getCarManager()实现机制上利用了BinderPool的思路,使用ICar.aidl的getService()来获取Server端的Binder对象,然后将Binder对象封装在Manager里面,同时将Manager对象缓存在一个Map集合中,后续就可以从Map取出需要的Manager,减少IPC通信开销。如下所示:
1
2
3
4
5
6
7
8
9
10
11
12
13
14
15
16
17
18
19
20
21
22
23
24
25
26
27
28
29
30
31
32
33
34
35
36
37
38
39
40
41
42
43
44
45
46
47
48
49
50
51
52
53
54
55
56
57
58
59
60
61
62
63
64
65
@Nullable public Object getCarManager(String serviceName) { CarManagerBase manager; synchronized (mLock) { if (mService == null ) { Log.w(TAG_CAR, "getCarManager not working while car service not ready" ); return null ; } manager = mServiceMap.get (serviceName); if (manager == null ) { try { IBinder binder = mService.getCarService(serviceName); if (binder == null ) { Log.w(TAG_CAR, "getCarManager could not get binder for service:" + serviceName); return null ; } manager = createCarManagerLocked(serviceName, binder); if (manager == null ) { Log.w(TAG_CAR, "getCarManager could not create manager for service:" + serviceName); return null ; } mServiceMap.put(serviceName, manager); } catch (RemoteException e) { handleRemoteExceptionFromCarService(e); } } } return manager; } @Nullable private CarManagerBase createCarManagerLocked(String serviceName, IBinder binder) { CarManagerBase manager = null ; switch (serviceName) { case AUDIO_SERVICE: manager = new CarAudioManager(this , binder); break ; case SENSOR_SERVICE: manager = new CarSensorManager(this , binder); break ; case INFO_SERVICE: manager = new CarInfoManager(this , binder); break ; ... default: String className = null ; try { className = mService.getCarManagerClassForFeature(serviceName); } catch (RemoteException e) { handleRemoteExceptionFromCarService(e); return null ; } if (className == null ) { Log.e(TAG_CAR, "Cannot construct CarManager for service:" + serviceName + " : no class defined" ); return null ; } manager = constructCarManager(className, binder); break ; } return manager; }
以上就Car API的实现过和原理了。注意在createCar()中有这样一段代码。
1
2
IBinder service = null ; service = ServiceManager.getService(CAR_SERVICE_BINDER_SERVICE_NAME);
在Client端与CarService建立连接之前,通过ServiceManager.getService()就可以直接取出IBinder对象,而不用等到与service建立连接后再从onServiceConnected(ComponentName name, IBinder service)中取。
但是这样操作的前提是使用ServiceManager.addService()添加了这个IBinder,那么是哪里添加的呢,IBinder是Server端实现的,那么答案就需要去CarService中寻找了。
CarService 的实现原理 想要说清楚CarService实现方式,我们需要搞明白CarService是怎么启动的。
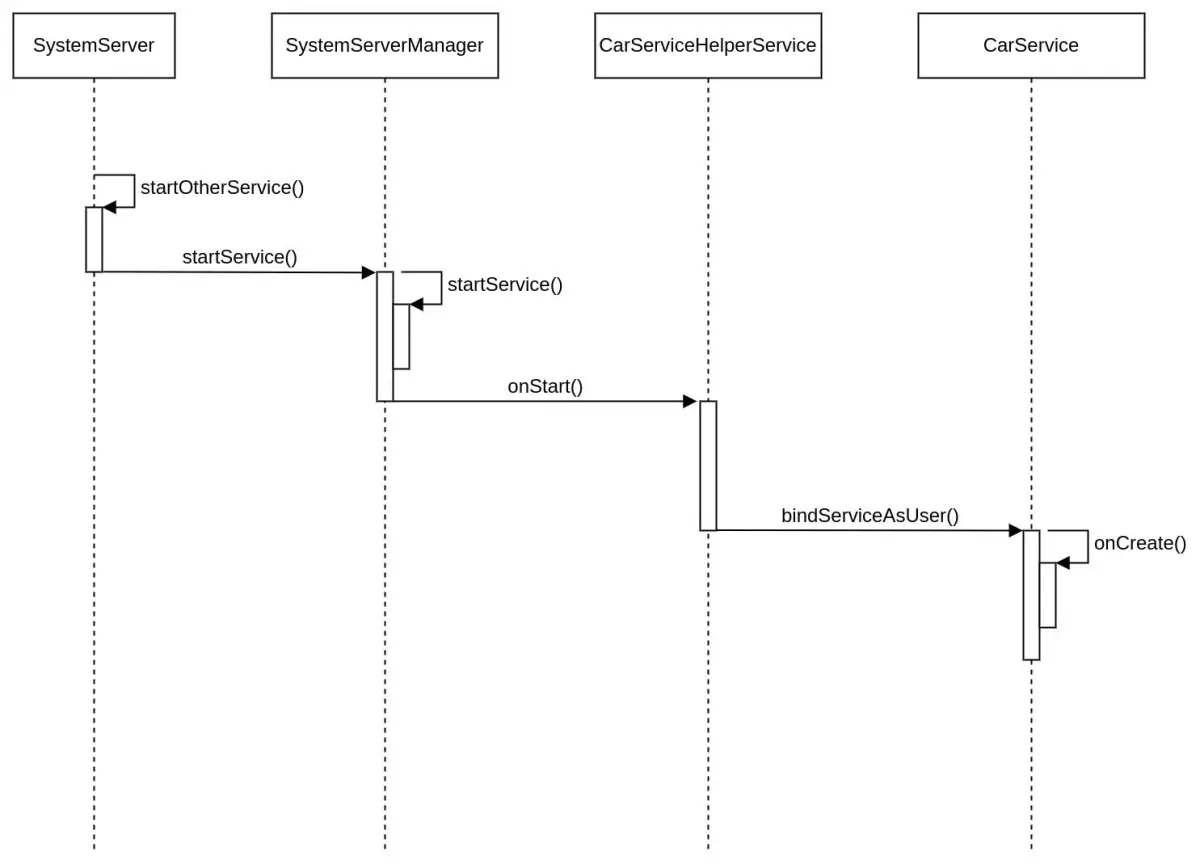
CarService 启动流程 CarService作为Android Automotive的核心服务,它是在SystemServer中启动的,SystemServer会在startOtherServices()方法中让SystemServiceManager先通过反射的形式创建出StartCarServiceHelperService这个对象。
1
2
3
4
5
6
7
8
9
10
private void startOtherServices (@NonNull TimingsTraceAndSlog t) ... if (mPackageManager.hasSystemFeature (PackageManager.FEATURE_AUTOMOTIVE)) { t.traceBegin ("StartCarServiceHelperService" ); mSystemServiceManager.startService (CAR_SERVICE_HELPER_SERVICE_CLASS); t.traceEnd (); } ... }
然后在SystemServiceManager中调用StartCarServiceHelperService的onStart()方法。
CarServiceHelperService是CarService的SystemService端的配套服务。
1
2
3
4
5
6
7
8
9
10
11
12
13
14
15
16
17
18
public SystemService startService (String className) final Class<SystemService> serviceClass = loadClassFromLoader(className, this .getClass().getClassLoader()); return startService(serviceClass); } public void startService (@NonNull final SystemService service) mServices.add(service); long time = SystemClock.elapsedRealtime(); try { service.onStart(); } catch (RuntimeException ex) { throw new RuntimeException("Failed to start service " + service.getClass().getName() + ": onStart threw an exception" , ex); } warnIfTooLong(SystemClock.elapsedRealtime() - time, service, "onStart" ); }
最终在onStart()方法中启动CarService,并加载jni库为CarService提供必要的API。
CarServiceHelperService 源码位置:
/frameworks/opt/car/services/src/com/android/internal/car/CarServiceHelperService.java
注意:CarServiceHelperService并不是android.app.Service
1
2
3
4
5
6
7
8
9
10
11
12
13
14
15
16
@Override public void onStart () ... Intent intent = new Intent(); intent.setPackage("com.android.car" ); intent.setAction(ICarConstants.CAR_SERVICE_INTERFACE); if (!mContext.bindServiceAsUser(intent, mCarServiceConnection, Context.BIND_AUTO_CREATE, UserHandle.SYSTEM)) { Slog.wtf(TAG, "cannot start car service" ); } loadNativeLibrary(); } void loadNativeLibrary () System.loadLibrary("car-framework-service-jni" ); }
通过以上的步骤CarService就完成了启动,CarService的启动时序如下所示:
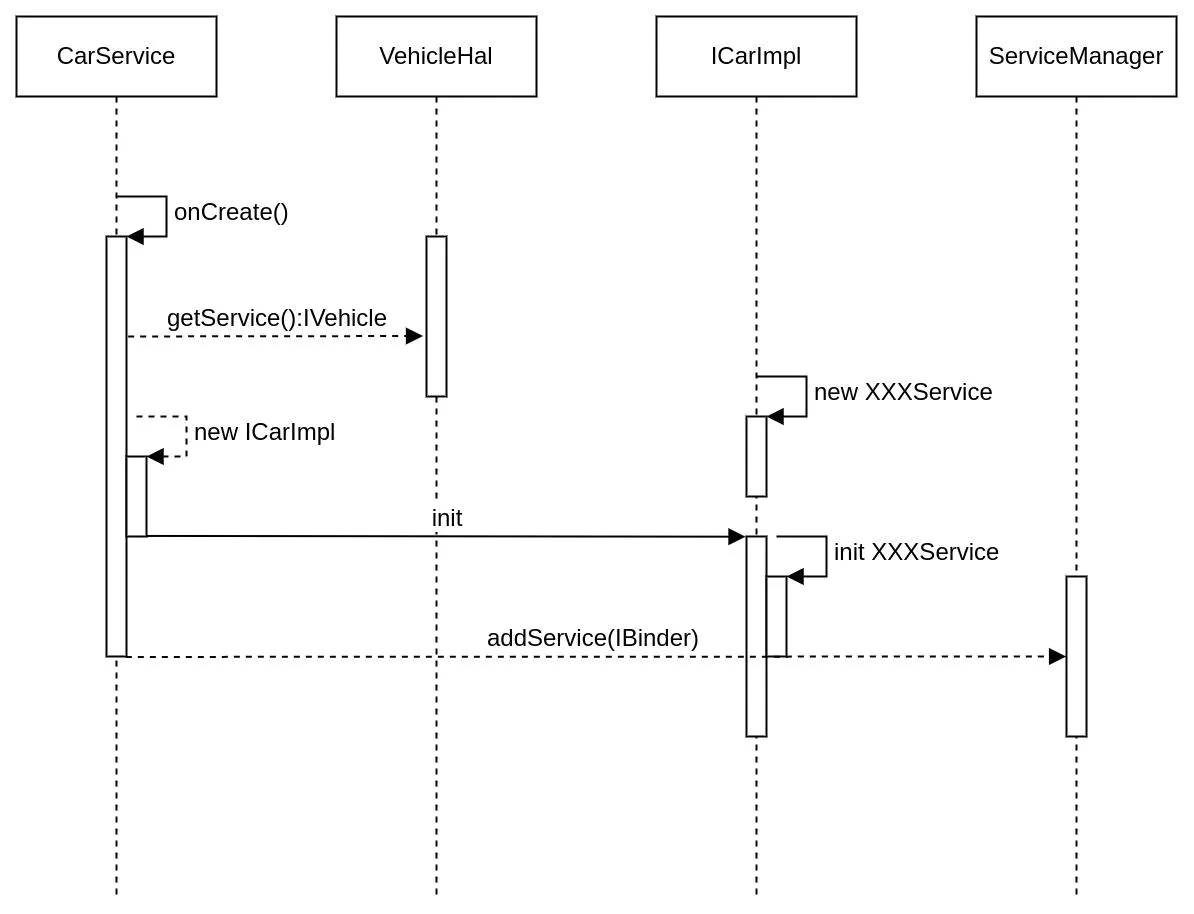
CarService 初始化 CarService进入启动时序后,会onCreate()方法中进行一系列的自身的初始化操作,步骤如下:
1)通过HIDL接口获取到HAL层的IHwBinder对象-IVehicle,与AIDL的用法类似,必须持有IHwBinder对象我们才可以与Vehicle HAL层进行通信。有关HIDL、VechicleHAL以后都会单独介绍。
2)创建ICarImpl对象,并调用init方法,它就是ICar.aidl接口的实现类,我们需要通过它才能拿到其他的Service的IBinder对象。
3)将ICar.aidl的实现类添加到ServiceManager中。这就解答了我们在Car API中疑问。
4)设定SystemProperty,将CarService设定为创建完成状态,只有包含CarService在内的所有的核心Service都完成初始化,才能结束开机动画并发送开机广播。
1
2
3
4
5
6
7
8
9
10
11
12
13
14
15
16
17
18
19
20
21
22
23
24
25
26
27
28
29
30
31
32
33
34
35
36
37
38
39
40
41
42
43
44
45
46
@Override public void onCreate () Log.i(CarLog.TAG_SERVICE, "Service onCreate" ); mCanBusErrorNotifier = new CanBusErrorNotifier(this ); mVehicle = getVehicle(); EventLog.writeEvent(EventLogTags.CAR_SERVICE_CREATE, mVehicle == null ? 0 : 1 ); if (mVehicle == null ) { throw new IllegalStateException("Vehicle HAL service is not available." ); } try { mVehicleInterfaceName = mVehicle.interfaceDescriptor(); } catch (RemoteException e) { throw new IllegalStateException("Unable to get Vehicle HAL interface descriptor" , e); } Log.i(CarLog.TAG_SERVICE, "Connected to " + mVehicleInterfaceName); EventLog.writeEvent(EventLogTags.CAR_SERVICE_CONNECTED, mVehicleInterfaceName); mICarImpl = new ICarImpl(this , mVehicle, SystemInterface.Builder.defaultSystemInterface(this ).build(), mCanBusErrorNotifier, mVehicleInterfaceName); mICarImpl.init(); linkToDeath(mVehicle, mVehicleDeathRecipient); ServiceManager.addService("car_service" , mICarImpl); SystemProperties.set("boot.car_service_created" , "1" ); super .onCreate(); } @Nullable private static IVehicle getVehicle () final String instanceName = SystemProperties.get("ro.vehicle.hal" , "default" ); try { return android.hardware.automotive.vehicle.V2_0.IVehicle.getService(instanceName); } catch (RemoteException e) { Log.e(CarLog.TAG_SERVICE, "Failed to get IVehicle/" + instanceName + " service" , e); } catch (NoSuchElementException e) { Log.e(CarLog.TAG_SERVICE, "IVehicle/" + instanceName + " service not registered yet" ); } return null ; }
接着我们再来看ICarImpl的实现,如下所示:
1)创建各个核心服务对象。
2)把服务对象缓存到CarLocalServices中,这里主要是为了方便Service之间的相互访问。
ICarImpl的源码位置:/packages/services/Car/service/src/com/android/car/ICar
1
2
3
4
5
6
7
8
9
10
11
12
13
14
15
16
17
18
19
20
21
22
23
24
25
26
27
28
29
30
31
32
33
34
35
ICarImpl(Context serviceContext, IVehicle vehicle, SystemInterface systemInterface, CanBusErrorNotifier errorNotifier, String vehicleInterfaceName, @Nullable CarUserService carUserService, @Nullable CarWatchdogService carWatchdogService) { ... mCarPowerManagementService = new CarPowerManagementService(mContext, mHal.getPowerHal(), systemInterface, mCarUserService); ... CarLocalServices.addService(CarPowerManagementService.class , mCarPowerManagementService); CarLocalServices.addService(CarPropertyService.class , mCarPropertyService); CarLocalServices.addService(CarUserService.class , mCarUserService); CarLocalServices.addService(CarTrustedDeviceService.class , mCarTrustedDeviceService); CarLocalServices.addService(CarUserNoticeService.class , mCarUserNoticeService); CarLocalServices.addService(SystemInterface.class , mSystemInterface); CarLocalServices.addService(CarDrivingStateService.class , mCarDrivingStateService); CarLocalServices.addService(PerUserCarServiceHelper.class , mPerUserCarServiceHelper); CarLocalServices.addService(FixedActivityService.class , mFixedActivityService); CarLocalServices.addService(VmsBrokerService.class , mVmsBrokerService); CarLocalServices.addService(CarOccupantZoneService.class , mCarOccupantZoneService); CarLocalServices.addService(AppFocusService.class , mAppFocusService); List<CarServiceBase> allServices = new ArrayList<>(); allServices.add(mFeatureController); allServices.add(mCarUserService); ... allServices.add(mCarWatchdogService); addServiceIfNonNull(allServices, mCarExperimentalFeatureServiceController); mAllServices = allServices.toArray(new CarServiceBase[allServices.size()]); }
3)将服务对象放置一个list中。这样init方法中就可以以循环的形式直接调用服务对象的init,而不需要一个个调用。VechicleHAL的程序也会在这里完成初始化。
1
2
3
4
5
6
7
8
9
10
11
12
13
14
15
@MainThread void init () mBootTiming = new TimingsTraceLog(VHAL_TIMING_TAG, Trace.TRACE_TAG_HAL); traceBegin("VehicleHal.init" ); mHal.init(); traceEnd(); traceBegin("CarService.initAllServices" ); for (CarServiceBase service : mAllServices) { service.init(); } traceEnd(); }
4)最后实现ICar.aidl中定义的各个接口就可以了,如下所示:
1
2
3
4
5
6
7
8
9
10
11
12
13
14
15
16
17
18
19
20
21
22
23
24
25
26
@Override public IBinder getCarService (String serviceName) if (!mFeatureController.isFeatureEnabled(serviceName)) { Log.w(CarLog.TAG_SERVICE, "getCarService for disabled service:" + serviceName); return null ; } switch (serviceName) { case Car.AUDIO_SERVICE: return mCarAudioService; case Car.APP_FOCUS_SERVICE: return mAppFocusService; case Car.PACKAGE_SERVICE: return mCarPackageManagerService; ... default : IBinder service = null ; if (mCarExperimentalFeatureServiceController != null ) { service = mCarExperimentalFeatureServiceController.getCarService(serviceName); } if (service == null ) { Log.w(CarLog.TAG_SERVICE, "getCarService for unknown service:" + serviceName); } return service; } }
总结一下CarService的启动时序如下所示:
总结 本篇讲解了CarService的总体结构,以及Car API 的实现原理,CarService中实现的功能非常庞大,就像文章中反复在强调的那样,在CarService实现的功能几乎就是覆盖整个车载Framework的核心。
然而现实中为了保证各个核心服务的稳定性,同时降低CarService协同开发的难度,一般会选择将一些重要的服务拆分单独作为一个独立的Service运行在独立的进程中,导致有的车机系统中CarService只实现了CarPropertyService的功能。